Introduction
Like other Command and Control (C2) frameworks, Cobalt Strike allows you to create different types of listeners. The most common options include listeners that communicate via HTTP, HTTPS, DNS, SMB, TCP, etc.
The SMB and TCP listeners are typically used in the post-exploitation phase, especially for lateral movement after initial access has taken place. In contrast, the HTTP, HTTPS or DNS variants are often used to gain initial access to the target network or to maintain persistence. These communication channels are particularly suitable for making initial contact with a target system and establishing an initial connection.
DNS listeners play a special role here, as they are often used as 'long-haul servers' to ensure long-term network or domain persistence. This makes them a valuable component for ongoing operations where it is critical to remain unnoticed and permanently present on the network.
In this article, we will cover in detail the setup and configuration of a possible setup for using a DNS listener in Cobalt Strike (version 4.0 and higher) in the context of Microsoft Azure and GoDaddy. Below is an overview of the individual steps that we will go through in detail:
- Why C2 traffic via DNS?
- Selection criteria for the C2 domain
- Creating and configuring the Redirector VM in Azure
- Creating and configuring the Cobalt Strike VM in Azure
- Configuration of DNS in GoDaddy
- Configuring the DNS listener in Cobalt Strike
- Testing the DNS listener
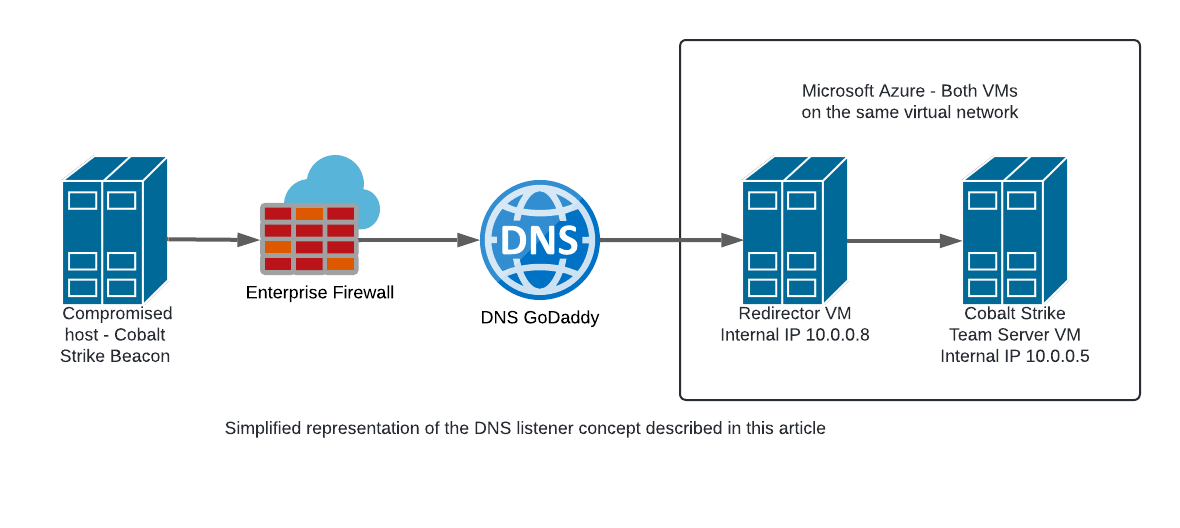
The following illustration shows a simplified version of the concept described in this article for using a DNS listener in Cobalt Strike. It shows the basic architecture consisting of the Redirector VM, which receives and forwards DNS queries, and the Cobalt Strike VM, which processes the queries and is used for C2 communication. The diagram is intended to help visualise the relationship between the different components and their function in the overall concept.
DNS-Listener - Why?
A DNS listener offers a number of advantages and specific use cases compared to HTTP or HTTPS listeners, especially in the context of masquerading and network persistence. Some important advantages are listed below:
- Stealth and firewall evasion:
DNS requests are considered legitimate traffic on many networks and therefore are often not monitored as closely as HTTP or HTTPS traffic. A DNS listener can therefore help to bypass security measures such as firewalls or intrusion detection/prevention systems (IDS/IPS).
- Persistence and long-term communication:
DNS listeners are particularly useful for long-term operations, as DNS queries can often remain unnoticed on the network for long periods of time. This makes DNS listeners ideal for maintaining network or domain persistence.
- Dealing with restricted networks:
In highly restricted or monitored networks where HTTP/HTTPS traffic is blocked or closely monitored, DNS can be used as an alternative communication method. Since DNS requests must be allowed almost everywhere, a DNS listener enables communication even in such environments.
- Reputation of domains:
Using a domain with a good reputation for the DNS listener increases the likelihood that DNS queries will remain unsuspicious and will not be blocked or scrutinised more closely. A trusted domain can help bypass security solutions such as content filters or DNS-based threat detection systems.
Of course, using a DNS listener does not only have advantages; the possible disadvantages are listed below:
- Limited data throughput:
DNS is not designed to transfer large amounts of data, which limits the bandwidth and speed of communication. This makes DNS listeners less suitable for large data transfers or fast command and control communication. - Increased complexity:
Implementing and maintaining a DNS listener is more complex than an HTTP or HTTPS listener. - Possibility of detection:
Although DNS traffic is often less monitored, this does not mean that it is completely invisible. Anomalies in DNS traffic, such as unusually frequent or large DNS requests, can be detected and analysed by advanced security solutions.
Selection of C2 domain
There are various approaches for selecting a C2 domain (hereinafter referred to as domain) to be used in conjunction with a DNS listener in Cobalt Strike. On the one hand, you can register a new domain and build it up step by step by allowing it to age and build up its reputation. On the other hand, it is possible to purchase an expired domain via services such as expireddomains.net. In practice, it is usually necessary to buy an expired domain that can be used in the context of the respective scenario as part of a Red Team engagement due to time constraints.
Before purchasing or registering a domain, however, care should be taken to ensure that the domain is as old as possible, has a good reputation and is not on the blacklists of security vendors.
Azure - Redirector
We start by creating a new VM in Azure that acts as a DNS redirector for our Cobalt Strike Team Server. This redirector has the task of preventing direct access to the team server via its public IP address by acting as a link between the implant (beacon) running at the destination and the Cobalt Strike Team Server. However, it is important to note that the use of a simple redirector, such as socat or iptables, does not provide complete protection against unwanted access by EDR sandboxes, scanners, blue teams and similar security measures.
The configuration of the VM is described below, whereby it should be noted that only the points that are configured or changed are discussed.
Basic Settings
In the next step, we start with the basic configuration of the virtual machine (VM). The prerequisite for this is an active Azure subscription. We then assign the VM to a resource group, assign a name, select a suitable region and a suitable image and make the other basic settings. The following illustration shows the configured basic settings of our new VM, which is to serve as a DNS redirector.
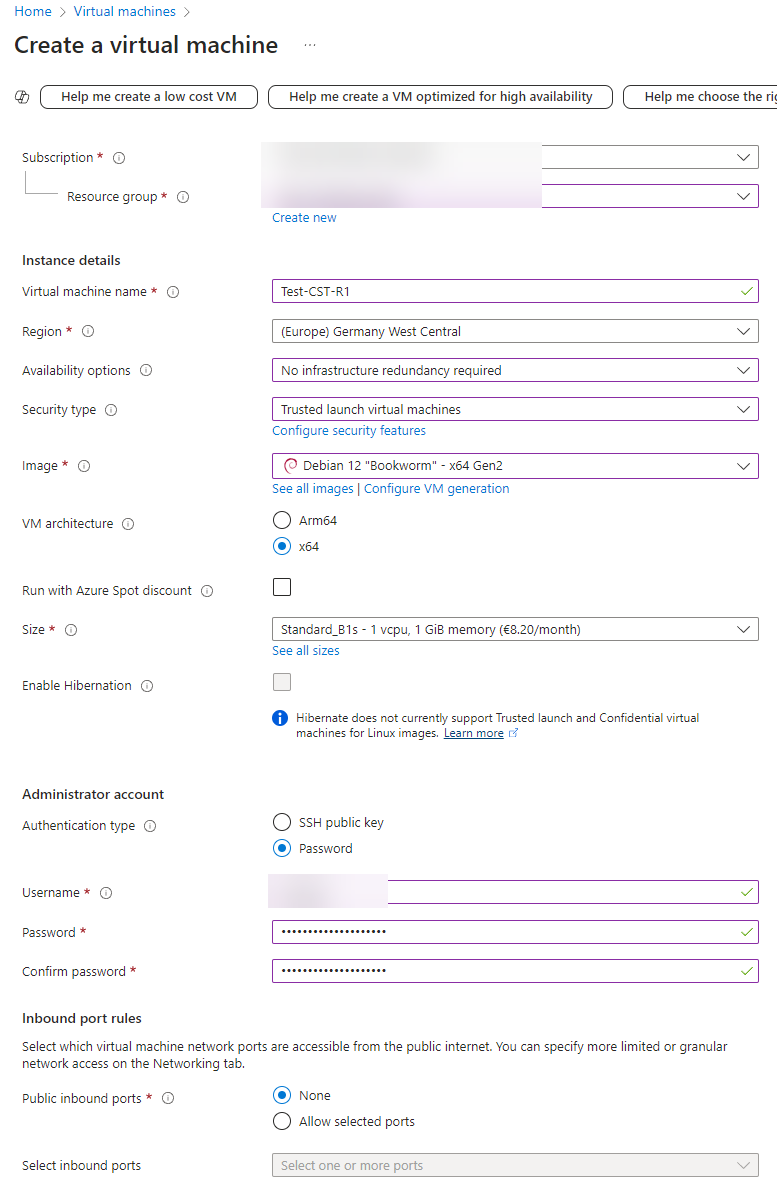
A particularly important aspect of the configuration is the careful selection of the region. If possible, this should match the location of the target in order to avoid anomalies in outgoing DNS queries in the target network. A region that does not match could appear suspicious and draw unwanted attention to the data traffic.
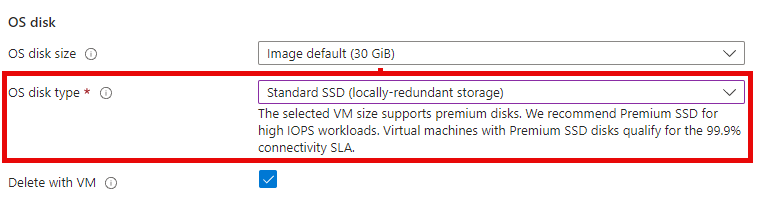
Disks Settings
As shown in the following figure, we set the setting for ‘OS disk type’ to ‘Standard SSD (locally-redundant storage)’. The rest of the configuration remains unchanged.
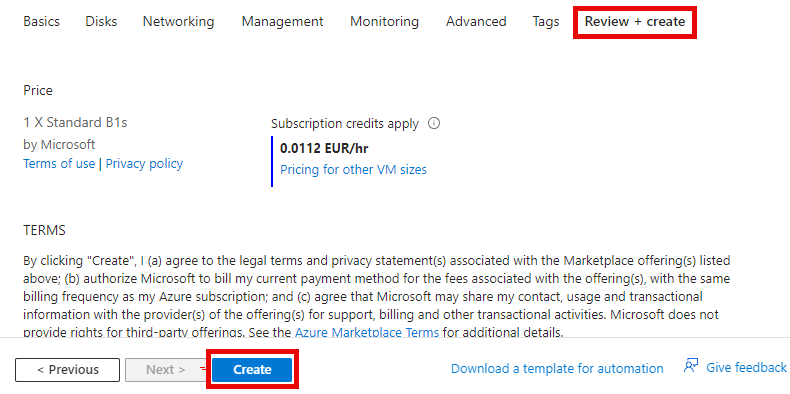
Review & Create VM
This completes the configuration of the Linux VM for our redirector. Settings that are not listed have not been changed and are therefore not explicitly mentioned. In the last step, we check the VM configuration before we create the VM.
Redirector - Configuration Network Settings
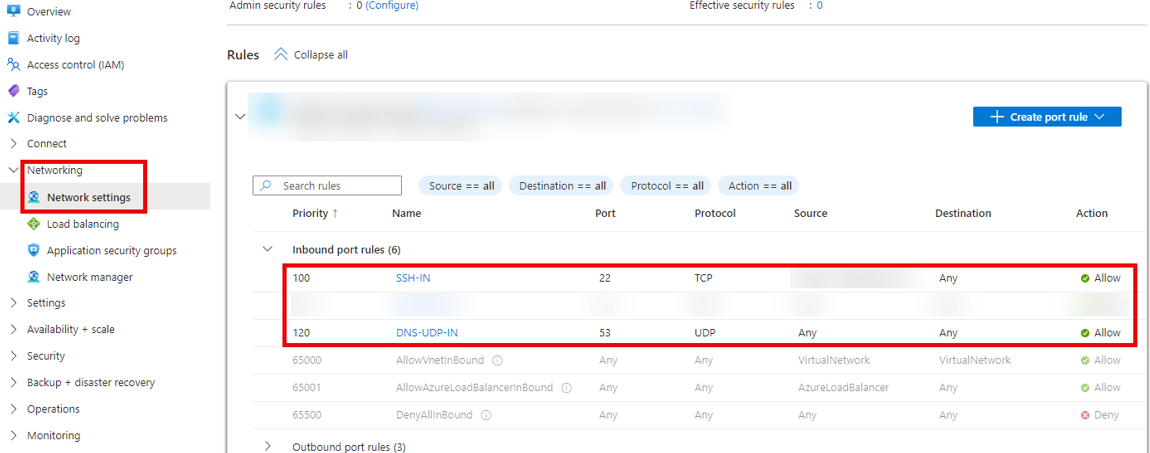
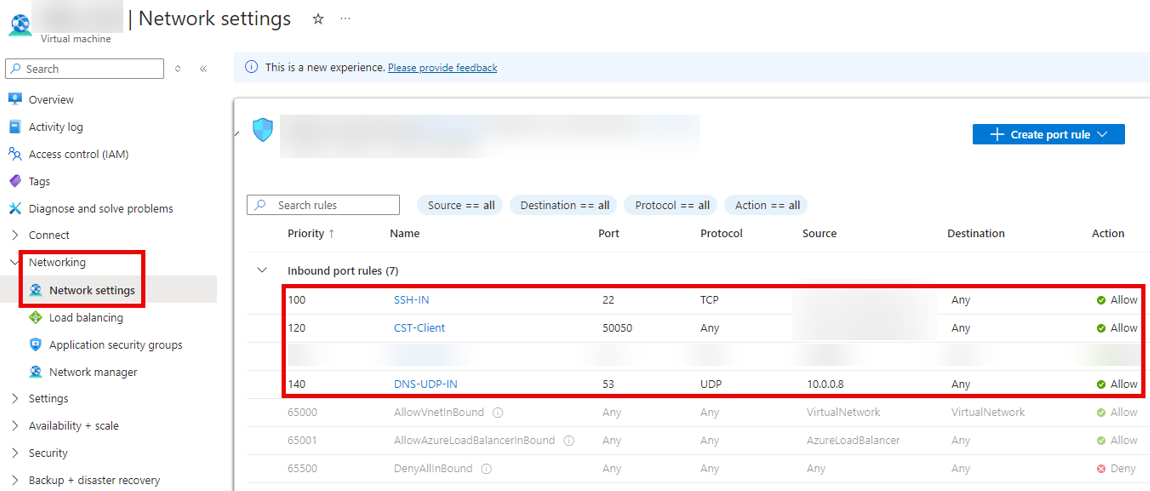
Once the VM has been created, we can proceed with configuring the network settings. In this section we will only focus on the configuration items that have been customised or added. As we have disabled all incoming ports when creating the VM, we will now start to change these settings to suit our needs.
As you can see in the figure below, we are allowing SSH access to our Linux Redirector VM, but restricting it to specific IP addresses. This means that SSH access to the VM is only possible from these specific IP addresses to prevent unauthorised access.
We also open the port for DNS (UDP). However, unlike SSH, we do not restrict this to specific IP addresses. This is important because in a red teaming scenario, we usually do not know the public IP addresses of our target in advance. Therefore, we need to accept incoming DNS requests to the redirector without restriction. In other words, restricting DNS access to certain IP addresses or domains could cause our redirector to block incoming DNS requests from the target, preventing proper redirection to the Cobalt Strike Team server.
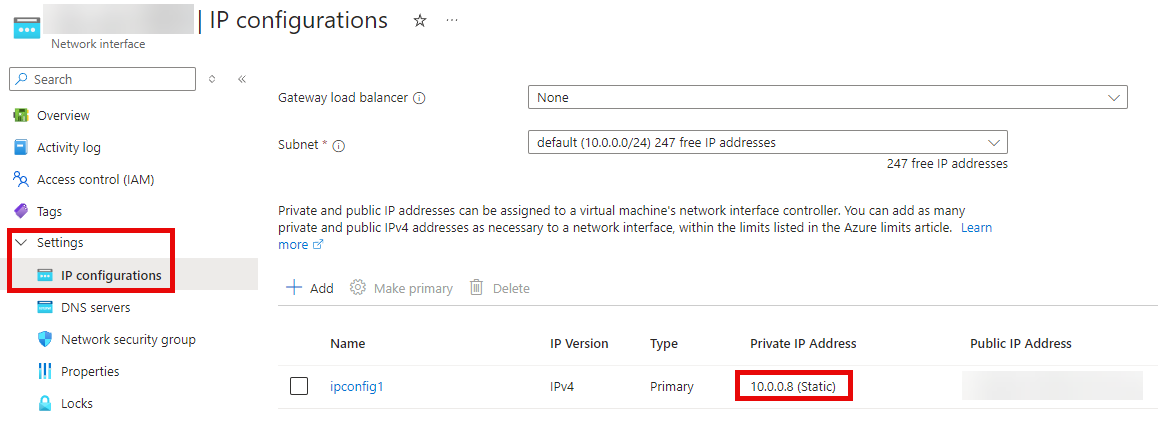
Having completed the configuration of the redirector VM in Azure, we will later proceed to create a VM for the Cobalt Strike Team server in the same way. As explained in the later section on configuring incoming rules for the Cobalt Strike Team server, we want to restrict incoming DNS requests to the internal IPv4 address of our redirector VM. To achieve this, we configure the internal IP address of the redirector VM as a static IPv4 address.
It is important that both the Redirector VM and the Cobalt Strike VM are part of the same virtual network. This configuration allows both VMs to communicate using their internal IPv4 addresses. Without this configuration, DNS redirection via internal IPv4 communication would not be possible and we would be forced to work with the public IP address of the Cobalt Strike VM in the DNS context, which is not desirable in this scenario.
This completes the configuration of our Redirector VM and we can continue with the creation of the Cobalt Strike VM.
Azure - Cobalt Strike
There are several ways to deploy, configure and operate the Cobalt Strike Team Server. On the one hand, the Team Server can be operated within your own internal network. On the other hand, it is also possible to host the team server on a cloud platform such as Microsoft Azure.
In our case, we decided to run the Cobalt Strike Team Server in Microsoft Azure. To do this, we create a VM in Azure that resides in the same virtual network as the Redirector VM we created earlier. Creating this VM is no different to creating the Redirector VM and can therefore be done in the same way.
Cobalt Strike - Configuration Network Settings
We also provide the necessary network configuration for the Cobalt Strike VM. As with the Redirector VM, the Cobalt Strike VM will only be accessible from specific IP addresses via SSH. This ensures that only authorised users can access the VM.
We also open port 50050, which is used to connect between the Cobalt Strike client and the Cobalt Strike Team server. Again, we restrict access to this port to specific IP addresses to ensure that only selected IPs can communicate with the team server via port 50050.
We also allow DNS traffic over UDP, but unlike the Redirector VM, we restrict incoming connections to specific IP addresses. In this case, we only allow incoming DNS requests from the internal IPv4 address of our redirector (in this case 10.0.0.8). This configuration ensures that only the redirector can forward DNS queries to the Cobalt Strike VM, further increasing the security and control of traffic.
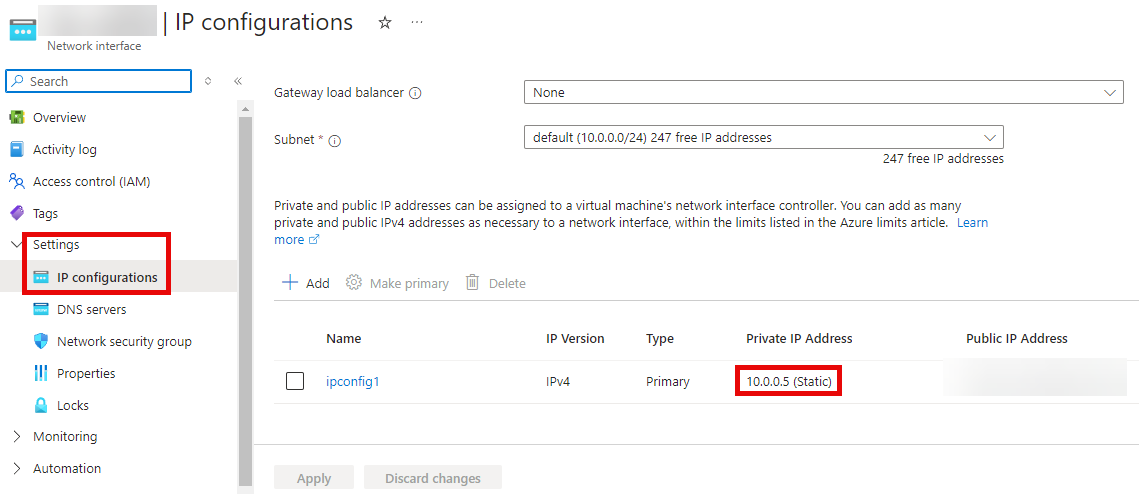
We will also configure the internal IPv4 address of the Cobalt Strike VM as a static IP. This step is crucial because we will later use iptables on the redirector VM to redirect all traffic destined for port 53 (DNS) to the Cobalt Strike VM's internal IPv4 address.
By setting the Cobalt Strike VM's internal IP to static, similar to the Redirector VM's configuration, we ensure that incoming DNS packets on the Redirector VM are consistently and correctly forwarded to the Cobalt Strike VM.
Summary Azure
Our preparations in Microsoft Azure are now complete. We have created a VM for our Cobalt Strike team server and configured it to only accept incoming connections on port 22 (SSH) and port 50050 (Cobalt Strike client) from specific public IP addresses. We also adjusted the incoming rules to only allow DNS UDP connections from the internal IPv4 address of our redirector (in this case 10.0.0.8).
The redirector was also created and configured in the same way to ensure secure and targeted communication between the two VMs. As mentioned earlier, it is important that both VMs are on the same virtual network. This allows communication via the internal IPv4 address, which is necessary for the DNS redirection concept to work smoothly.
Traffic Redirection
To correctly forward the incoming DNS traffic on the Redirector VM in Azure to the Cobalt Strike VM, we configure a forwarding with iptables. The aim is to forward all incoming requests on port 53 (DNS) of the Redirector VM to port 53 of the internal IP address of the Cobalt Strike VM (in this case 10.0.0.5).
The first step is to establish an SSH connection to the Redirector VM, e.g. using Putty. After successfully logging in, it is recommended to open a new terminal session within the SSH connection using the screen command as shown below. This will prevent the Cobalt Strike Team server from being terminated if the SSH session is interrupted.
# Start a new screen session with a specific name
screen -S CSDNS  # Creates a new screen session named "CSDNS"
Here are some other useful screen commands.
# Detach from the current screen session
# Press Ctrl + A, then D  # This will detach from the "CSDNS" session without closing it

# List all active screen sessions
screen -ls  # Shows a list of all current screen sessions

# Reattach to an existing screen session
screen -r CSDNS  # Reattaches to the "CSDNS" session

# Terminate the screen session
# Inside the screen session, type:
exit  # Ends the "CSDNS" screen session
Once the session is running, we set up the iptables forwarding. To do this, we run the following commands, replacing the wildcard IP address 10.0.0.5 with the internal IPv4 address of our own Cobalt Strike VM.
# Allow incoming DNS requests on port 53 (UDP and TCP)
iptables -I INPUT -p udp --dport 53 -j ACCEPT

# Forward incoming DNS traffic to the internal IP 10.0.0.5 on port 53 (UDP and TCP)
iptables -t nat -A PREROUTING -p udp --dport 53 -j DNAT --to-destination 10.0.0.5:53

# Allow forwarding of the DNS traffic
iptables -I FORWARD -p udp --dport 53 -j ACCEPT

# Enable masquerading for NAT (source NAT) to ensure proper routing of responses
iptables -t nat -A POSTROUTING -j MASQUERADE

# Enable IP forwarding (required for routing packets)
sysctl net.ipv4.ip_forward=1
When the redirection setup through iptables is complete and working, press Ctrl+A, then D to detach from the session.
DNS Configuration
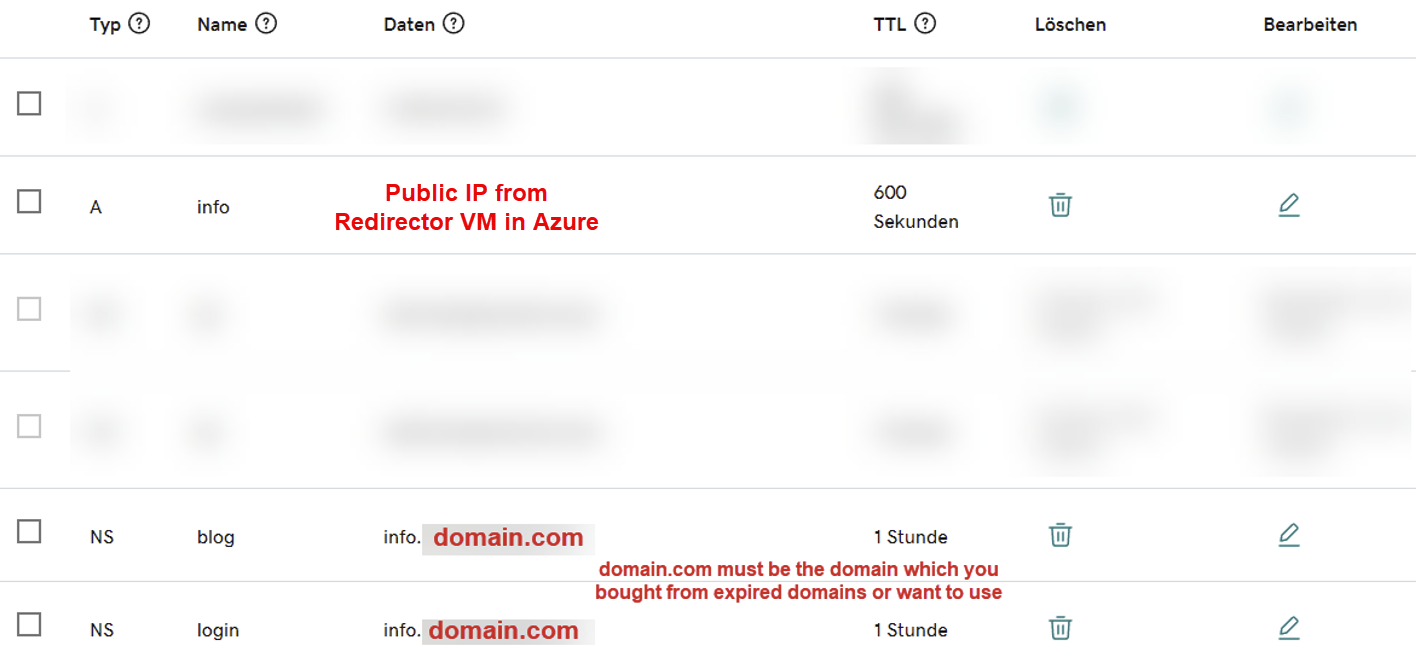
In this case, we'll use GoDaddy as our registrar and look at how to configure the DNS for our domain. First we create an 'A' record in the DNS and give it a name, for example 'info'. This 'A' record is configured to point to the public IPv4 address of the redirector VM in Azure.
In addition, two name server records are created pointing to the previously created 'A' record. The names of the two nameservers are arbitrary, in this case we use 'blog' and 'login'. These nameservers will be used later in the listener configuration of Cobalt Strike.
Once the DNS configuration of our domain is complete, we can proceed with setting up the DNS listener in the Cobalt Strike client.
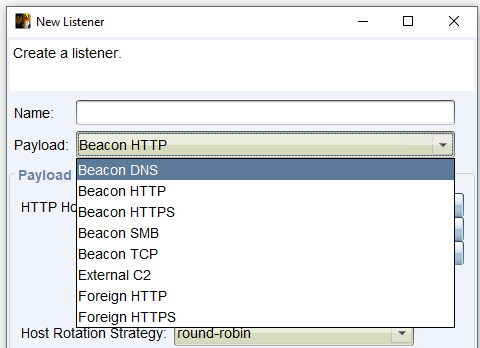
Cobalt Strike - DNS Listener
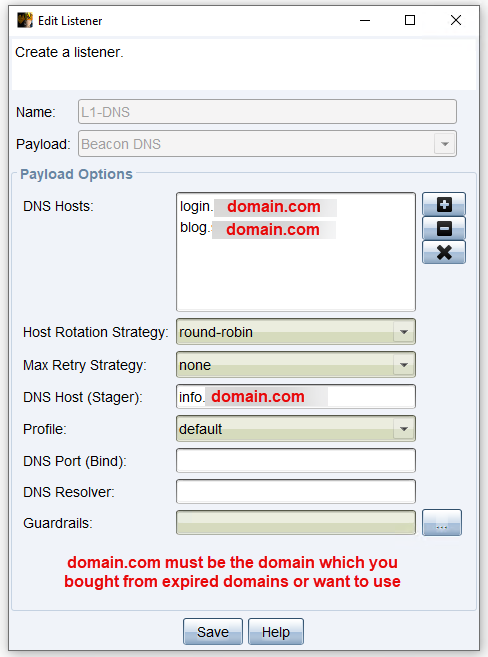
To use our domain in conjunction with a DNS listener in Cobalt Strike, we need to create a new listener. For the payload, we select the 'Beacon DNS' option. We then add the Fully Qualified Domain Names (FQDNs) of the two previously created nameserver entries as 'DNS Hosts'. The FQDN of the 'A' record entry that we configured for the redirector VM is entered as 'DNS Host (Stager)'. The rest of the DNS Listener settings can be left unchanged.
This configuration will allow the DNS listener to process queries via the correctly configured DNS records, thus establishing the connection between the beacon and the Cobalt Strike Team server.
DNS-Listener Test
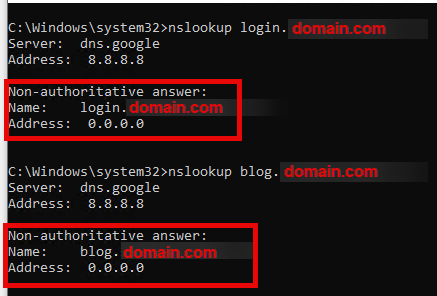
If everything has been configured correctly so far, all preparations should be complete and communication via DNS to our Cobalt Strike Team server should be possible in the context of our domain. To check this, as a first test, we will run the nslookup command on the FQDNs of the two nameservers of our domain.
If the configuration was successful, we will receive the IP address 0.0.0.0 as a response from the Cobalt Strike Team server, as shown below. This response indicates that the DNS listener on the Cobalt Strike Team server is correctly configured and that queries can be handled via the configured DNS records.
DNS-Beacon Test
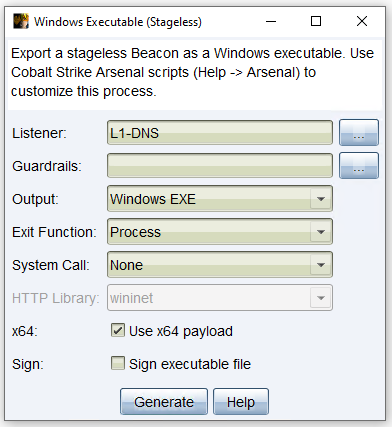
Finally, we check the functionality of our DNS listener by creating a 'Windows Stageless Payload' and selecting our DNS listener as the listener. It is not necessary to change any of the other settings in the payload configuration for this test.
Once we have created the payload, we can run it and see if it successfully connects to the Cobalt Strike Team server. If the DNS listener is working correctly, the beacon should successfully connect to the team server via DNS, confirming the successful configuration.
Next, we run the generated beacon_x64.exe on a host in our lab with AV/EPP/EDR disabled. If all went well, our Cobalt Strike DNS payload should successfully communicate with the DNS listener. This means that the beacon has connected to the Cobalt Strike Team server via DNS, confirming the success of the entire configuration. If the connection was successful, you will see this in the Cobalt Strike interface, where the beacon will appear as an active agent.
To complete the initialisation of the DNS beacon, we need to interact with the DNS beacon and perform a check-in. Only then will we be able to use the DNS beacon for communication or later exploitation.
Summary
In this blog post we presented a possible setup for using C2 traffic via DNS Beacon or DNS Listener. We created two VMs in Microsoft Azure: A Redirector VM that receives DNS queries from our DNS Beacon and forwards them using iptables under Linux on port 53 to the internal IPv4 address of the Cobalt Strike VM, which was also created in Azure.
In addition, the DNS configuration was discussed, the necessary commands for correct routing with iptables were explained, the setup of the DNS listener for Cobalt Strike (from version 4.0) was explained and finally the steps to check the functionality of the DNS listener were described.
This configuration provides a solid foundation for using DNS-based C2 traffic in a secure and controlled environment within Cobalt Strike. However, it is important to note that this configuration does not provide complete protection against web scanners, sandboxes or the Blue Team from a Red Team perspective. If you want to go deeper and increase your security, you might want to take a look at RedWarden from mgeeky. RedWarden offers advanced options to better protect your C2 infrastructure from detection.
Happy Hacking!
Daniel Feichter @VirtualAllocEx