Introduction
In my last blog post Cobalt Strike - DNS Listener we talked about setting up a DNS listener in Cobalt Strike in the context of Microsoft Azure and domain registrar GoDaddy. A DNS listener is certainly justified, e.g. in the context of long-haul servers to maintain persistence, but it has the disadvantage that DNS transmission can be very slow and is not intended for the transmission of large amounts of data.
In this article we will explore how high reputation domains can be used in the context of Content Delivery Networks (CDNs) under Microsoft Azure in conjunction with a C2 domain and Nginx as a reverse proxy for our Red Team infrastructure. In the following, I will give an overview of the resources required and the main topics we will cover in detail.
- Selection of a C2 domain
- Create and configure the required components in Microsoft Azure
- VM for Nginx Reverse Proxy
- VM for Cobalt Strike Team Server
- Content Delivery Network (CDN)
- Configuring the DNS of the C2 domain
- Configuration of Cobalt Strike
- Mallable Profile
- Listener
- Configuration of the Nginx reverse proxy
The aim of this article is to create a C2 infrastructure that allows communication from the implant (beacon) on the target host to the Cobalt Strike Team server via the path Azure CDN -> C2 domain -> Nginx reverse proxy. The following diagram shows the concept in a simplified form.
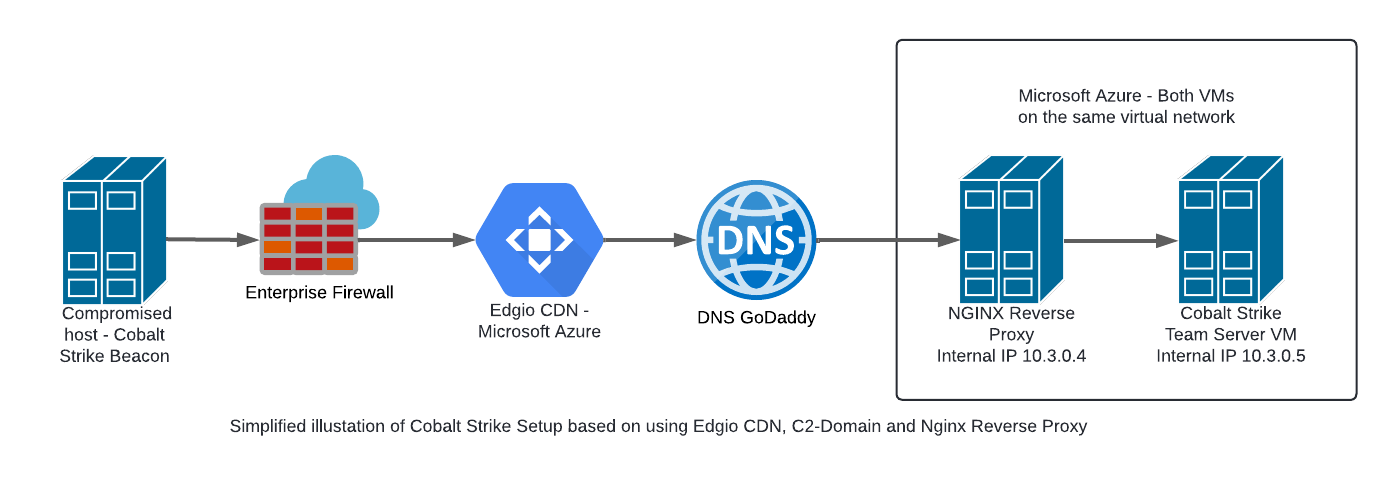
Selection of a C2-Domain
In practice, for our planned C2 setup of CDN, Nginx and Cobalt Strike, it is not absolutely necessary to select a domain as the C2 domain. However, as we will see later, we want to avoid specifying the IP address of our Nginx reverse proxy as the origin hostname in the CDN configuration. Instead, we prefer to specify the FQDN of a legitimate subdomain in the context of our C2 domain, which points to the public IP address of our Nginx reverse proxy via an A record. This may seem complex at first, but will become clearer and more understandable as the article progresses.
However, there are several options for selecting a domain to use as part of our C2 infrastructure. One is to register a new domain and build it up gradually, letting it age and build its reputation. On the other hand, it is possible to buy an expired domain through services such as expireddomains.net. In practice, it is usually necessary to purchase an expired domain that can be used in the context of the particular scenario during a red team engagement due to time constraints.
However, before buying or registering a domain, make sure it is old enough, has a good reputation and is not blacklisted by security vendors. We will tackle the DNS configuration for our domain at a later stage, once we have created the Nginx VM at Azure and know the public IP of the VM.
Microsoft Azure - Required components
For the implementation of our planned C2 infrastructure, we need the following components in Microsoft Azure:
- Linux VM for Nginx Reverse Proxy
- Linux VM for Cobalt Strike Team Server
- Edgio CDN Endpoint
Azure - Nginx VM
The first step is to create the Linux VM that will later act as the Nginx reverse proxy. The reverse proxy plays a central role in the Command and Control (C2) infrastructure as it processes the incoming traffic and forwards it to the actual C2 server. We will explain in detail what a reverse proxy does, how it is used in a C2 context, and how it differs from a simple redirector (such as socat or iptables) later in the configuration of Nginx.
First, however, we will focus on creating and configuring the Linux VM in Microsoft Azure.
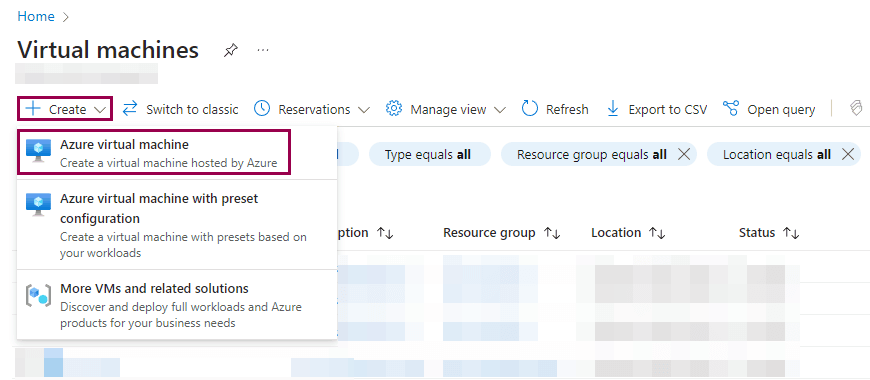
The following section describes how to configure the VM. Please note that only those items that need to be configured or changed are discussed.
Basic Settings
Assuming we have an active Azure subscription, we start by configuring the basic settings of the virtual machine (VM). We assign the VM to a resource group, give it a name, select a suitable region and image, and set the other basic settings. The following figure shows the basic settings configured for our Nginx VM.
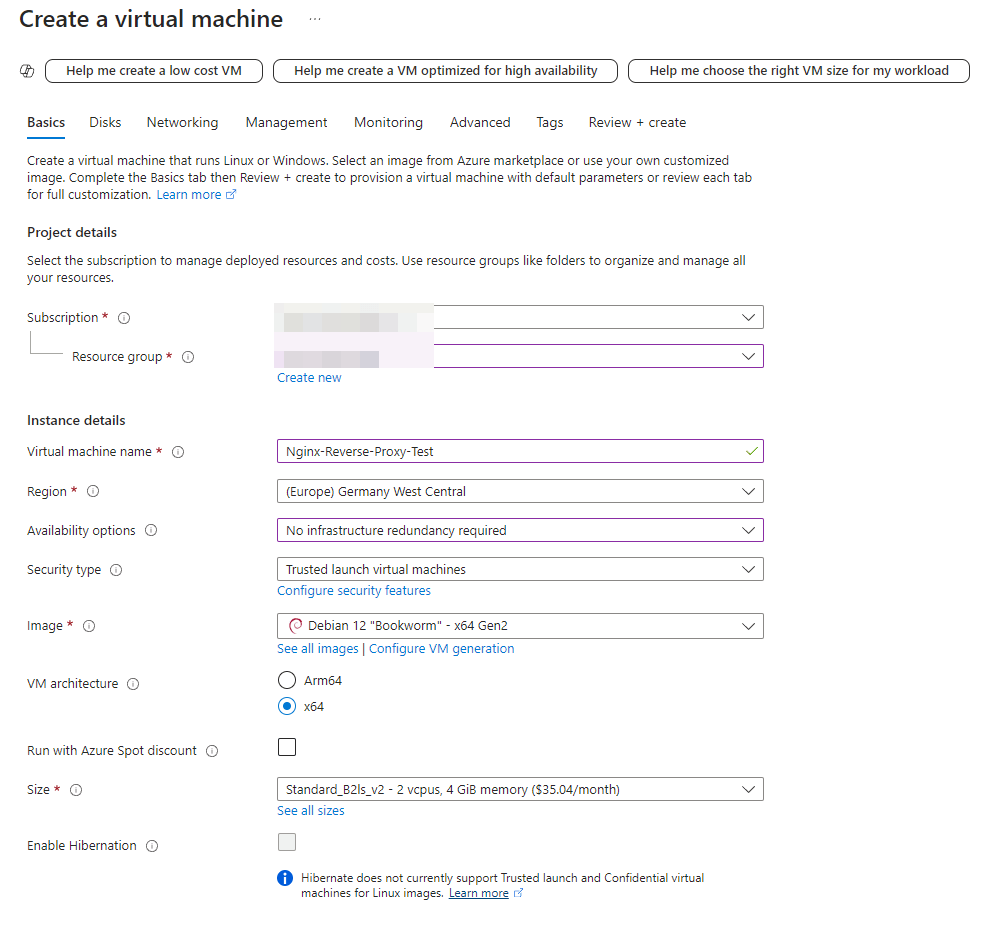
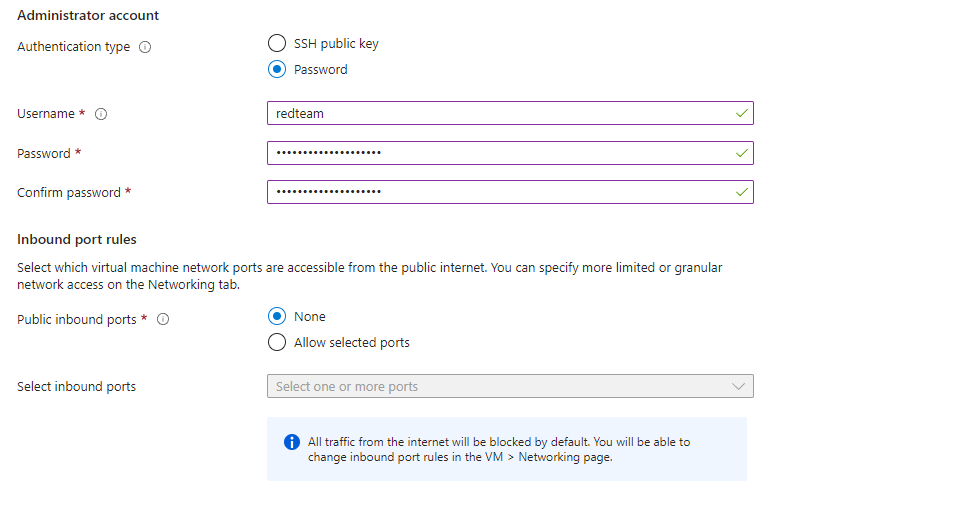
In my last article, Cobalt Strike - DNS Listener, we talked about how careful selection of the region is a crucial factor in the configuration. Ideally, this region should match the location of the target to avoid anomalies in outgoing DNS requests in the target network. A mismatched region could look suspicious and draw unwanted attention to the traffic.
In this C2 configuration, we can also select the region based on this criterion. However, in this particular case, it is less critical from an OPSEC point of view if the region does not exactly match the location of the target. This is because the Nginx reverse proxy in this architecture 'only' acts as an intermediary between Azure's CDN and the Cobalt Strike Team server, and not directly between the beacon and the Cobalt Strike Team server. In other words, the beacon on the target host first connects to the CDN. Only then is the traffic passed through the origin hostname to the GoDaddy DNS server and finally to the Azure Nginx reverse proxy.
Disks Settings
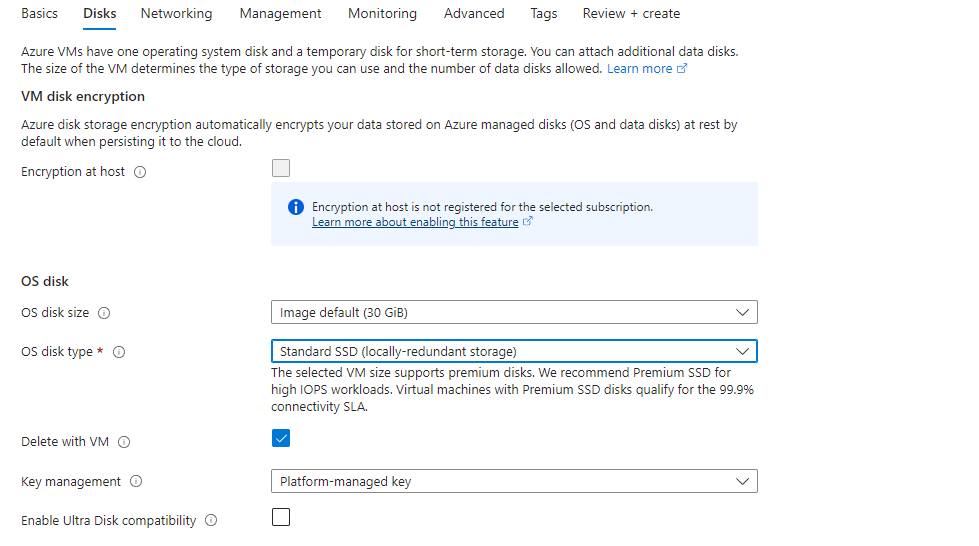
As shown in the following figure, we set the 'OS disc type' to 'Standard SSD (local redundant storage)'. The rest of the configuration remains the same.
Review & Create VM
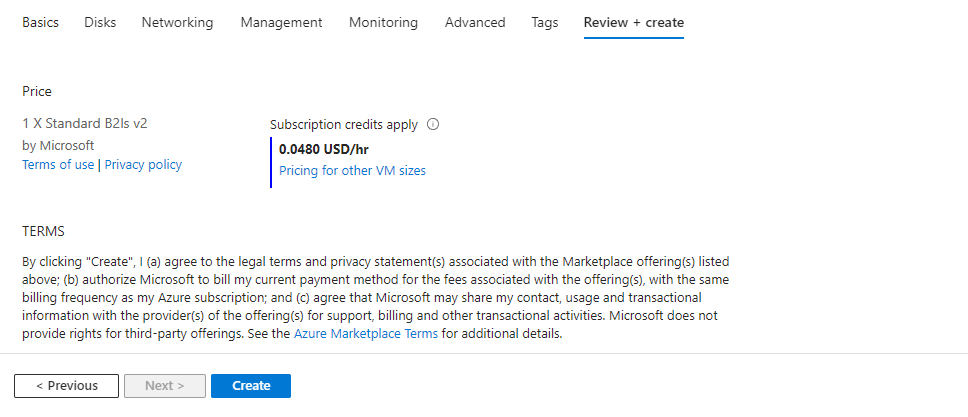
This completes the configuration of the Linux VM for our redirector. Settings that are not listed have not been changed and are therefore not explicitly mentioned. The final step is to verify the VM configuration before building the VM.
Nginx - Configuration Network Settings
Now that the VM has been created, we can proceed with configuring the network settings. In this section we will only focus on the configuration items that have been customised or added. Since we disabled all incoming ports when we created the VM, we will start by adjusting these settings to suit our needs.
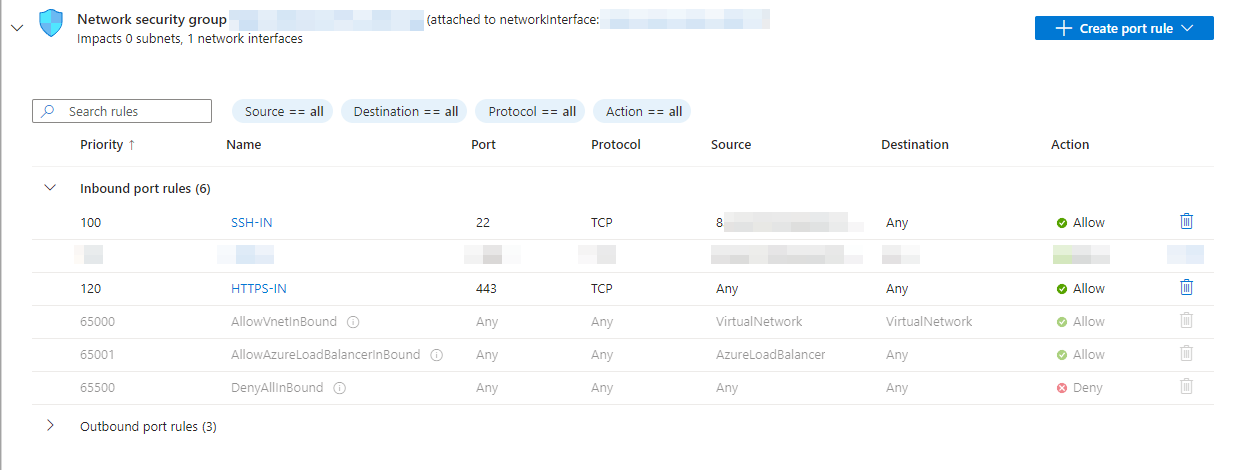
As shown in the figure below, we will allow SSH access to our Nginx VM, but restrict it to a selection of specific IP addresses. This means that SSH access to the VM is only possible from these authorised IP addresses, preventing unauthorised access.
We also open the port for HTTPS connections, but unlike SSH, we do not restrict it to specific IP addresses. This is particularly important because in a red-teaming scenario we do not usually know the public IP addresses of our target in advance. Restricting HTTPS access to specific IP addresses or ranges could cause our redirector to block incoming HTTPS requests from the target, preventing them from being properly redirected to the Cobalt Strike Team server. We therefore allow HTTPS requests without restriction.
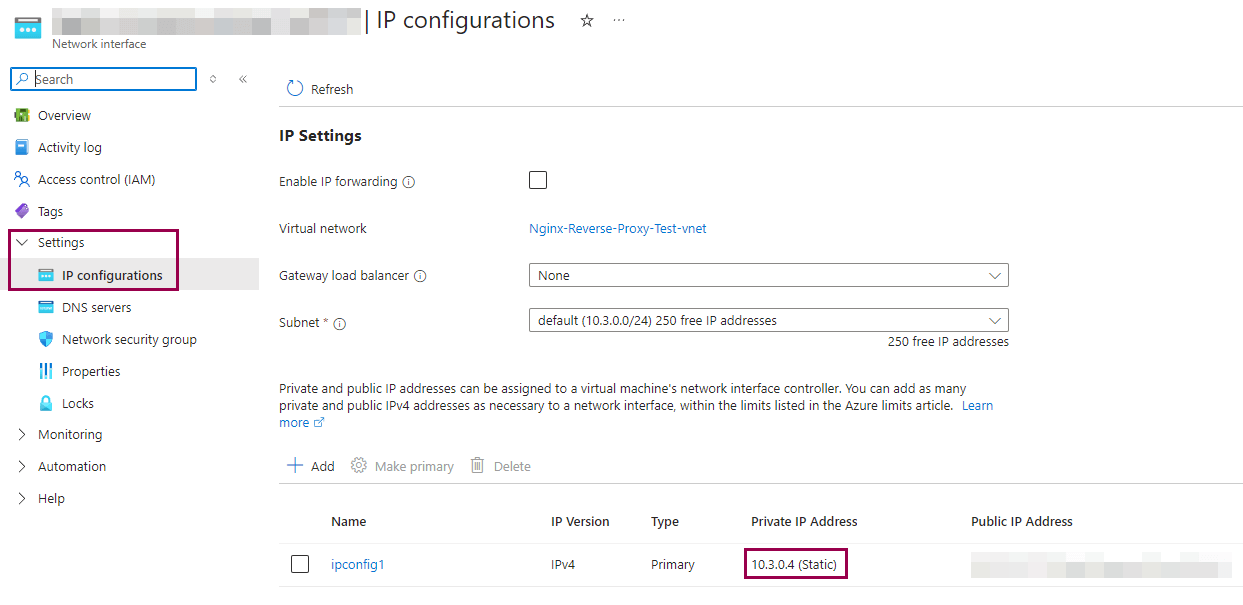
Once we have finished configuring the inbound rules, we will want to assign an internal static IPv4 address to the Nginx VM (in this case 10.3.0.4). This is necessary so that we can later configure the inbound rules of the Cobalt Strike VM (which we will create next) so that incoming HTTPS requests are only accepted from the internal IPv4 of the Nginx VM. Important: This concept requires that the Nginx VM and the Cobalt Strike VM are on the same virtual network.
The configuration of the Nginx VM in Azure is complete, but before we start installing and configuring Nginx on this VM, we will first create the remaining components we need in Azure, namely a VM for the Cobalt Strike Team server and the Edgio CDN.
Azure - Cobalt Strike VM
The VM for the Cobalt Strike Team server can be created in the same way as the Nginx VM. We use the same Linux image 'Debian 12 Bookworm' and the configuration of the basic settings is the same, only the configuration of the incoming rules is slightly different.
Cobalt Strike - Configuration Network Settings
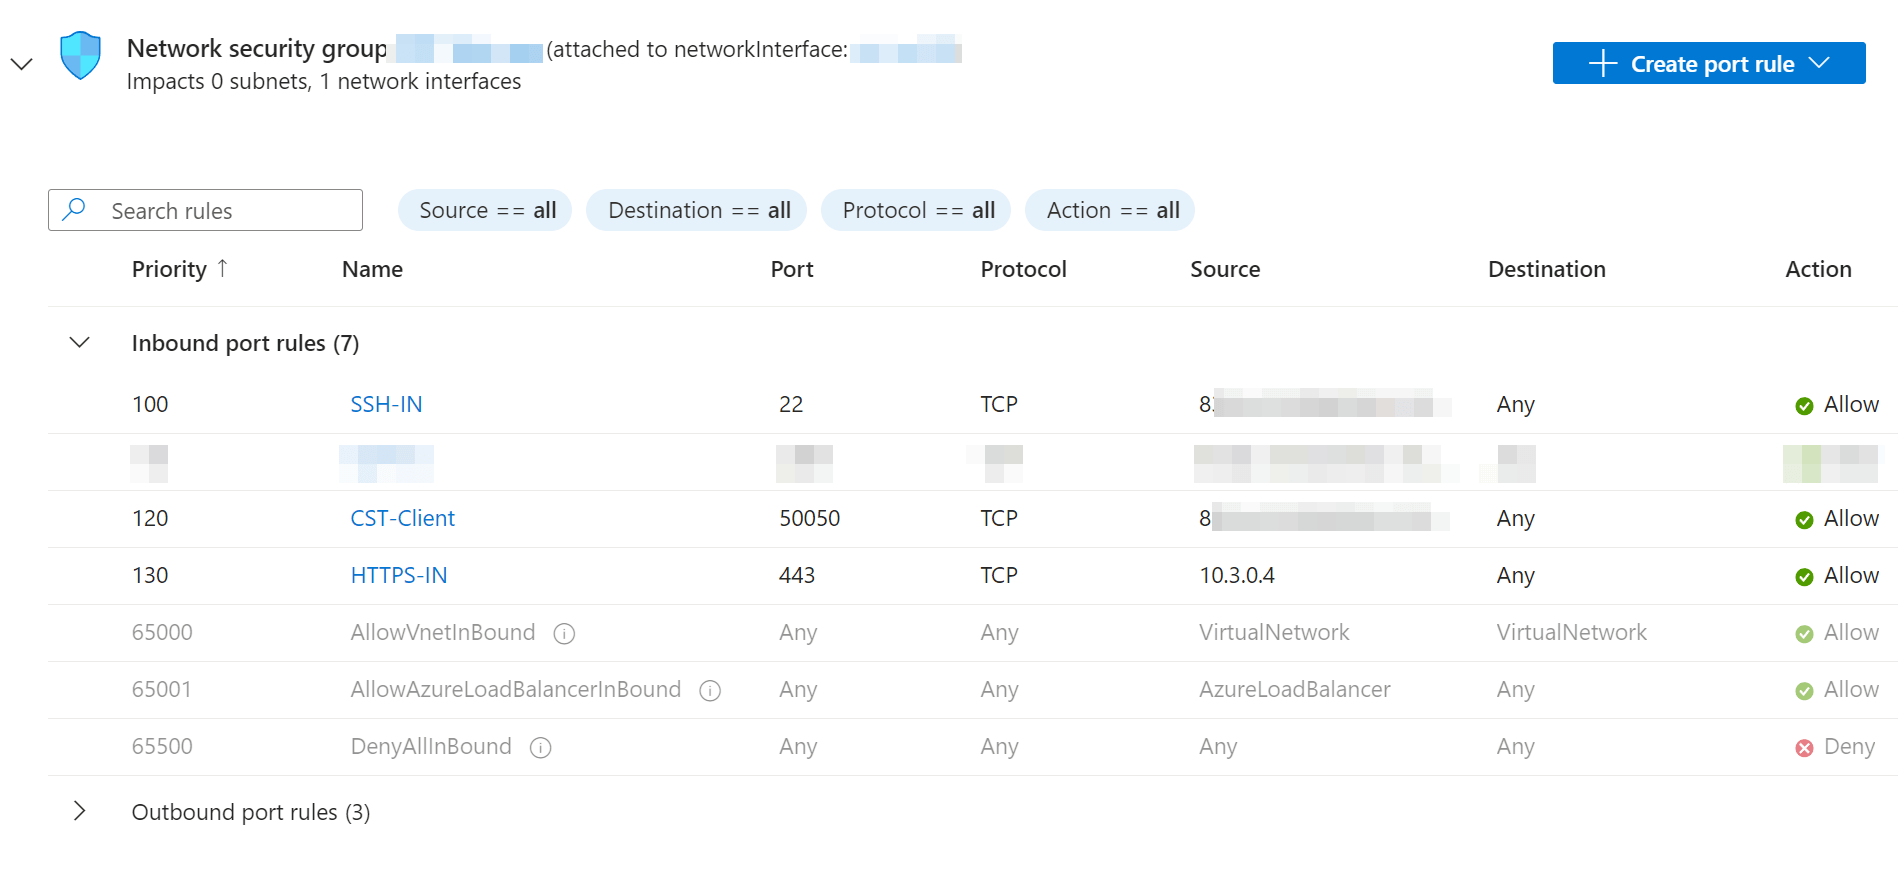
We also configure the necessary network configuration for the inbound rules for the Cobalt Strike VM. As with the Nginx VM, the Cobalt Strike VM will only be accessible via SSH from specific IP addresses. This ensures that only authorised users can access the VM.
We also open port 50050, which is used to connect between the Cobalt Strike client and the Cobalt Strike team server. Again, we restrict access to this port to certain IP addresses to ensure that only authorised IPs can communicate with the team server via port 50050.
We also allow HTTPS traffic to the Cobalt Strike VM, but unlike the Nginx VM, we restrict incoming connections to certain IP addresses. In this case, we only allow incoming requests from the internal IPv4 address of our Nginx VM, in this example 10.3.0.4, in the HTTPS context. This configuration ensures that our Cobalt Strike Team server will generally only accept incoming HTTP traffic from the Nginx reverse proxy.
This measure increases the security of the Cobalt Strike infrastructure by strictly limiting access to authorised communication channels and IP addresses, minimising the attack surface and protecting the integrity of our Cobalt Strike Team server.
We also assign a static IP address (10.3.0.5) to the Cobalt Strike VM for internal IPv4, which will be used later in the Nginx configuration. This ensures that communication between the Nginx VM and the Cobalt Strike VM remains stable and predictable, which is particularly important when configuring the reverse proxy.
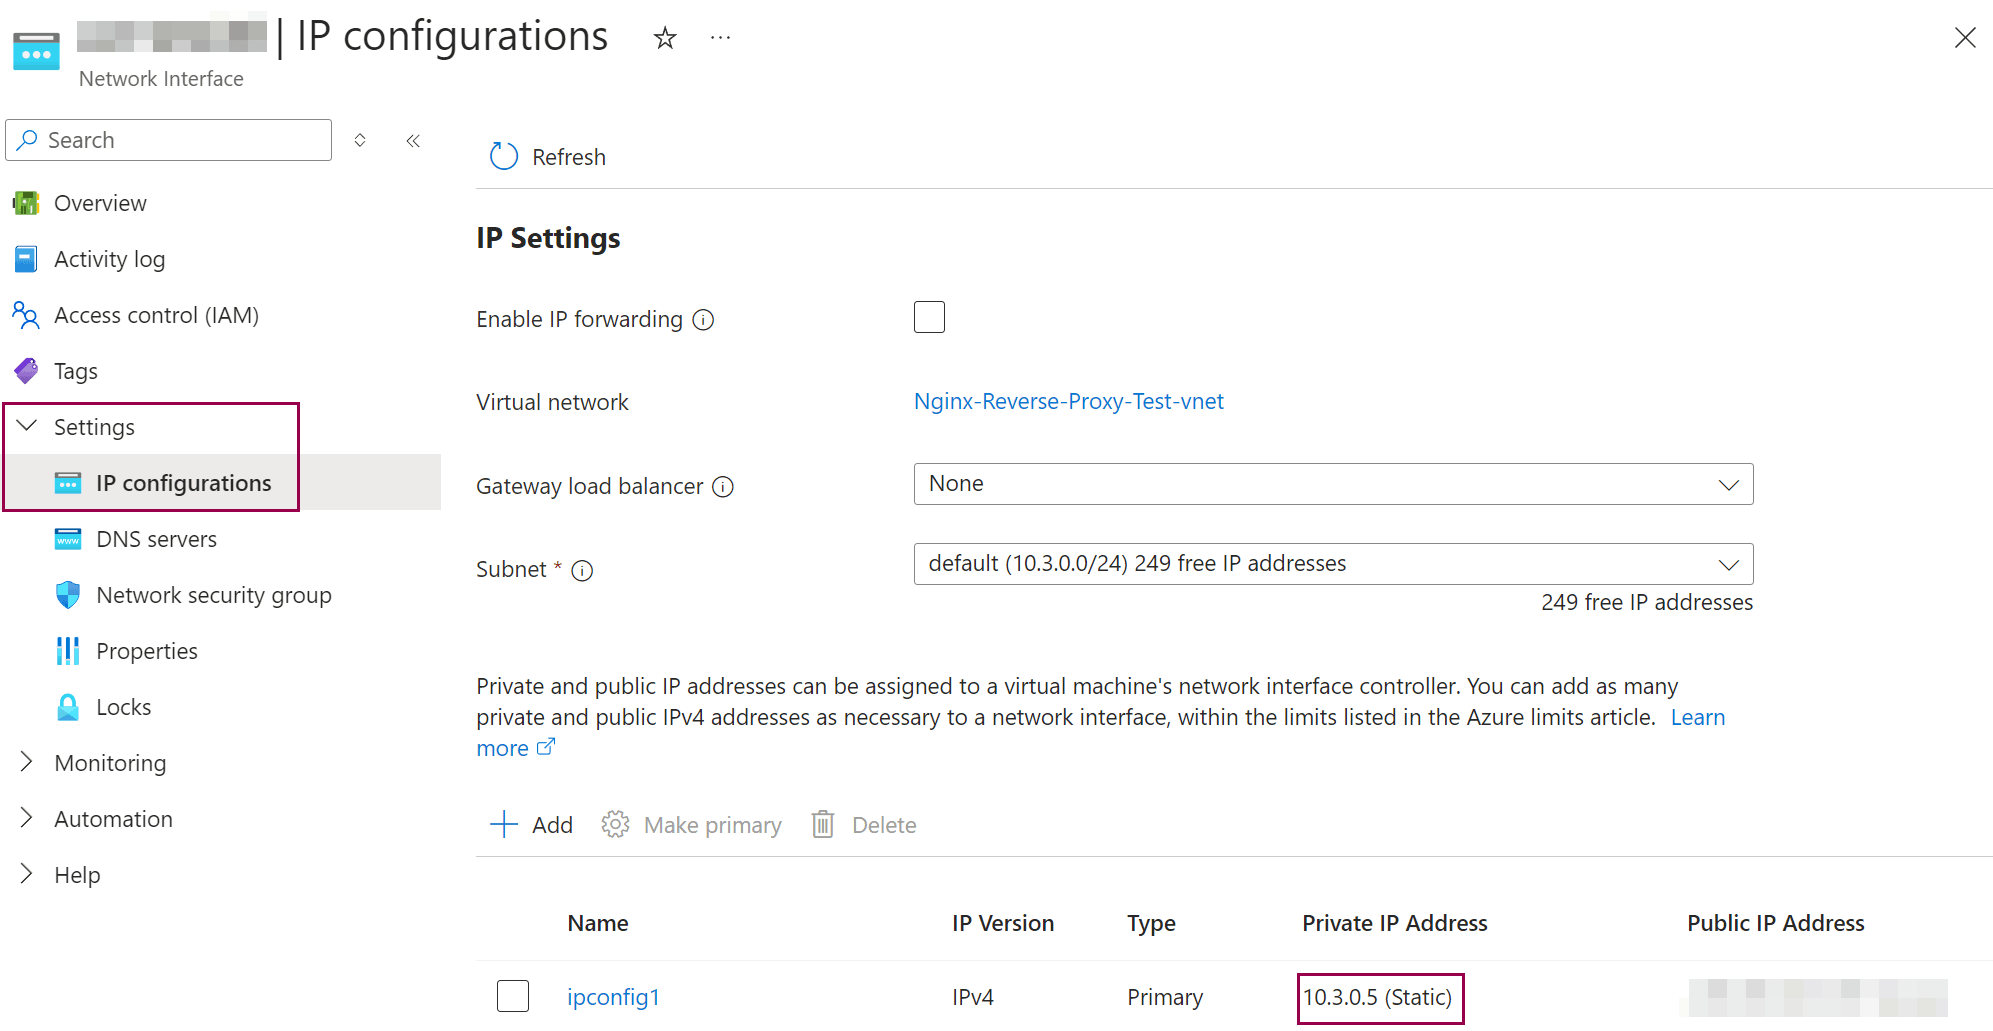
This completes the basic configuration of the Cobalt Strike VM. To complete the setup, we will later cover the configuration of the Malleable Profile and the Cobalt Strike Listener.
C2-Domain - DNS
Before we start setting up the CDN in Azure, we need to make a DNS entry in the C2 domain, which will later be used in the CDN configuration as the origin hostname to which our CDN endpoint points.
As shown in the figure below, we first choose a name for the subdomain (in this case 'docs') that will be used in conjunction with our C2 domain. This name is then pointed to the public IP address of our Nginx VM via an A record. This ensures that the implant (beacon) at the destination communicates with the Nginx VM via the CDN and the C2 domain using the origin hostname.

Azure - CDN Endpoint
The next step is to create the CDN endpoint in Microsoft Azure that we will use to communicate our command and control traffic. Without going into too much detail about how Content Delivery Networks (CDNs) work, suffice it to say that they play a crucial role in our context. They allow us to use Microsoft Azure domains (e.g. ajax.microsoft.com) with a very high reputation to effectively disguise our command and control traffic.
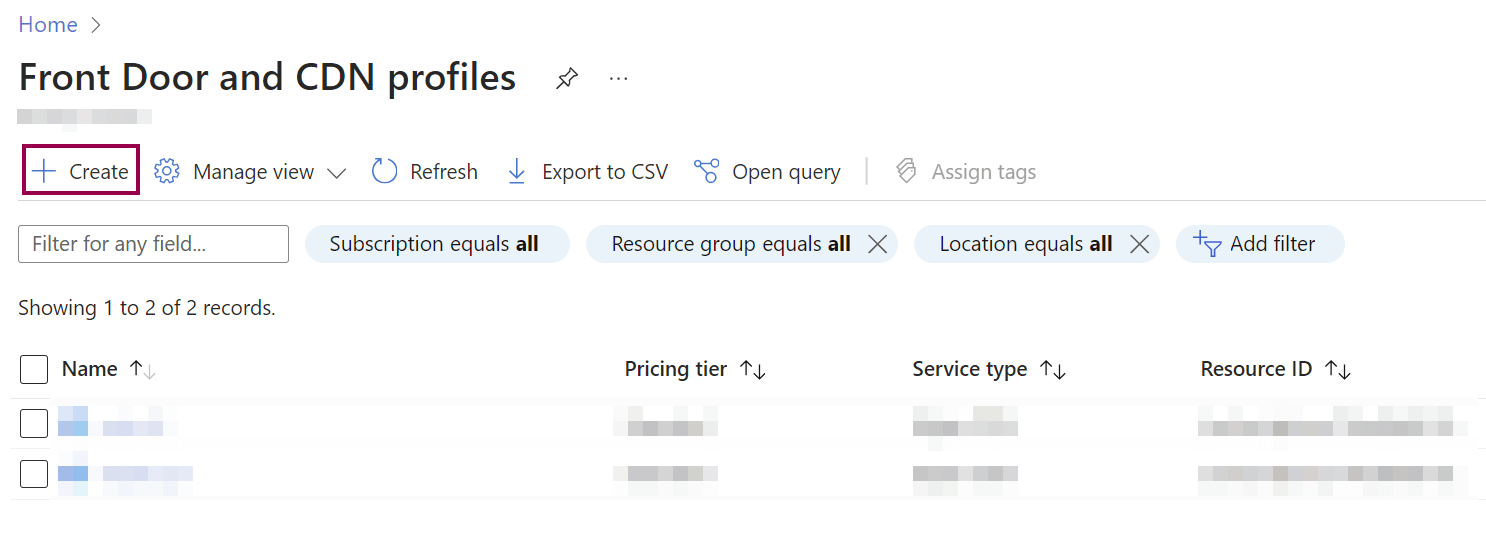
By using a CDN, we can route our traffic through trusted and commonly used infrastructure, making it much more difficult to detect and block our activities. This is a major advantage in red-teaming scenarios where the goal is to stay under the radar and avoid suspicious Internet traffic. The first step is to set up the CDN in Azure, as shown in the figure below.
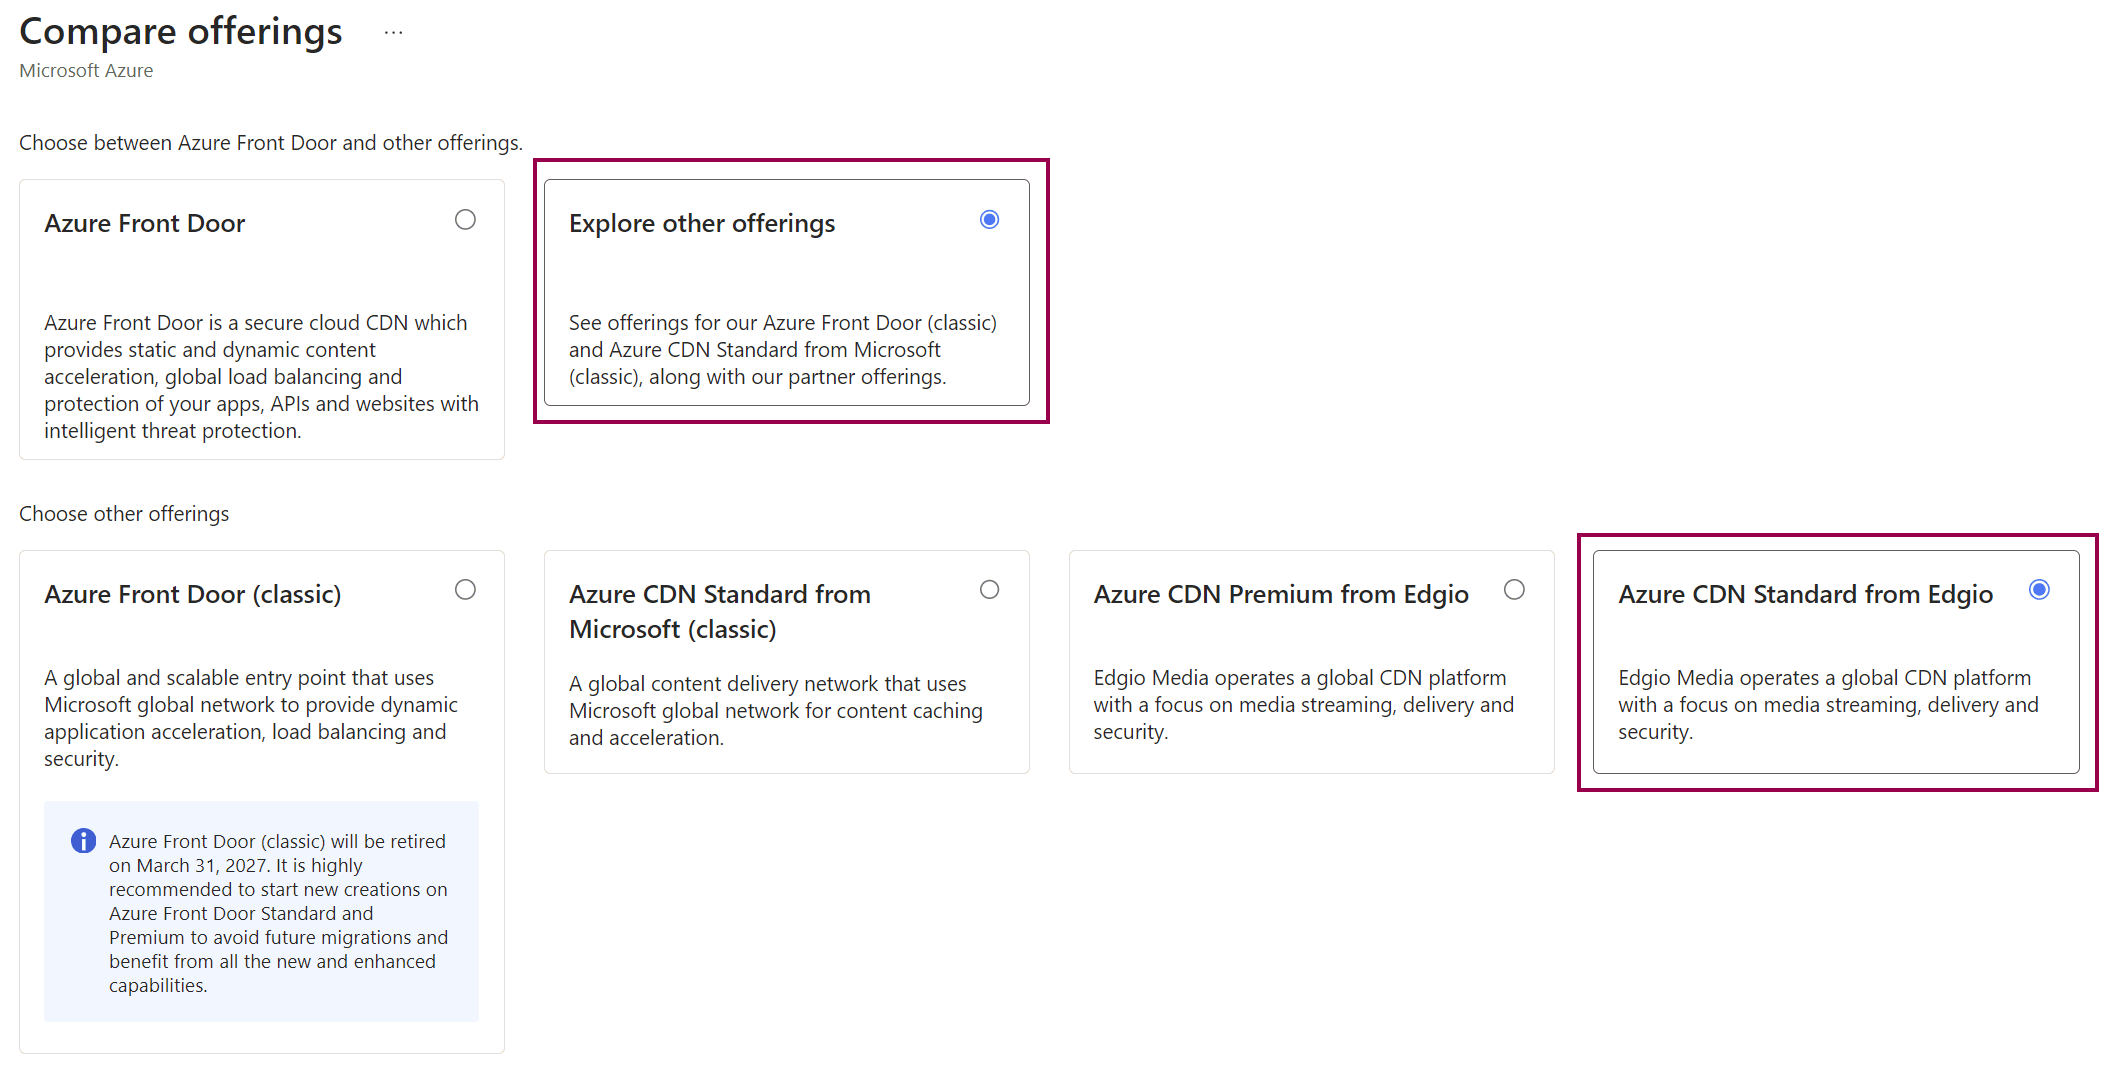
Next we need to select a quote and choose the 'Standard Edgio' option.
The next step is to do the basic configuration of our CDN profile. As with the VMs, we need to have an active Azure subscription and select the resource group that contains both the Nginx and Cobalt Strike VMs. The name for the CDN can be chosen freely, as can the CDN endpoint name if it has not already been assigned. In this example we will use xyz-cache.azuredge.net.
We set the 'Origin Type' to 'Custom Origin'. Under 'Origin Hostname' we enter the FQDN of the subdomain of our C2 domain, which we have previously created in the DNS of our C2 domain and which points to the public IP of the Nginx VM at Azure via an A record. In other words, if the name of our C2 domain is domain.com and we have defined a subdomain in the DNS, e.g. 'docs', pointing to the public IP of the Nginx VM, we would enter docs.domain.com as the 'origin hostname' in this case.
This configuration ensures that all requests to the CDN endpoint are redirected to the appropriate subdomain of our C2 domain, which in turn points directly to the public IP of the Nginx VM in Azure. In this way we can effectively mask the command and control traffic going through the CDN and ensure that it ultimately arrives correctly at our Nginx VM.
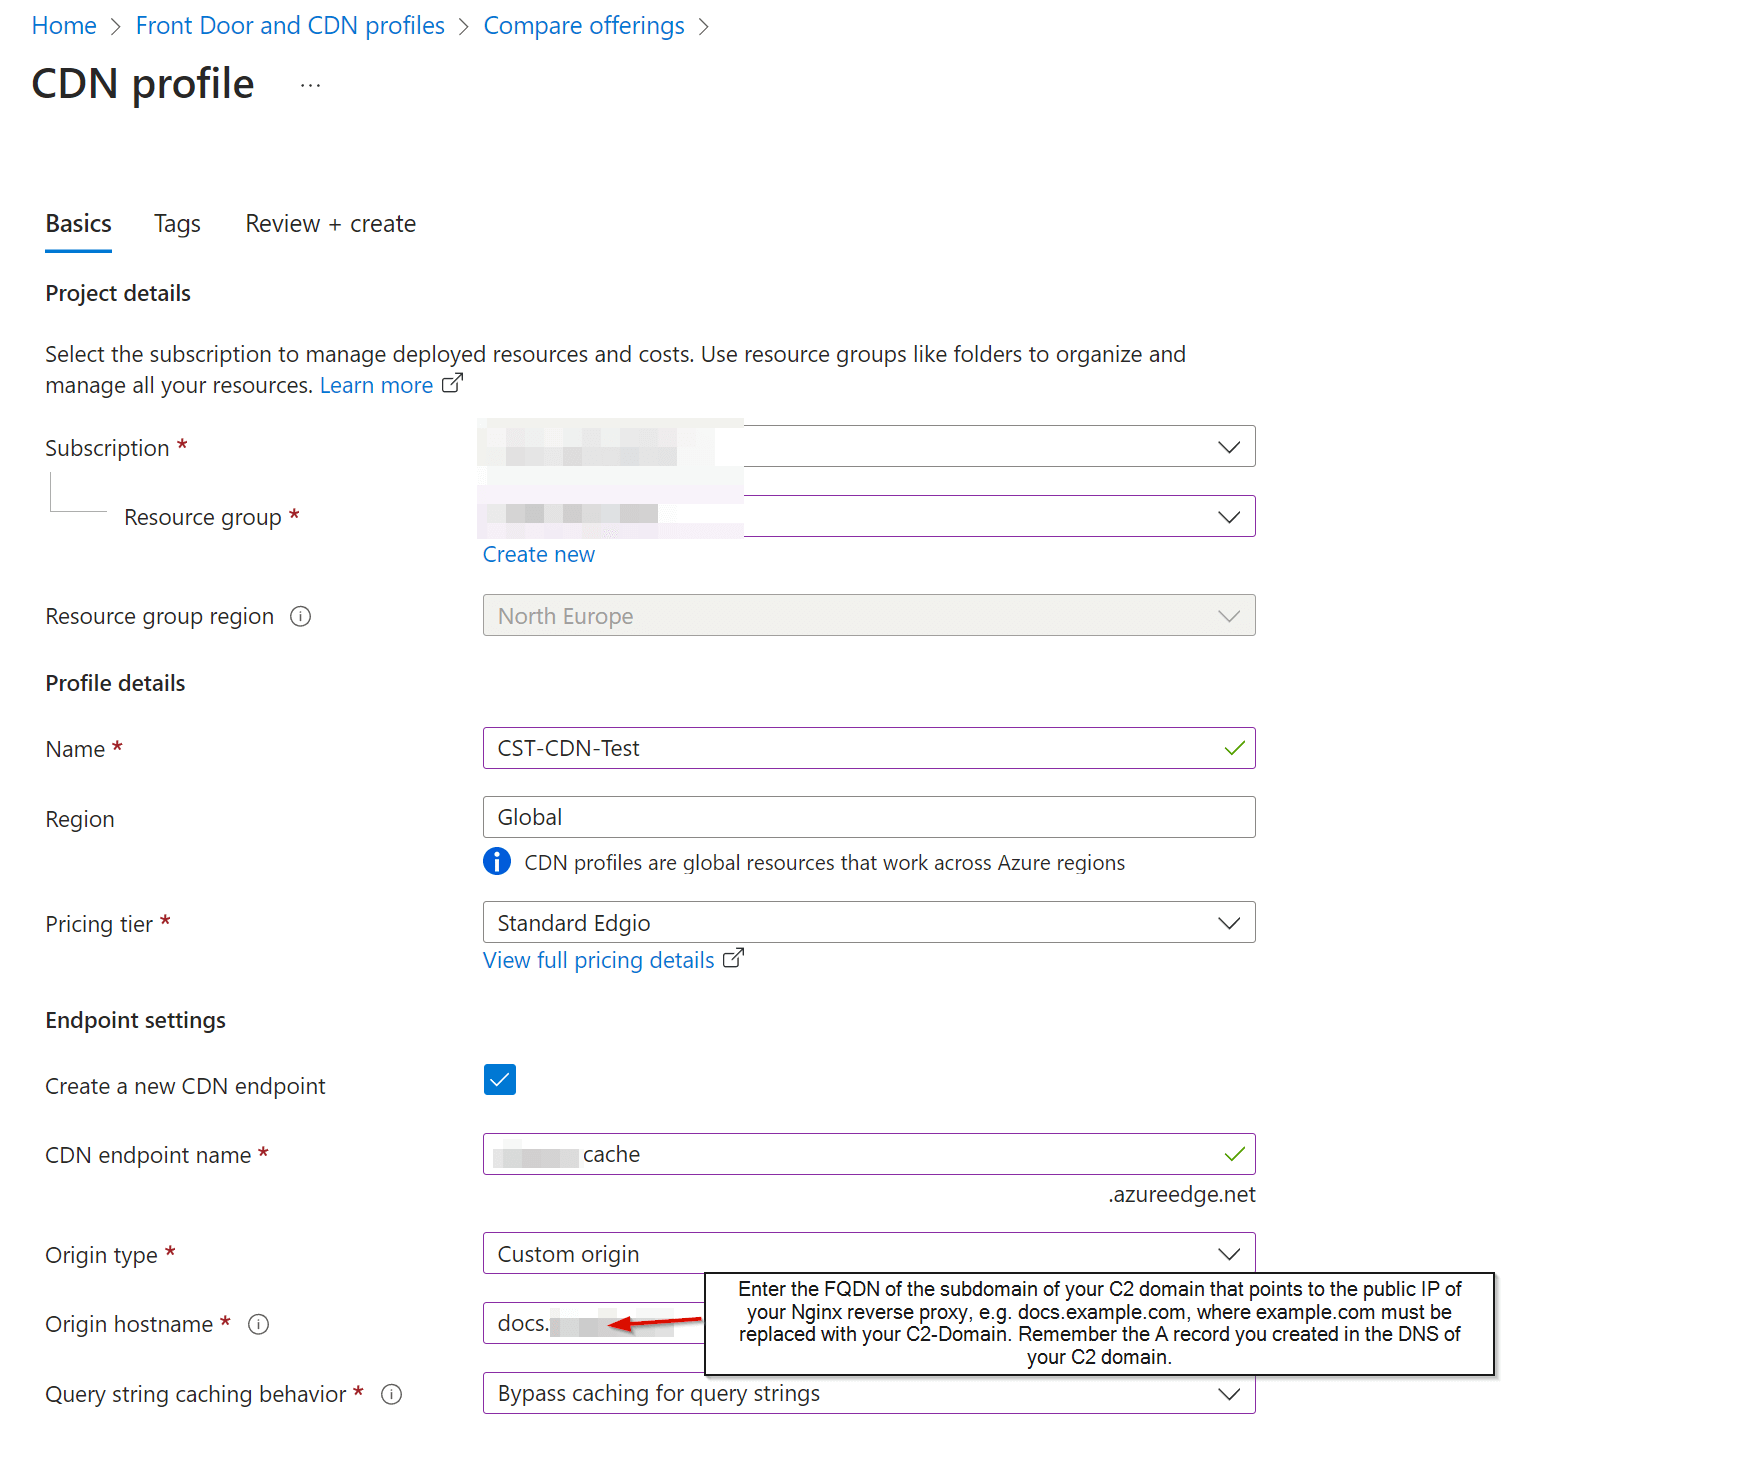
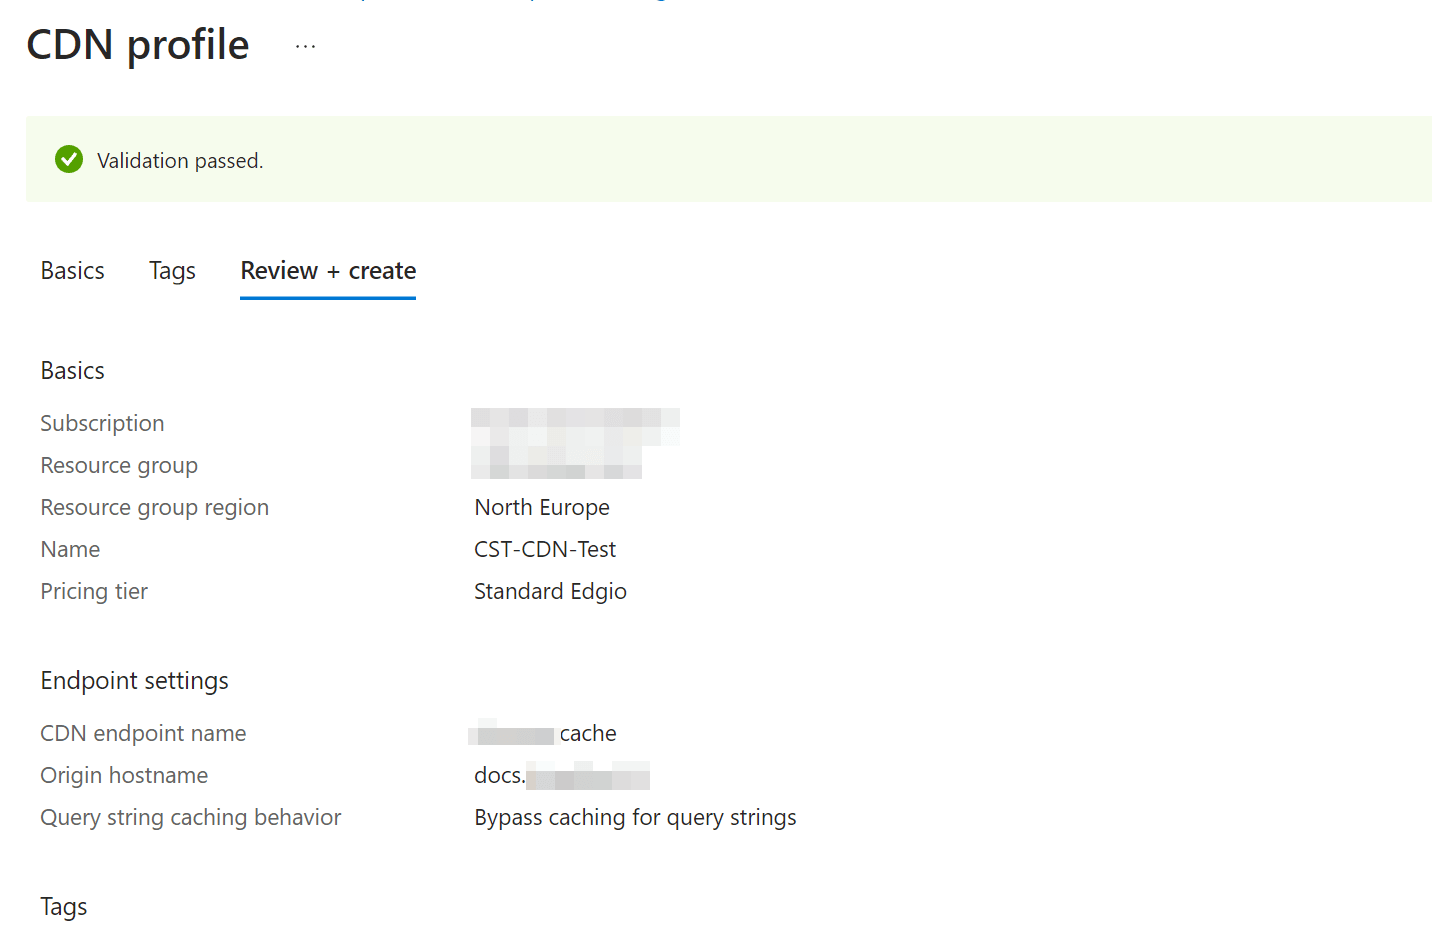
Our CDN endpoint can then be created. Deployment may take a while, but should be completed in a few minutes.
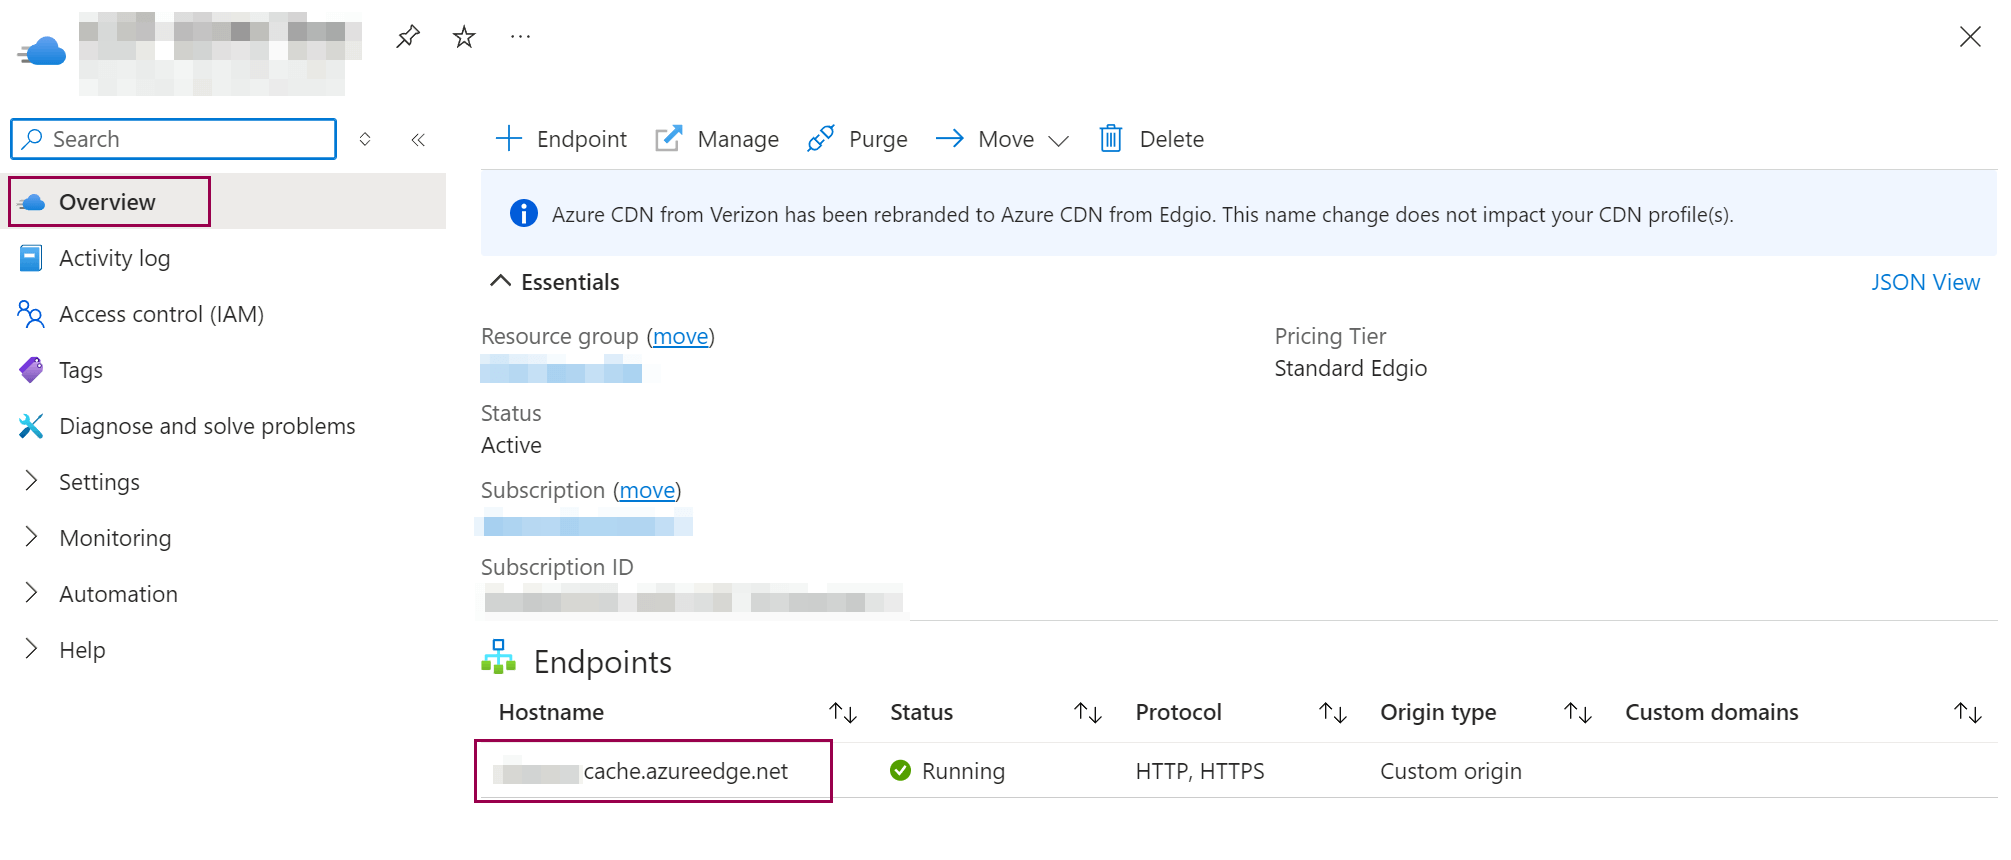
CDN - Configuration
Now that we have created our CDN, we need to configure it. The first step is to select our endpoint in the overview, in this case xyz-cache.azureedge.net, as shown below.
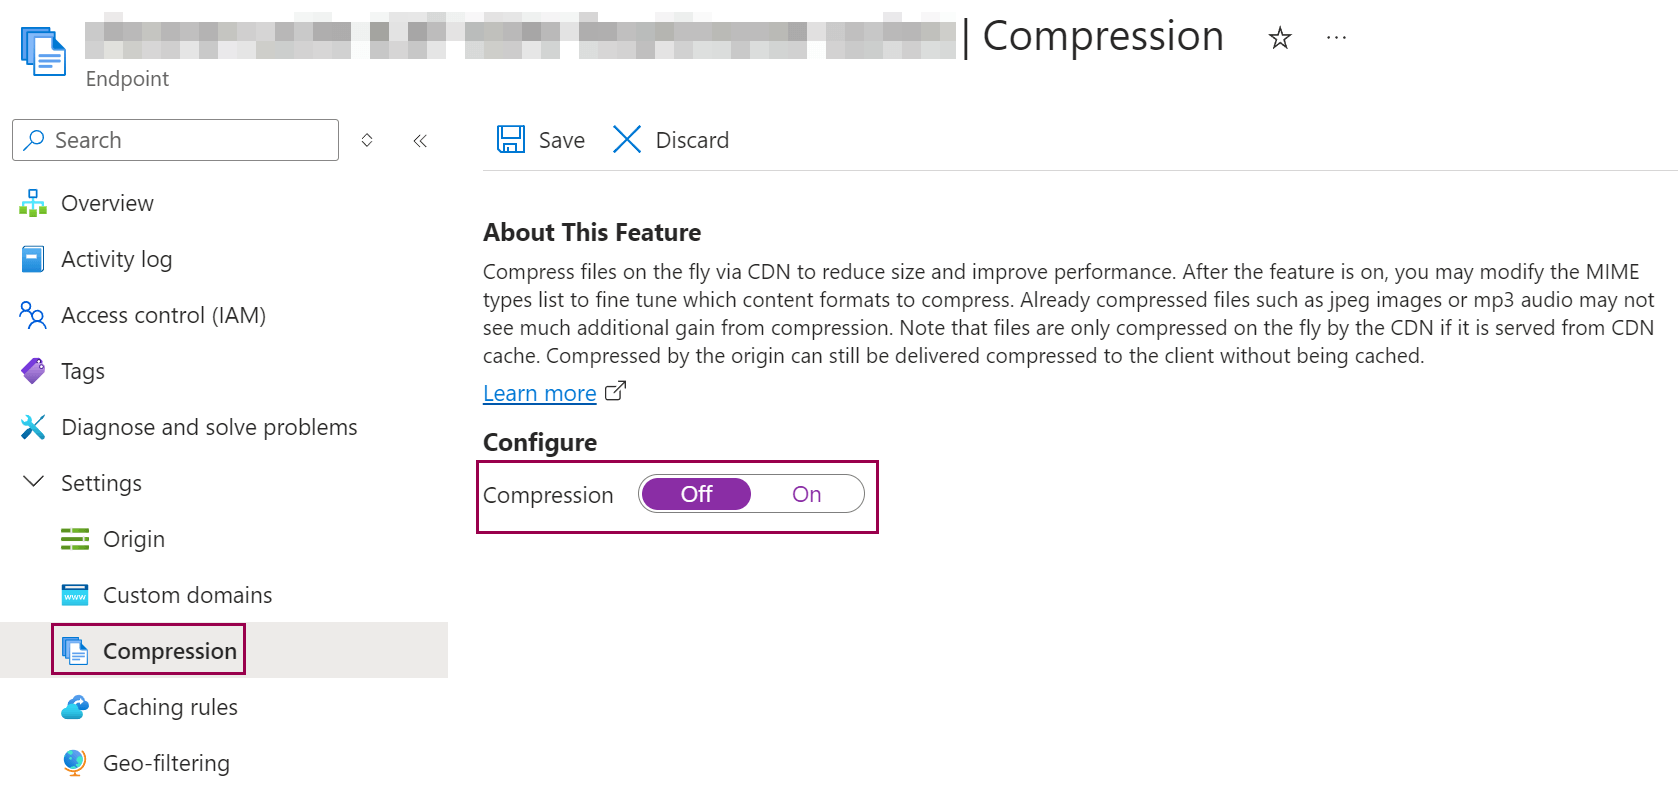
Finally, disable compression and confirm with 'Save'.
We also want to change the 'Caching Rules' configuration as follows, set the 'Caching Behaviour' to 'Bypass cache' and confirm the changed configuration with the 'Save' button.
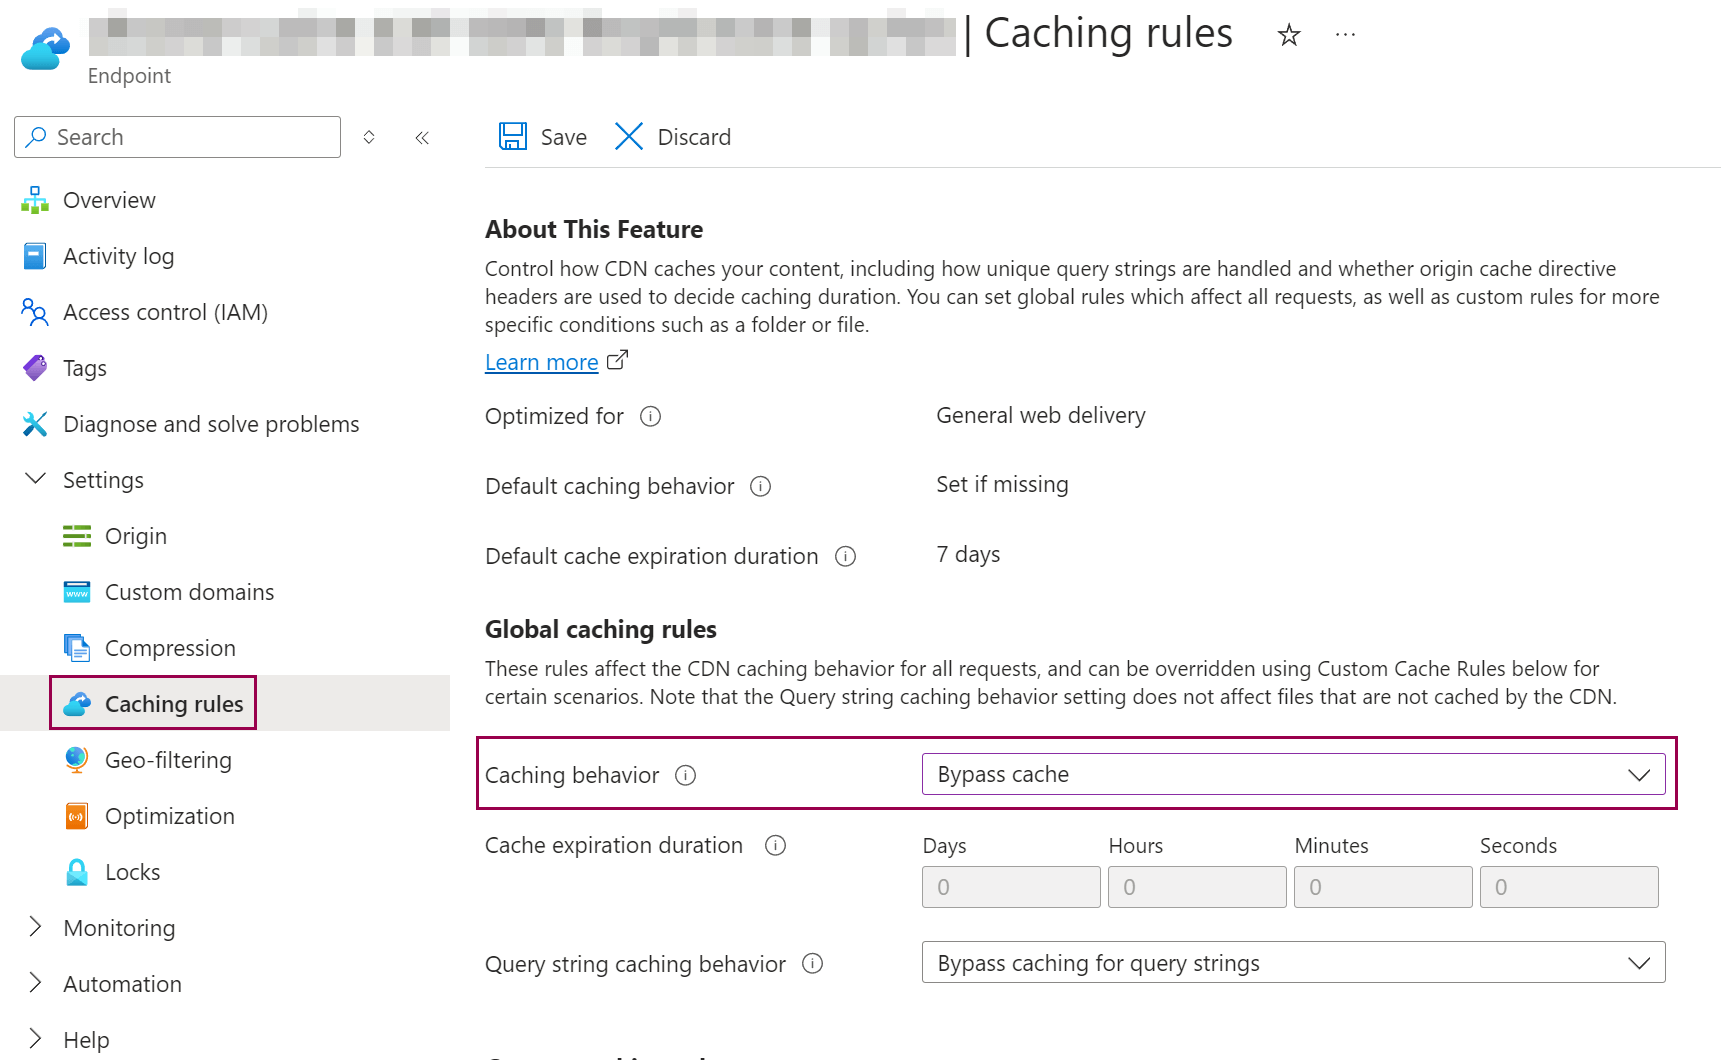
This completes the configuration of our CDN endpoint.
Summary Azure
Our preparations at Microsoft Azure are now complete. We have successfully installed and configured a VM for our Nginx reverse proxy and a VM for our Cobalt Strike Team server. Both VMs have an internal static IPv4 address, are on the same virtual network and can therefore communicate with each other internally.
For security reasons, we have configured both VMs to only allow incoming SSH connections from specific IP addresses, so that we can control who is allowed to connect via SSH. In addition, both VMs allow incoming HTTPS connections, with our Nginx VM accepting HTTPS requests without restriction, while the Cobalt Strike VM only allows incoming HTTPS connections from the internal IPv4 address of the Nginx VM.
We have also opened port 50050 on the Cobalt Strike VM, which is required for communication between the Cobalt Strike Team server and the client. Similar to the SSH connections, we have restricted access to certain IP addresses in order to control exactly who can connect to the team server from which IP addresses via the Cobalt Strike client. With this configuration, we have a solid foundation for secure and controlled management of our C2 infrastructure.
Nginx - Reverse Proxy
In the next step, we will connect to our Nginx VM via SSH and start installing and configuring the Nginx reverse proxy. However, before we dive into the details of the configuration, it is important to understand what a reverse proxy is, how it can be used in the context of command and control (C2) traffic, and how it differs from a simple redirector such as socat or iptables.
What is a Reverse Proxy?
A reverse proxy (in our case Nginx) is a server that receives requests from clients (implant at the target - beacon) and forwards them to a backend server (in our case our Cobalt Strike Team server). In simple terms, the reverse proxy in our C2 setup acts as an intermediary between the client (beacon) and the backend server (team server), with the client not contacting the actual backend server directly and, in simple terms, not even knowing which server is behind the Nginx reverse proxy. The reverse proxy thus hides the identity and location of the backend server, protecting it from direct attack.
In addition, a reverse proxy offers many benefits, such as load balancing by distributing incoming traffic across multiple backend servers to avoid congestion. It can also act as a security barrier, filtering requests before they reach the backend server and providing SSL/TLS termination, which simplifies the management of encryption certificates. In addition, a reverse proxy can cache content to improve response times and reduce the load on back-end servers.
In contrast, a classic proxy server, also known as a forward proxy, works on the client side. While the forward proxy is used by the client to send requests to the Internet and may filter content or control access, the reverse proxy sits on the server side and manages incoming requests from clients. The forward proxy therefore acts as an agent for the client, while the reverse proxy acts as an agent for the server.
This distinction is critical to understanding the respective roles of the two types of proxies within a network infrastructure. While the forward proxy exercises control on the client side, the reverse proxy enables efficient and secure traffic management on the server side.
Reverse Proxy in Context of C2
As part of our C2 infrastructure, we use the Nginx reverse proxy as an intelligent intermediary that forwards HTTPS requests from our beacon to the Cobalt Strike Team server. Unlike a simple redirector, such as one using socat or iptables, which forwards all incoming HTTPS requests to the Cobalt Strike Team server indiscriminately, the Nginx reverse proxy allows specific criteria to be defined in the configuration.
For example, with Nginx, we can specify that only HTTPS requests containing certain URIs or host headers (as defined in the Cobalt Strike Team Mallable profile) are passed to the Cobalt Strike Team server. This means that the Nginx reverse proxy is able to intelligently filter incoming HTTPS requests. Only requests that match our defined criteria and are destined for the Cobalt Strike Team server are actually forwarded.
This approach significantly increases the security of our C2 infrastructure by protecting the command and control server from unwanted access by Blue Team security measures, automated scanners, sandboxes and other potential threats. By using Nginx to filter legitimate traffic, we are making a significant contribution to the security and efficiency of our C2 infrastructure.
Nginx - Setup
Now that we have covered the theoretical side of reverse proxies in the context of command and control, we can move on to the practical side of installation and configuration.
SSL Certificat
Before we start configuring Nginx, we will use Certbot to create an SSL certificate for our C2 domain, which we will use on the Nginx VM. This is necessary because our Cobalt Strike server will not be using a dedicated SSL certificate.
However, as our CDN operates on layer 7 (application layer), it is necessary that the remote peer, in this case our Nginx reverse proxy, has a valid SSL certificate. This ensures that the CDN service can communicate properly with our proxy without triggering security warnings.
The following certbot command can be used to create the SSL certificate, where domain.com must be replaced with the name of your own C2 domain.
certbot certonly --manual --preferred-challenges=dns --email admin@domain.com --server https://acme-v02.api.letsencrypt.org/directory --agree-tos -d '*.domain.com' -d 'domain.com'After executing the certbot command, we get the value for the first _acme_challenge, which we will have to enter in the DNS settings of our C2 domain. Once this value has been noted, press Enter to proceed to the next step. You will now be shown the value for the second _acme_challenge, which will also need to be stored as a TXT record in the DNS of the C2 domain.
These TXT records are an integral part of the verification process that Let's Encrypt (via Certbot) uses to ensure that you are in control of the domain. Once both _acme_challenge records are correctly set in the DNS of your C2 domain, the verification process can be completed and the SSL Certificate issued.
The following figure shows an example of the certbot process for domain.com. This name must of course be replaced with the actual domain of your C2 infrastructure that you intend to use for your C2 operations.
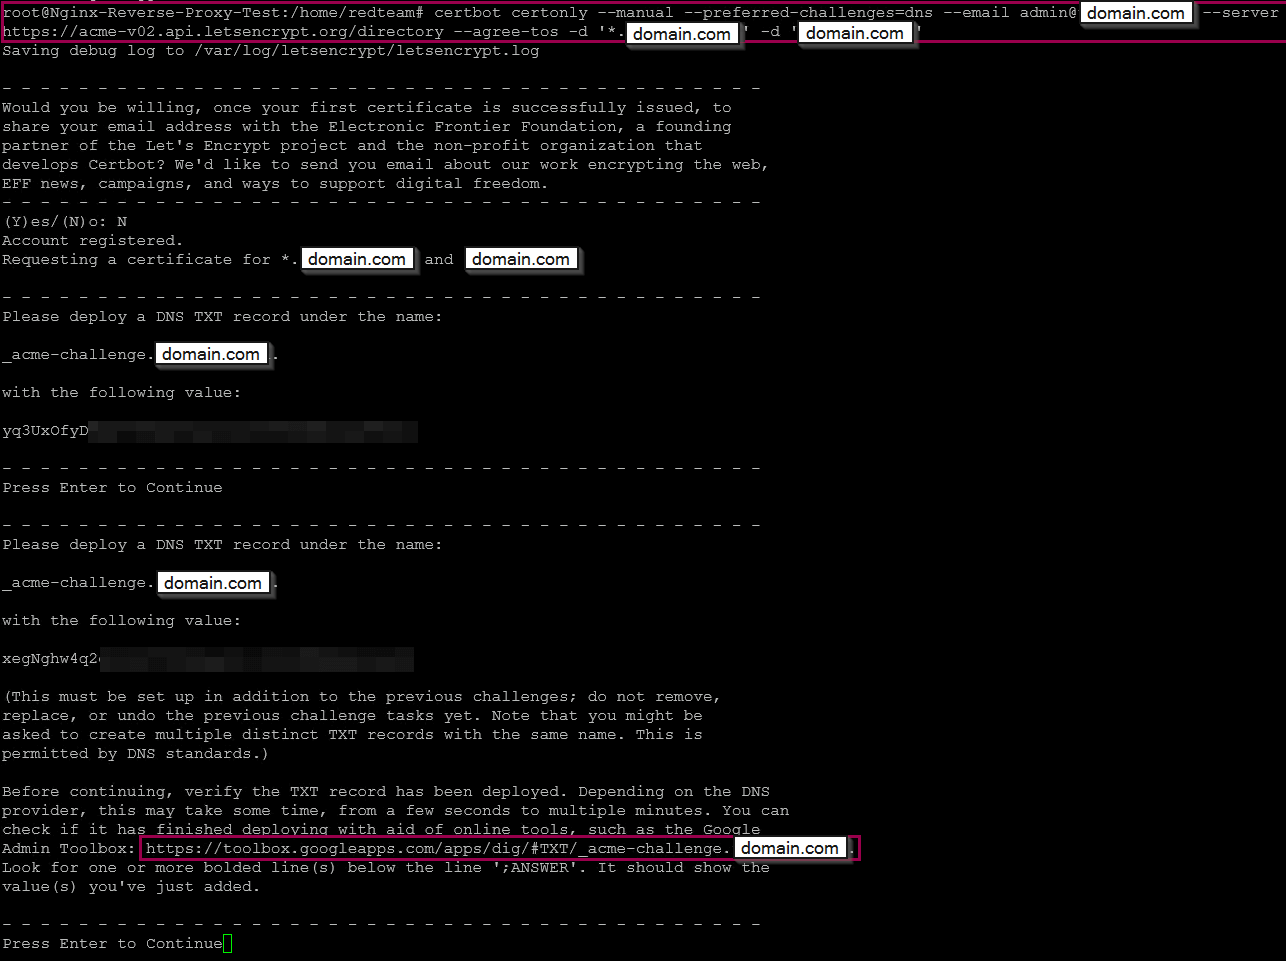
This is an important step to ensure that the CDN service can successfully access the Nginx instance, as a valid SSL certificate is required for Layer 7 communication.

After the two entries have been made in the DNS of the C2 domain, you should wait about 5-10 minutes before pressing Enter to complete the process of issuing the Certbot certificates. This wait time is important because it may take some time for the DNS changes to propagate globally and for the new TXT records to be fully processed.
The wait time ensures that Let's Encrypt can correctly recognise and verify the TXT records so that the certificate issuance process can be completed successfully. Once this time has elapsed, press Enter to continue the Certbot process and the SSL Certificate for the C2 domain will be issued.

This completes the creation of the SSL certificate and we can start the actual installation and configuration of the Nginx reverse proxy.
Nginx - Configuration
If Nginx is not already installed on the Linux VM, we use the following command to install it on Ubuntu.
apt install nginxThe next step is to delete the file containing the default configuration of nginx with the following command
rm /etc/nginx/sites-enabled/defaultNow we will create a new default configuration file for Nginx in which we will configure our reverse proxy configuration.
nano /etc/nginx/sites-enabled/defaultFor the new default configuration we will use the following parameters, where domain.com must of course be replaced with your own C2 domain. In this configuration we define the path to the SSL certificate we have created with Certbot. We also use the proxy_pass parameter to define the IP address to which valid HTTPS requests will be redirected. This is the internal IPv4 address of the Cobalt Strike Team server, and since this is HTTPS traffic, we use port 443.
An important aspect of this configuration is what criteria the Nginx reverse proxy uses to decide whether an incoming HTTPS request is legitimate and should be forwarded to the Cobalt Strike Team server. This decision is made by defining the URIs for GET and POST requests, which are later entered into the Cobalt Strike Malleable profile. In this case we use lib-8f74c3d1.min.js for GET requests and app.7e5b9f2a.bundle.js for POST requests.
In simple terms, this means that when we have finished configuring the Cobalt Strike Malleable Profile and, for example, create a test payload with the configured listeners, the defined URIs will also be included in that payload. When the beacon finally attempts to connect to the team server via the CDN -> DNS -> Nginx route, the Nginx reverse proxy will recognise these URIs as legitimate parts of the incoming HTTPS request. This allows the proxy to identify the request as legitimate traffic from our Cobalt Strike beacon and forward the HTTPS traffic to the team server accordingly.
This method ensures that only specially configured requests are passed through the Nginx reverse proxy, providing an additional layer of security and filtering between the external network and the Cobalt Strike team server.
server {
    listen 443 ssl default_server;           # Listen on port 443 for HTTPS as the default server for this IP.
    listen [::]:443 ssl default_server;      # Listen on port 443 for HTTPS on all IPv6 addresses as the default server.

    ssl_certificate /etc/letsencrypt/live/domain.com/fullchain.pem;  # Path to the SSL certificate file.
    ssl_certificate_key /etc/letsencrypt/live/domain.com/privkey.pem;  # Path to the SSL certificate private key file.

    client_max_body_size 200M;               # Set the maximum allowed size of client request body to 200MB.
    root /var/www/html;                      # Set the document root to serve files from /var/www/html.
    server_name _;                           # Catch-all server block (matches any server name).

    location ~ ^/(lib-8f74c3d1.min.js|app.7e5b9f2a.bundle.js) {
        client_max_body_size 200M;           # Override the client body size limit to 200MB for these specific files.
        proxy_pass https://10.3.0.5:443;     # Proxy requests for these files to another server at 10.3.0.5 over HTTPS.
    }
}
This completes the configuration of the Nginx reverse proxy. Once we have saved and closed the default configuration file, we will use the following command to ensure that Nginx starts automatically after a reboot.
sudo systemctl enable nginxThe next step is to restart the Nginx service to ensure that the new default configuration is installed and used.
sudo systemctl restart nginxFinally, we will use the following command to check that the nginx service is running correctly.
sudo systemctl status nginx
If the Nginx service is running correctly and the configuration has been done correctly, we are finished configuring the Nginx reverse proxy and can move on to configuring Cobalt Strike.
Cobalt Strike - Setup
In the case of Cobalt Strike, we need to configure two things: on the server side (Team Server) we need to configure the mallable profile correctly, and on the client side we need to create the Cobalt Strike listener correctly. We will start with the mallable profile.
Mallable Profile - Configuration
The Malleable Profile is a key component of Cobalt Strike that allows the network behaviour of the beacon to be customised and obfuscated so that it appears to be legitimate web traffic, making it more difficult to detect. Careful configuration of the Malleable Profile is essential to ensure that communication between the beacon and the Team Server remains discreet and undetectable by security solutions. The Malleable Profile defines various aspects of network communication, such as HTTP headers, URIs, POST data and other parameters used by the beacon to communicate with the Team Server. These customisations are necessary to make C2 traffic appear as legitimate web traffic, minimising the likelihood of it being detected and blocked by security solutions.
URIs
The URIs for GET and POST requests must be configured to match the URIs defined in the Nginx configuration. In our case these are lib-8f74c3d1.min.js for GET requests and app.7e5b9f2a.bundle.js for POST requests. These URIs are not only used to disguise beacon traffic by mimicking legitimate web requests, but also play a central role in the functionality of the Nginx reverse proxy. The proxy uses these URIs to determine whether the request is a legitimate HTTPS request from the beacon. In other words, only if the URIs match correctly will the HTTPS traffic be forwarded from the Nginx reverse proxy to the Cobalt Strike Team server. Otherwise, the request will not be forwarded, providing additional security and blocking unwanted access from scanners, bots, blue teams, etc.
To configure this, open the appropriate Malleable profile, e.g. webbug.profile, and add the appropriate entries in the GET and POST sections. The verb for GET and POST should already be there, you just need to add the URIs for GET and POST. It is important that the URIs for GET and POST are different so that Cobalt Strike and Nginx can distinguish between these two HTTP methods. In our example we use the URI lib-8f74c3d1.min.js for GET and the URI app.7e5b9f2a.bundle.js for POST. These URIs must match exactly those specified in the Nginx configuration to ensure that the Nginx reverse proxy processes the traffic correctly. If the URIs match, the HTTPS traffic will be forwarded to the Cobalt Strike Team server, otherwise the request will be blocked.
Host Header
The Host header must also be defined correctly to ensure that communication via the CDN works smoothly. This header informs the CDN of the domain or sub-domain being addressed and is crucial for the correct forwarding of the request to the Nginx reverse proxy and ultimately to the Cobalt Strike Team server. It is therefore necessary to add the Host parameter to the Malleable profile for both GET and POST requests, specifying as the value the endpoint name we have chosen for our CDN. In this case it would be xyz-cache.azureedge.net. The value for the header must of course be adapted to your own CDN endpoint name.
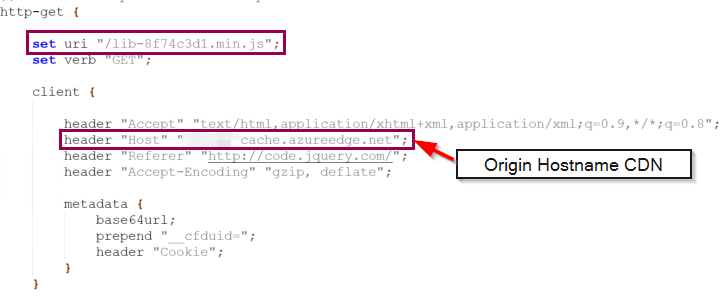
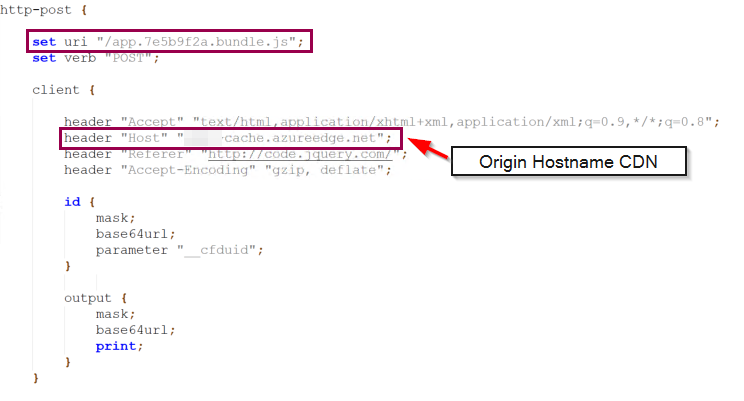
This completes the configuration of the Mallable profile, and the configuration shown ensures that the beacon generates the desired traffic, which is accepted and correctly forwarded by both the CDN and the Nginx reverse proxy.
Cobalt Strike - Listener
Finally, we need to configure our Cobalt Strike listener. To do this, we create an HTTPS listener. In the Hosts field, we enter the CDN domains we want to use to hide our C2 traffic. These domains are the endpoints that we have previously configured for our CDN and play a central role in the communication between the beacon and the Cobalt Strike Team server.
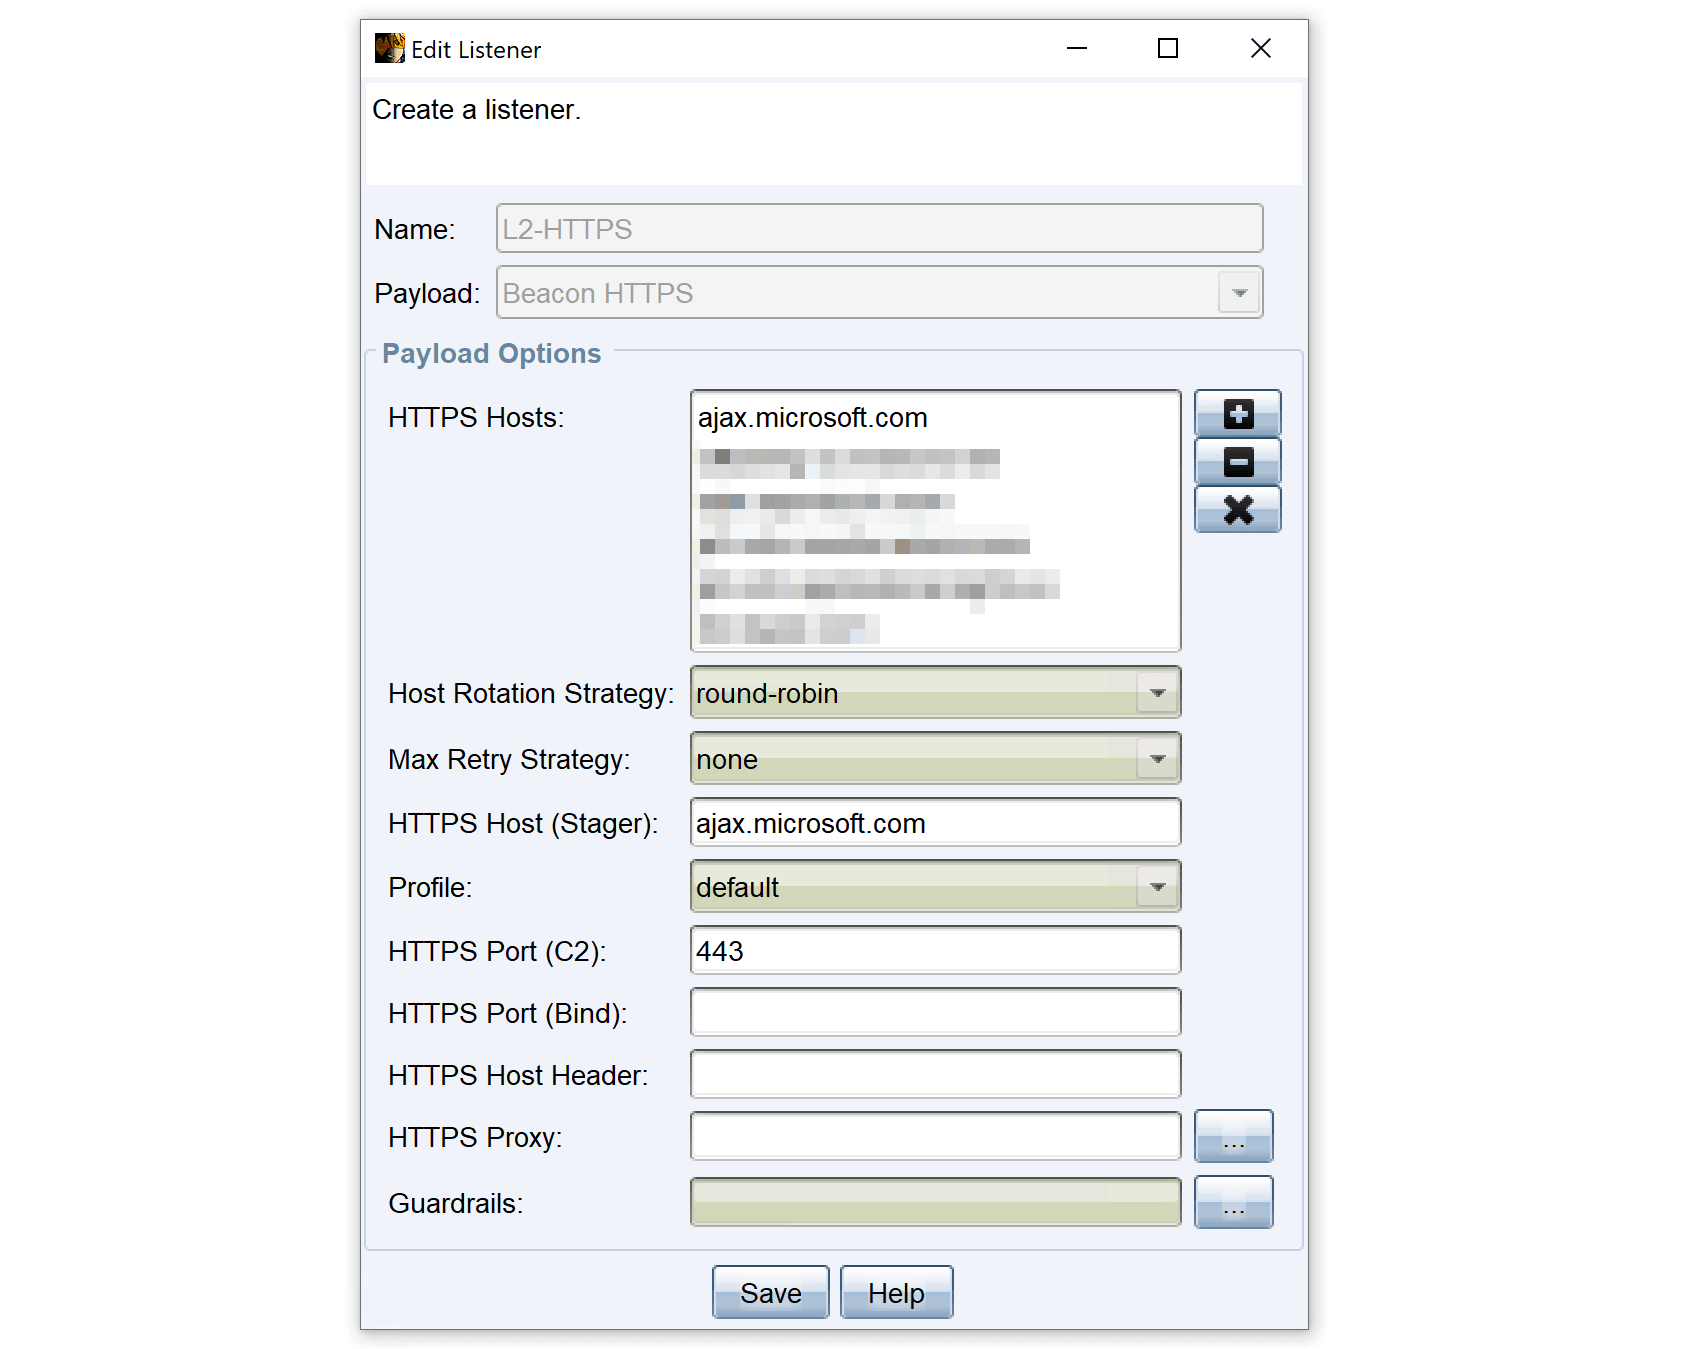
This completes the configuration of Cobalt Strike and our C2 infrastructure, which consists of a CDN, DNS, Nginx, Cobalt Strike Team server and client.
C2-Setup - Test
Finally, we want to test the functionality of our C2 configuration. There are several ways to do this. We can either run a test with curl, or we can create a test payload with Cobalt Strike and see if a command and control connection opens in the Cobalt Strike client.
The first step is to use the following curl command to test whether Nginx will forward our request to the Cobalt Strike team server. The command simulates a POST request through the CDN. Looking closely at the command, we can see that the CDN domain is correctly specified, but the POST URI false_uri.js does not match the URI that we have defined in Nginx and in Cobalt Strike's Malleable profile. We run the command anyway to see what happens.
curl -X POST https://ajax.microsoft.com/false_uri.js -d test -H "host: xyz-cache.azureedge.net"As the URI does not match the URI defined in the Malleable profile and in the Nginx configuration, Nginx could block the request and not forward it to the Cobalt Strike Team server. This would indicate that the security mechanisms are working correctly. Please do not be confused by the fact that I have obscured the host name in this case, as I was using a ready-made setup for this test and did not want to reveal the endpoint name of the CDN.

The next step is to use the curl command again, but this time with the correct URI defined in our Nginx and Malleable profile configuration. Again, I am using a pre-built configuration, so I have pixelated the correct URI for security reasons. This test shows that the connection is successfully established via the path CDN -> DNS C2 domain -> Nginx reverse proxy -> Cobalt Strike Team server.
Compared to the previous test where the wrong URI was used, we can now see that the request is correctly processed and forwarded to the Cobalt Strike Team server. This confirms that our C2 infrastructure is correctly configured and working as planned.

This test ensures that all components of our C2 infrastructure are communicating correctly and that the Nginx reverse proxy is able to reliably route legitimate requests to the Cobalt Strike team server. As an additional test, we can run a payload with Cobalt Strike in the context of our HTTPS CDN listener to ensure that the C2 channel from the beacon to the team server is opened correctly.
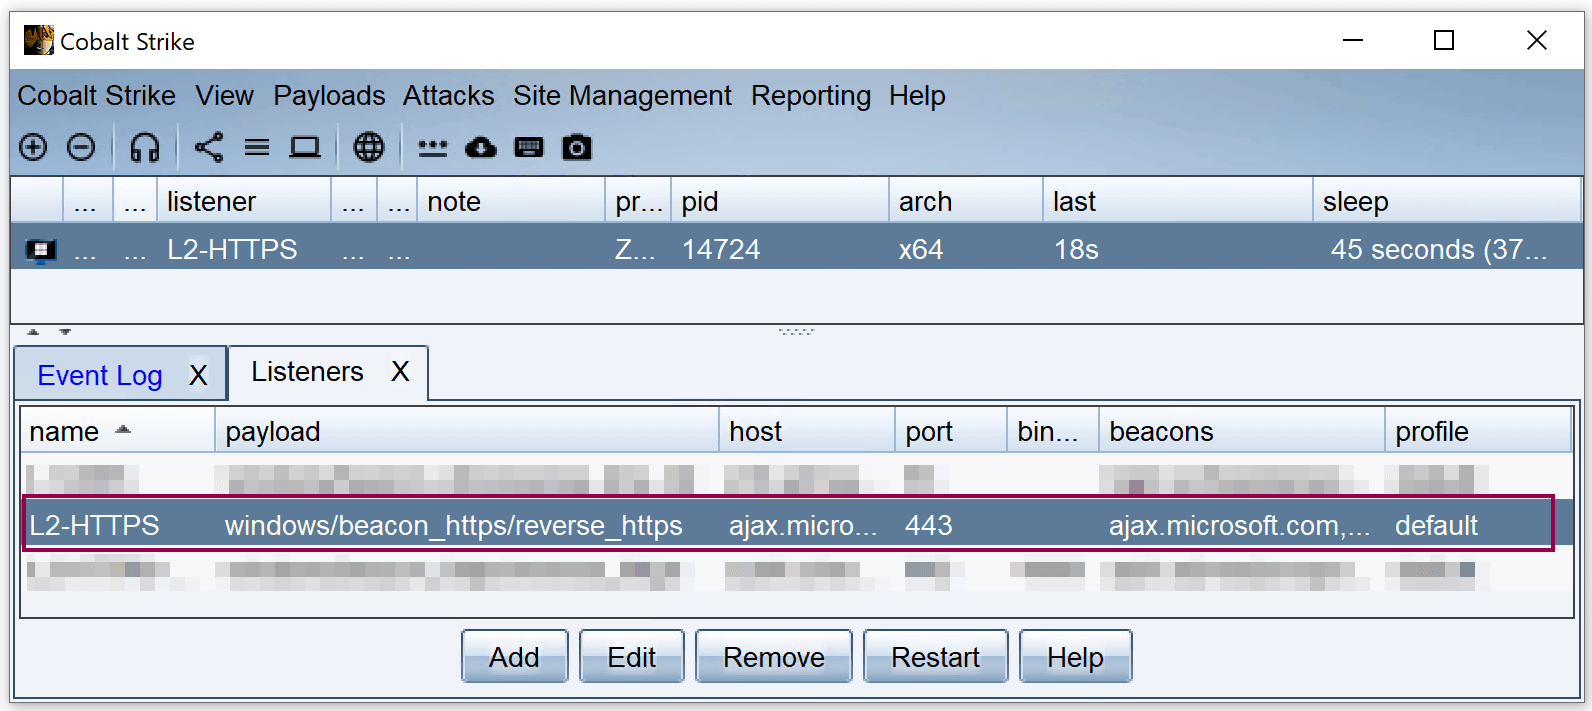
In this scenario, we have configured Nginx and the Cobalt Strike listener so that all communication is over HTTPS, which makes it difficult to analyse the traffic with tools such as Wireshark, as the traffic is encrypted. However, if you want to examine the C2 traffic more closely with Wireshark, you can extend the Nginx configuration to allow unencrypted traffic over port 80. This would involve setting up an HTTP listener under Cobalt Strike and repeating the test using HTTP instead of HTTPS. This approach allows the unencrypted C2 traffic to be analysed and understood in detail.
I will leave it to the reader to set up an HTTP configuration and analyse the unencrypted traffic. This is a good opportunity to familiarise yourself with how the C2 configuration in this article works.
Summary
In this article we presented a possible C2 setup for Cobalt Strike using Microsoft Azure CDNs, a C2 domain and a Nginx reverse proxy for C2 communication between Beacon and Team Server. When setting up the CDN, it was necessary to define an endpoint name, e.g. xyz-cache.azureedge.net. As the origin host, we defined the FQDN of the subdomain of our C2 domain, which points to the public IP of the Nginx reverse proxy via an A record, e.g. docs.domain.com.
The Nginx reverse proxy has been configured to communicate with the CDN via HTTPS and to forward incoming HTTPS requests to the Cobalt Strike Team server only if the URIs for GET and POST are correct. Requests that do not match the defined URIs will be rejected and not forwarded to the team server.
This C2 setup provides a solid foundation for an advanced C2 infrastructure that goes beyond the capabilities of a simple redirector using, for example, socat or iptables to forward incoming HTTPS requests to the team server without filtering. With Nginx we can better protect our team server from unwanted access by scanners, bots or the Blue Team. It is therefore advisable to choose GET and POST URIs that are difficult to guess. Using CDNs also allows us to hide our C2 traffic amongst legitimate CDN traffic, and to use domains with very high reputations for our command and control traffic.
We also investigated how the Malleable profile needs to be configured to ensure that communication via the CDN and Nginx works smoothly. To ensure that communication through the CDN is correct, we added the host header for GET and POST and entered our CDN endpoint name (xyz-edge.azureedge.net). To ensure that the Nginx reverse proxy can correctly forward the incoming connections from our beacon to the team server, we have defined the same URIs for GET (lib-8f74c3d1.min.js) and POST (app.7e5b9f2a.bundle.js) in the Malleable Profile as used in the Nginx configuration. The Malleable Profile configuration is taken into account when creating each Cobalt Strike payload so that the reverse proxy can identify the incoming HTTPS connection from the beacon and forward it correctly to the team server.
Overall, the Cobalt Strike C2 setup shown here, consisting of Edgio CDN, C2 domain and Nginx reverse proxy, provides a solid foundation for a good and secure C2 communications environment by integrating multiple layers of security and making it more difficult for scanners, bots, blue teams, etc. to detect command and control traffic and the Cobalt Strike team server.
Happy Hacking!
Daniel Feichter @VirtualAllocEx