Einführung
Grundsätzlich bietet Cobalt Strike, wie auch andere Command-and-Control (C2) Frameworks, die Möglichkeit, verschiedene Arten von Listenern zu erstellen. Zu den gängigsten Optionen gehören Listener, die über HTTP, HTTPS, DNS, SMB, TCP usw. kommunizieren.
Die Listener-Varianten über SMB und TCP werden typischerweise in der Post-Exploitation-Phase eingesetzt, insbesondere für Lateral Movement, nachdem der Initial Access bereits erfolgt ist. Im Gegensatz dazu kommen die Varianten über HTTP, HTTPS oder DNS häufig zum Einsatz, um den Initial Access im Zielnetzwerk zu erreichen oder um Persistenz aufrechtzuerhalten. Diese Kommunikationswege sind besonders geeignet, um den ersten Kontakt zu einem Zielsystem herzustellen und eine initiale Verbindung aufzubauen.
DNS-Listener spielen hierbei eine besondere Rolle, da sie häufig als sogenannte "Long-Haul-Server" eingesetzt werden, um eine langfristige Netzwerk- oder Domänenpersistenz zu gewährleisten. Dies macht sie zu einer wertvollen Komponente für fortlaufende Operationen, bei denen es entscheidend ist, unbemerkt und dauerhaft im Netzwerk präsent zu bleiben.
In diesem Artikel werden wir die Einrichtung und Konfiguration eines möglichen Setups für die Verwendung eines DNS-Listeners in Cobalt Strike (ab Version 4.0) im Kontext von Microsoft Azure und GoDaddy ausführlich behandeln. Nachfolgend gebe ich einen Überblick über die einzelnen Schritte, die wir im Detail durchgehen werden:
- Warum C2-Traffic via DNS?
- Auswahlkriterien für die C2-Domain
- Erstellen und Konfiguration der Redirector VM in Azure
- Erstellen und Konfiguration der Cobalt Strike VM in Azure
- Konfiguration von DNS in GoDaddy
- Konfiguration des DNS-Listeners in Cobalt Strike
- Testen des DNS-Listeners
Die folgende Abbildung zeigt in vereinfachter Form das in diesem Artikel beschriebene Konzept für den Einsatz eines DNS-Listeners im Rahmen von Cobalt Strike. Sie zeigt die grundlegende Architektur, bestehend aus der Redirector VM, die DNS-Anfragen empfängt und weiterleitet, und der Cobalt Strike VM, die die Anfragen verarbeitet und für die C2-Kommunikation verwendet wird. Die Abbildung soll ein wenig helfen, die Beziehung zwischen den verschiedenen Komponenten und ihre Funktion im Gesamtkonzept zu visualisieren.
DNS-Listener - Warum?
Ein DNS-Listener bietet eine Reihe von Vorteilen und spezifischen Anwendungsfällen im Vergleich zu HTTP- oder HTTPS-Listenern, insbesondere im Kontext von Masquerading und Netzwerkpersistenz. Nachfolgend sind einige wichtige Vorteile aufgeführt:
- Tarnung und Umgehung von Firewalls:
DNS-Anfragen werden in vielen Netzwerken als legitimer Datenverkehr angesehen und daher oft nicht so streng überwacht wie HTTP- oder HTTPS-Traffic. Ein DNS-Listener kann daher helfen, Sicherheitsmaßnahmen wie Firewalls oder Intrusion Detection/Prevention Systeme (IDS/IPS) zu umgehen.
- Persistenz und Langzeitkommunikation:
DNS-Listener sind besonders nützlich für Langzeitoperationen, da DNS-Anfragen oft über lange Zeiträume unbemerkt im Netz verbleiben können. Dies macht DNS-Listener ideal für die Aufrechterhaltung von Netzwerk- oder Domain-Persistenz.
- Umgang mit eingeschränkten Netzwerken:
In stark eingeschränkten oder überwachten Netzwerken, in denen HTTP/HTTPS-Traffic blockiert oder genau überwacht wird, kann DNS als alternative Kommunikationsmethode verwendet werden. Da DNS-Anfragen fast überall zugelassen werden müssen, ermöglicht ein DNS-Listener die Kommunikation auch in solchen Umgebungen.
- Reputation von Domains:
Die Verwendung einer Domain mit guter Reputation für den DNS-Listener erhöht die Wahrscheinlichkeit, dass DNS-Anfragen unverdächtig bleiben und nicht blockiert oder genauer untersucht werden. Eine vertrauenswürdige Domain kann helfen, Sicherheitslösungen wie Inhaltsfilter oder DNS-basierte Bedrohungserkennungssysteme zu umgehen.
Natürlich hat die Verwendung eines DNS-Listeners nicht nur Vorteile; die möglichen Nachteile sind unten aufgeführt:
- Begrenzter Datendurchsatz:
DNS ist nicht für die Übertragung großer Datenmengen ausgelegt, was die Bandbreite und Geschwindigkeit der Kommunikation einschränkt. Dies macht DNS-Listener weniger geeignet für große Datenübertragungen oder schnelle Command and Control Kommunikation. - Erhöhte Komplexität:
Die Implementierung und Wartung eines DNS-Listeners ist komplexer als die eines HTTP- oder HTTPS-Listeners. - Möglichkeit der Erkennung:
Obwohl DNS-Traffic häufig weniger überwacht wird, bedeutet dies nicht, dass er völlig unsichtbar ist. Anomalien im DNS-Traffic, wie ungewöhnlich häufige oder große DNS-Anfragen, können von fortschrittlichen Sicherheitslösungen erkannt und analysiert werden.
Auswahl C2-Domain
Für die Auswahl einer C2-Domain (im Folgenden Domain genannt), die in Verbindung mit einem DNS-Listener in Cobalt Strike verwendet werden soll, gibt es verschiedene Ansätze. Einerseits kann man eine neue Domain registrieren und diese schrittweise aufbauen, indem man sie altern lässt und ihre Reputation aufbaut. Zum anderen besteht die Möglichkeit, eine bereits abgelaufene Domain über Dienste wie expireddomains.net zu erwerben. In der Praxis ist es im Rahmen eines Red Team Engagements aus Zeitgründen meist notwendig, eine expired Domain zu kaufen, die im Kontext des jeweiligen Szenarios verwendet werden kann.
Vor dem Kauf oder der Registrierung einer Domain sollte jedoch darauf geachtet werden, dass die Domain möglichst alt ist, eine gute Reputation hat und nicht auf den Blacklists von Security Vendoren steht.
Azure - Redirector
Wir beginnen mit der Erstellung einer neuen VM in Azure, die als DNS-Redirector für unseren Cobalt Strike Team Server fungiert. Dieser Redirector hat die Aufgabe, den direkten Zugriff auf den Teamserver über dessen öffentliche IP-Adresse zu verhindern, indem er als Bindeglied zwischen dem am Zielort ausgeführten Implant (Beacon) und dem Cobalt Strike Team Server fungiert. Es ist jedoch wichtig zu beachten, dass die Verwendung eines einfachen Redirectors, wie z.B. socat oder iptables, keinen vollständigen Schutz vor unerwünschten Zugriffen durch EDR-Sandboxen, Scanner, Blue Teams und ähnliche Sicherheitsmaßnahmen bietet.
Im Folgenden wird auf die Konfiguration der VM eingegangen, wobei zu beachten ist, dass nur auf die Punkte eingegangen wird, die konfiguriert bzw. geändert werden.
Basic Settings
Im nächsten Schritt beginnen wir mit der Grundkonfiguration der virtuellen Maschine (VM). Voraussetzung dafür ist ein aktives Azure-Abonnement (Subscription). Anschließend ordnen wir die VM einer Resource Group zu, vergeben einen Namen, wählen eine geeignete Region sowie ein geeignetes Image aus und nehmen die weiteren Grundeinstellungen vor. Die folgende Abbildung zeigt die konfigurierten Grundeinstellungen unserer neuen VM, die als DNS-Redirector dienen soll.
Ein besonders wichtiger Aspekt bei der Konfiguration ist die sorgfältige Auswahl der Region. Diese sollte möglichst mit dem Standort des Ziels übereinstimmen, um Anomalien bei ausgehenden DNS-Anfragen im Zielnetzwerk zu vermeiden. Eine nicht übereinstimmende Region könnte verdächtig erscheinen und unerwünschte Aufmerksamkeit auf den Datenverkehr lenken.
Disks Settings
Wie in der folgenden Abbildung gezeigt, setzen wir die Einstellung für "OS disk type" auf "Standard SSD (locally-redundant storage)". Der Rest der Konfiguration bleibt unverändert.
Review & Create VM
Damit ist die Konfiguration der Linux-VM für unseren Redirector abgeschlossen. Nicht aufgeführte Einstellungen wurden nicht verändert und sind daher nicht explizit erwähnt. Im letzten Schritt führen wir eine Überprüfung der VM-Konfiguration durch, bevor wir die VM erstellen.
Redirector - Konfiguration Network Settings
Nachdem die VM erstellt wurde, können wir mit der Konfiguration der Netzwerkeinstellungen fortfahren. In diesem Abschnitt konzentrieren wir uns nur auf die Konfigurationselemente, die angepasst oder hinzugefügt wurden. Da wir bei der Erstellung der VM alle eingehenden Ports deaktiviert haben, beginnen wir nun damit, diese Einstellungen entsprechend unseren Anforderungen zu ändern.
Wie in der folgenden Abbildung zu sehen ist, erlauben wir den SSH-Zugriff auf unsere Linux Redirector VM, beschränken diesen aber auf bestimmte IP-Adressen. Das bedeutet, dass der Zugriff auf die VM über SSH nur von diesen bestimmten IP-Adressen möglich ist, um unbefugten Zugriff zu verhindern.
Zusätzlich öffnen wir den Port für DNS (UDP). Im Gegensatz zu SSH beschränken wir diesen jedoch nicht auf bestimmte IP-Adressen. Dies ist wichtig, da wir in einem Red-Teaming-Szenario die öffentlichen IP-Adressen unseres Ziels in der Regel nicht im Voraus kennen. Daher müssen wir eingehende DNS-Anfragen an den Redirector ohne Einschränkung akzeptieren. Mit anderen Worten: Eine Beschränkung des DNS-Zugriffs auf bestimmte IP-Adressen oder Domains könnte dazu führen, dass unser Redirector eingehende DNS-Anfragen des Ziels blockiert und damit die korrekte Weiterleitung zum Cobalt Strike Team-Server verhindert.
Nachdem wir die Konfiguration der Redirector-VM in Azure abgeschlossen haben, werden wir später auf die gleiche Weise eine VM für den Cobalt Strike Team-Server erstellen. Wie im späteren Abschnitt über die Konfiguration der eingehenden Regeln für den Cobalt Strike Team-Server erläutert wird, möchten wir eingehende DNS-Anfragen auf die interne IPv4-Adresse unserer Redirector-VM beschränken. Um dies zu erreichen, konfigurieren wir die interne IP-Adresse der Redirector-VM als statische IPv4-Adresse.
Es ist wichtig, dass sowohl die Redirector VM als auch die Cobalt Strike VM Teil desselben virtuellen Netzwerks sind. Durch diese Konfiguration können beide VMs über ihre internen IPv4-Adressen kommunizieren. Ohne diese Konfiguration wäre die DNS-Redirection über die interne IPv4-Kommunikation nicht möglich und wir wären gezwungen, mit der öffentlichen IP-Adresse der Cobalt Strike VM im DNS-Kontext zu arbeiten, was in diesem Szenario nicht wünschenswert ist.
Damit ist die Konfiguration unserer Redirector VM abgeschlossen und wir können mit der Erstellung der Cobalt Strike VM fortfahren.
Azure - Cobalt Strike
Grundsätzlich gibt es verschiedene Ansätze für die Nutzung, Konfiguration und den Betrieb des Cobalt Strike Team Servers. Zum einen kann der Team Server im eigenen internen Netzwerk betrieben werden. Zum anderen besteht die Möglichkeit, den Team Server auf einer Cloud-Plattform wie Microsoft Azure zu hosten.
In unserem Fall haben wir uns dafür entschieden, den Cobalt Strike Team Server in Microsoft Azure zu betreiben. Dazu erstellen wir eine VM in Azure, die sich im selben virtuellen Netzwerk wie die zuvor erstellte Redirector VM befindet. Die Erstellung dieser VM unterscheidet sich nicht von der Erstellung der Redirector VM und kann daher auf die gleiche Weise durchgeführt werden.
Cobalt Strike - Konfiguration Network Settings
Auch für die Cobalt Strike VM nehmen wir die notwendige Netzwerkkonfiguration vor. Wie auch bei der Redirector VM wird die Cobalt Strike VM nur von bestimmten IP-Adressen über SSH erreichbar sein. Damit wird sichergestellt, dass nur autorisierte Benutzer auf die VM zugreifen können.
Zusätzlich öffnen wir den Port 50050, der für die Verbindung zwischen dem Cobalt Strike Client und dem Cobalt Strike Team Server benötigt wird. Auch hier beschränken wir den Zugriff auf diesen Port auf bestimmte IP-Adressen, um sicherzustellen, dass nur ausgewählte IPs über Port 50050 mit dem Team Server kommunizieren können.
Zusätzlich erlauben wir den DNS-Traffic über UDP, beschränken aber im Gegensatz zur Redirector VM die eingehenden Verbindungen auf bestimmte IP-Adressen. In diesem Fall erlauben wir im DNS-Kontext nur eingehende Anfragen von der internen IPv4-Adresse unseres Redirectors (in diesem Fall 10.0.0.8). Diese Konfiguration stellt sicher, dass nur der Redirector DNS-Anfragen an die Cobalt Strike VM weiterleiten kann, was die Sicherheit und Kontrolle des Datenverkehrs weiter erhöht.
Wir werden auch die interne IPv4 Adresse der Cobalt Strike VM als statische IP konfigurieren. Dieser Schritt ist wichtig, da wir später iptables auf der Redirector VM verwenden werden, um den gesamten Verkehr für Port 53 (DNS) an die interne IPv4-Adresse der Cobalt Strike VM umzuleiten.
Indem wir die interne IP der Cobalt Strike VM auf statisch setzen, ähnlich wie bei der Konfiguration der Redirector VM, stellen wir sicher, dass eingehende DNS-Pakete auf der Redirector VM konsistent und korrekt an die Cobalt Strike VM weitergeleitet werden.
Zusammenfassung Azure
Unsere Vorbereitungen in Microsoft Azure sind nun abgeschlossen. Wir haben eine VM für unseren Cobalt Strike Teamserver erstellt und so konfiguriert, dass eingehende Verbindungen auf Port 22 (SSH) und Port 50050 (Cobalt Strike Client) nur von bestimmten öffentlichen IP-Adressen akzeptiert werden. Zusätzlich haben wir die Inbound-Regeln so angepasst, dass DNS-UDP-Verbindungen nur von der internen IPv4-Adresse unseres Redirectors (in diesem Fall 10.0.0.8) zugelassen werden.
Der Redirector wurde ebenfalls auf die gleiche Weise erstellt und konfiguriert, um eine sichere und zielgerichtete Kommunikation zwischen den beiden VMs zu gewährleisten. Wie bereits erwähnt, ist es wichtig, dass sich beide VMs im gleichen virtuellen Netzwerk befinden. Dies ermöglicht die Kommunikation über die interne IPv4-Adresse, die für das reibungslose Funktionieren des DNS-Redirection-Konzepts erforderlich ist.
Traffic Redirection
Um den eingehenden DNS-Traffic auf der Redirector VM in Azure korrekt an die Cobalt Strike VM weiterzuleiten, konfigurieren wir eine Weiterleitung mit iptables. Ziel ist es, alle eingehenden Anfragen auf Port 53 (DNS) der Redirector VM an Port 53 der internen IP-Adresse der Cobalt Strike VM weiterzuleiten (in diesem Fall 10.0.0.5).
Zuerst stellen wir eine SSH-Verbindung zur Redirector VM her, z.B. mit Putty. Nach erfolgreichem Login empfiehlt es sich, innerhalb der SSH-Verbindung mit dem Befehl screen eine neue Terminal-Session zu öffnen (siehe unten). Dies verhindert, dass der Cobalt Strike Team Server beendet wird, falls die SSH-Session unterbrochen wird.
# Start a new screen session with a specific name
screen -S CSDNS  # Creates a new screen session named "CSDNS"
Anbei noch ein paar weitere nützliche screen commands.
# Detach from the current screen session
# Press Ctrl + A, then D  # This will detach from the "CSDNS" session without closing it

# List all active screen sessions
screen -ls  # Shows a list of all current screen sessions

# Reattach to an existing screen session
screen -r CSDNS  # Reattaches to the "CSDNS" session

# Terminate the screen session
# Inside the screen session, type:
exit  # Ends the "CSDNS" screen session
Sobald die Sitzung läuft, richten wir die iptables-Weiterleitung ein. Dazu führen wir folgenden Befehl aus, wobei die Platzhalter-IP-Adresse 10.0.0.5 durch die interne IPv4-Adresse der eigenen Cobalt Strike VM ersetzt werden muss.
# Allow incoming DNS requests on port 53 (UDP and TCP)
iptables -I INPUT -p udp --dport 53 -j ACCEPT

# Forward incoming DNS traffic to the internal IP 10.0.0.5 on port 53 (UDP and TCP)
iptables -t nat -A PREROUTING -p udp --dport 53 -j DNAT --to-destination 10.0.0.5:53

# Allow forwarding of the DNS traffic
iptables -I FORWARD -p udp --dport 53 -j ACCEPT

# Enable masquerading for NAT (source NAT) to ensure proper routing of responses
iptables -t nat -A POSTROUTING -j MASQUERADE

# Enable IP forwarding (required for routing packets)
sysctl net.ipv4.ip_forward=1
Wenn die Redirection über iptables eingerichtet ist und funktioniert, drücken Sie Strg+A und dann D, um die Sitzung zu beenden.
DNS Konfiguration
In diesem Fall verwenden wir GoDaddy als Registrar und schauen uns an, wie der DNS für unsere Domain konfiguriert werden muss. Zuerst erstellen wir einen "A"-Record im DNS, dem wir einen Namen geben, zum Beispiel "info". Dieser "A"-Record wird so konfiguriert, dass er auf die öffentliche IPv4-Adresse der Redirector-VM in Azure verweist.
Zusätzlich werden zwei Namenserver-Einträge erstellt, die auf den zuvor erstellten "A"-Eintrag verweisen. Die Namen der beiden Nameserver sind frei wählbar, in diesem Fall verwenden wir "blog" und "login". Diese Nameserver werden später in der Listener-Konfiguration von Cobalt Strike verwendet.
Nachdem die DNS-Konfiguration unserer Domain abgeschlossen ist, können wir mit der Einrichtung des DNS-Listeners im Cobalt Strike Client fortfahren.
Cobalt Strike - DNS Listener
Um unsere Domain im Zusammenhang mit einem DNS-Listener in Cobalt Strike zu verwenden, müssen wir einen neuen Listener erstellen. Für die Payload wählen wir die Option "Beacon DNS". Anschließend fügen wir die Fully Qualified Domain Names (FQDNs) der beiden zuvor erstellten Nameserver-Einträge als "DNS Hosts" hinzu. Der FQDN des "A"-Record-Eintrags, den wir für die Redirector-VM konfiguriert haben, wird als "DNS Host (Stager)" eingetragen. Die restlichen Einstellungen des DNS-Listeners können unverändert bleiben.
Diese Konfiguration ermöglicht es dem DNS-Listener, Anfragen über die korrekt konfigurierten DNS-Records zu verarbeiten und so die Verbindung zwischen dem Beacon und dem Cobalt Strike Team Server herzustellen.
DNS-Listener Test
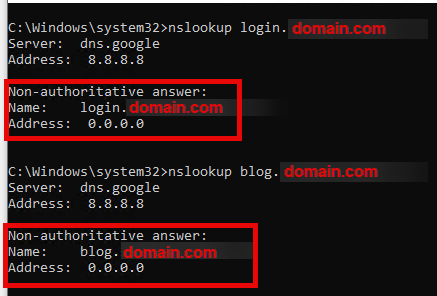
Wenn bisher alles richtig konfiguriert wurde, sollten nun alle Vorbereitungen abgeschlossen sein und eine Kommunikation über DNS zu unserem Cobalt Strike Teamserver im Kontext unserer Domain möglich sein. Um dies zu überprüfen, führen wir als ersten Test den Befehl nslookup auf die FQDNs der beiden Nameserver unserer Domain aus.
Wenn die Konfiguration erfolgreich war, erhalten wir als Antwort vom Cobalt Strike Team Server die IP-Adresse 0.0.0.0, wie unten dargestellt. Diese Antwort zeigt an, dass der DNS-Listener auf dem Cobalt Strike Team Server korrekt konfiguriert ist und Anfragen über die konfigurierten DNS-Records verarbeitet werden können.
DNS-Beacon Test
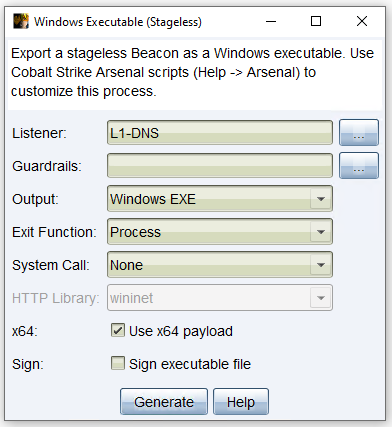
Abschließend überprüfen wir die Funktionalität unseres DNS-Listeners, indem wir eine "Windows Stageless Payload" erstellen und unseren DNS-Listener als Listener auswählen. Für diesen Test ist es nicht notwendig, die anderen Einstellungen der Payload-Konfiguration zu ändern.
Nachdem wir die Payload erstellt haben, können wir sie ausführen und beobachten, ob die Verbindung zum Cobalt Strike Team Server erfolgreich hergestellt wird. Wenn der DNS-Listener korrekt funktioniert, sollte sich der Beacon erfolgreich über DNS mit dem Teamserver verbinden, was die erfolgreiche Konfiguration bestätigt.
Als nächstes führen wir die generierte beacon_x64.exe auf einem Host in unserem LAB aus, auf der AV/EPP/EDR deaktiviert ist. Wenn alles richtig funktioniert hat, sollte unsere Cobalt Strike DNS Payload erfolgreich mit dem DNS Listener kommunizieren. Dies bedeutet, dass der Beacon eine Verbindung zum Cobalt Strike Team Server über DNS hergestellt hat, was den Erfolg der gesamten Konfiguration bestätigt. Wenn die Verbindung erfolgreich war, können Sie dies in der Cobalt Strike Oberfläche sehen, wo der Beacon als aktiver Agent angezeigt wird.
Um die Initialisierung des DNS-Beacons abzuschließen, müssen wir noch mit dem DNS-Beacon interagieren und einen Checkin durchführen. Erst dann können wir den DNS-Beacon für die Kommunikation oder für eine spätere Post-Exploitation verwenden.
Zusammenfassung
In diesem Blogeintrag haben wir ein mögliches Setup für die Nutzung von C2-Traffic über DNS Beacon bzw. DNS Listener vorgestellt. Dazu haben wir zwei VMs in Microsoft Azure erstellt: Eine Redirector VM, die DNS-Anfragen von unserem DNS Beacon empfängt und diese mit Hilfe von iptables unter Linux auf Port 53 an die interne IPv4-Adresse der Cobalt Strike VM weiterleitet, die ebenfalls in Azure erstellt wurde.
Zusätzlich wurde die DNS-Konfiguration besprochen, die notwendigen Befehle für ein korrektes Routing mit iptables erklärt, die Einrichtung des DNS-Listeners für Cobalt Strike (ab Version 4.0) erläutert und schließlich die Schritte zur Überprüfung der Funktionsfähigkeit des DNS-Listeners beschrieben.
Diese Konfiguration bietet eine solide Grundlage für die Nutzung von DNS-basiertem C2-Traffic in einer sicheren und kontrollierten Umgebung im Rahmen von Cobalt Strike. Es ist jedoch wichtig zu betonen, dass diese Konfiguration aus Sicht des Red Teams keinen vollständigen Schutz vor Webscannern, Sandboxes oder dem Blue Team bietet. Wer tiefer in die Materie einsteigen und seine Sicherheit erhöhen möchte, sollte sich z.B. RedWarden von mgeeky ansehen. RedWarden bietet erweiterte Optionen, um Ihre C2-Infrastruktur besser vor Entdeckung zu schützen.
Happy Hacking!
Daniel Feichter @VirtualAllocEx